Additional Margin Parameters
The Additional Margin Parameters widget allows you to:
- Display the set of defined factors and add-ons used in the Additional Initial Margin Formulas. These are shown on the
masterbranch.
See the Additional Margin Parameters section for information on the implementation in Atoti ISDA-SIMM. - Create new what-if simulations from the
masterbranch - Update already created what-ifs branches by adding, adjusting and removing factors and add-ons
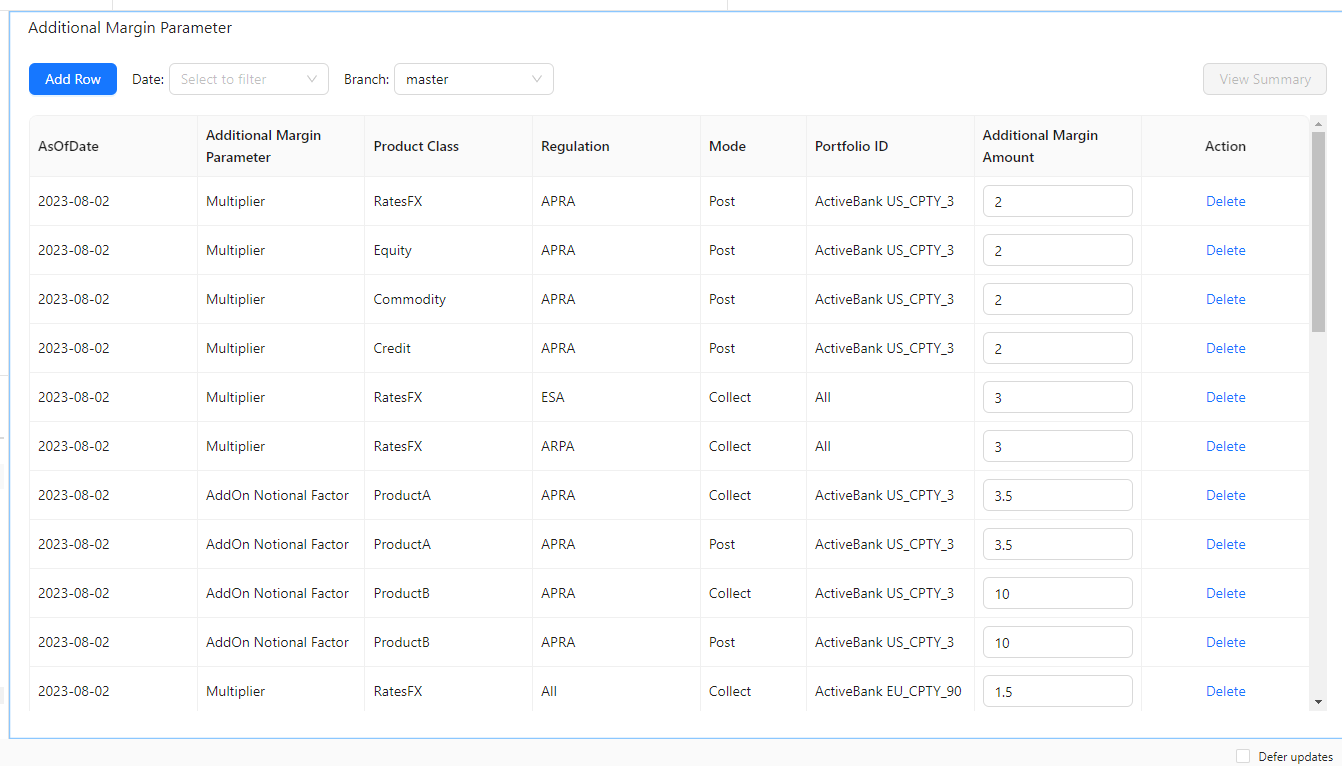
The elements you interact with in the Additional Margin Parameter widget are:
| Element | Description |
|---|---|
| Date | Timestamp (at close of business) for the data. |
| Branch | Selects the base branch for your new branch or comparison. By default the base branch is always “master” when creating a new branch. |
| Additional Margin Amount | The value of the Additional Margin parameter. |
| Action | The actions you can perform on the what-if simulation. |
Using the widget
The following sections explain how to set up and run a simulation.
1. Setting up your simulation
- In the top left menu, click Insert > Widgets, then drag and drop the Additional Margin Parameter widget to your dashboard.
On initial display, you can see the parameter values as in the “master” branch. - From the Date dropdown list, select an AsOfDate.
This sets up the master branch from which to create your own branches and perform your what-if simulations.
2. Making your changes
Adding new margin parameters
To define a new additional margin parameter:
- Click Add Row and complete the fields for the new row:
The fields are defined according to standard ISDA CRIF (Common Risk Interchange Format). For details on how to become a licensed CRIF user, contact ISDA at analytics@isda.org.
| Field | Description |
|---|---|
| AsOfDate | Risk value date |
| Additional Margin Parameter | Parameter identifier |
| Product Class | See ISDA CRIF |
| Regulation | See ISDA CRIF |
| Mode | Specify the Post or Collection mode in which the netting sets are computed |
| Portfolio ID | See ISDA CRIF |
| Additional Margin Amount | Value of the Additional Margin parameter |
-
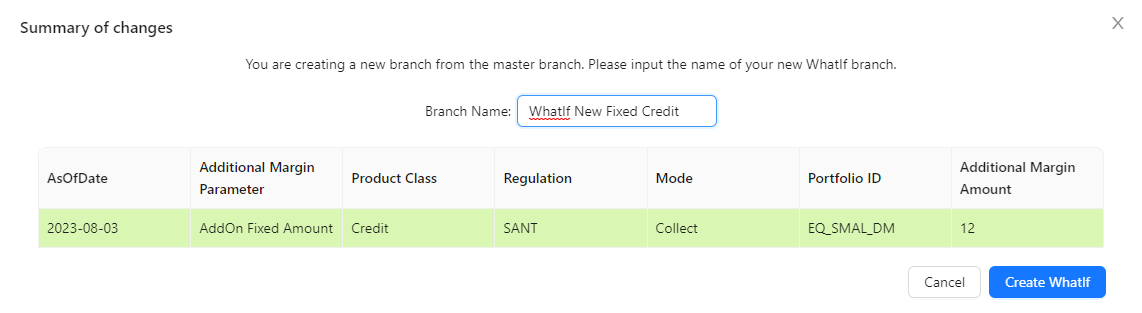
Click Save in the Action column. The system highlights the new row in green to indicate your row will be added when you create or update your branch in the next step.
-
Click View Summary to review your changes and create or update your branch.
For a new branch:In the Branch Name field, type a descriptive name for the what-if simulation. For example, “WhatIf New Fixed Credit” for the branch which has a new AddOn Fixed Amount parameter for the “Credit” product class.
Modifying parameters
To modify an existing parameter:
-
For each parameter, enter your changes directly in the Additional Margin Amount. The system highlights changed rows in yellow, to indicate this value will be modified when you create or update your branch in the next step.
You can delete your changes by clicking Restore in the Action column for the relevant row. -
Click View Summary to review your changes and create or update your branch.
For a new branch:
In the Branch Name field, type a descriptive name for the what-if simulation. For example, “WhatIf FX Multiplier -> 17” for the branch in which the Multiplier parameter for the “RatesFX” product class is changed to “17”.
This name will show up in your data visualization widgets and filters.

Removing parameters
To remove a parameter:
-
Select the row containing the required parameter.
-
Click Delete in the Action column. The system highlights the row in pink to indicate your row will be deleted when you create or update the What-If in the next step.
You can abandon the deletion by clicking Restore . -
Click View Summary to review your changes and create or update your branch.
For a new branch:
In the Branch Name field, type a descriptive name for the what-if simulation. For example, “WhatIf FX Multiplier DEL” for the branch in which the Multiplier parameter for the “RatesFX” product class is deleted.
This name will show up in your data visualization widgets and filters.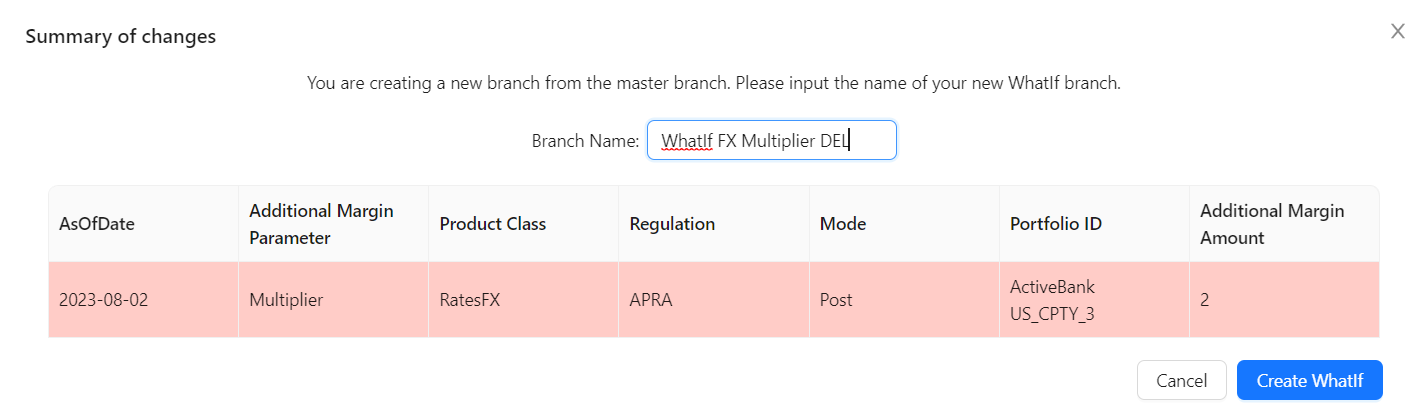
Reviewing your Changes
From the Summary of changes popup, you have the following options:
- Cancel: Closes the summary window and returns you to the Additional Margin Parameter table to continue your modifications.
- Create WhatIf (for a new branch): Creates your branch with the values you changed.
- Update WhatIf (for an existing branch): Updates your branch with the values you changed.
Once you are happy with your changes, click Create WhatIf (for a new branch) or Update WhatIf (for an existing branch).
The widget creates or updates your branch with the values you changed.
3. Viewing the effects of your changes
tip
To view the simulated calculations, add the Epoch hierarchy into the view, for example, on columns of your Pivot Table. You may also want to set a filter on this hierarchy and select: “master” and your branch.
Managing the Additional Margin Parameter simulation
- Select your branch from the Branch dropdown list.
- You can update your branch by:
To manage your branches and review your simulation runs, use the WhatIf Manager.
See also
- Parameter Sets
- Calibrations
- Calibrations
- Calibrations Support
- Epoch
- File Upload
- Parameter Set
- Parameter Set
- Parameter Sets
- Trade Novation