
- Using the Filters popup.
- Using a Saved filter.
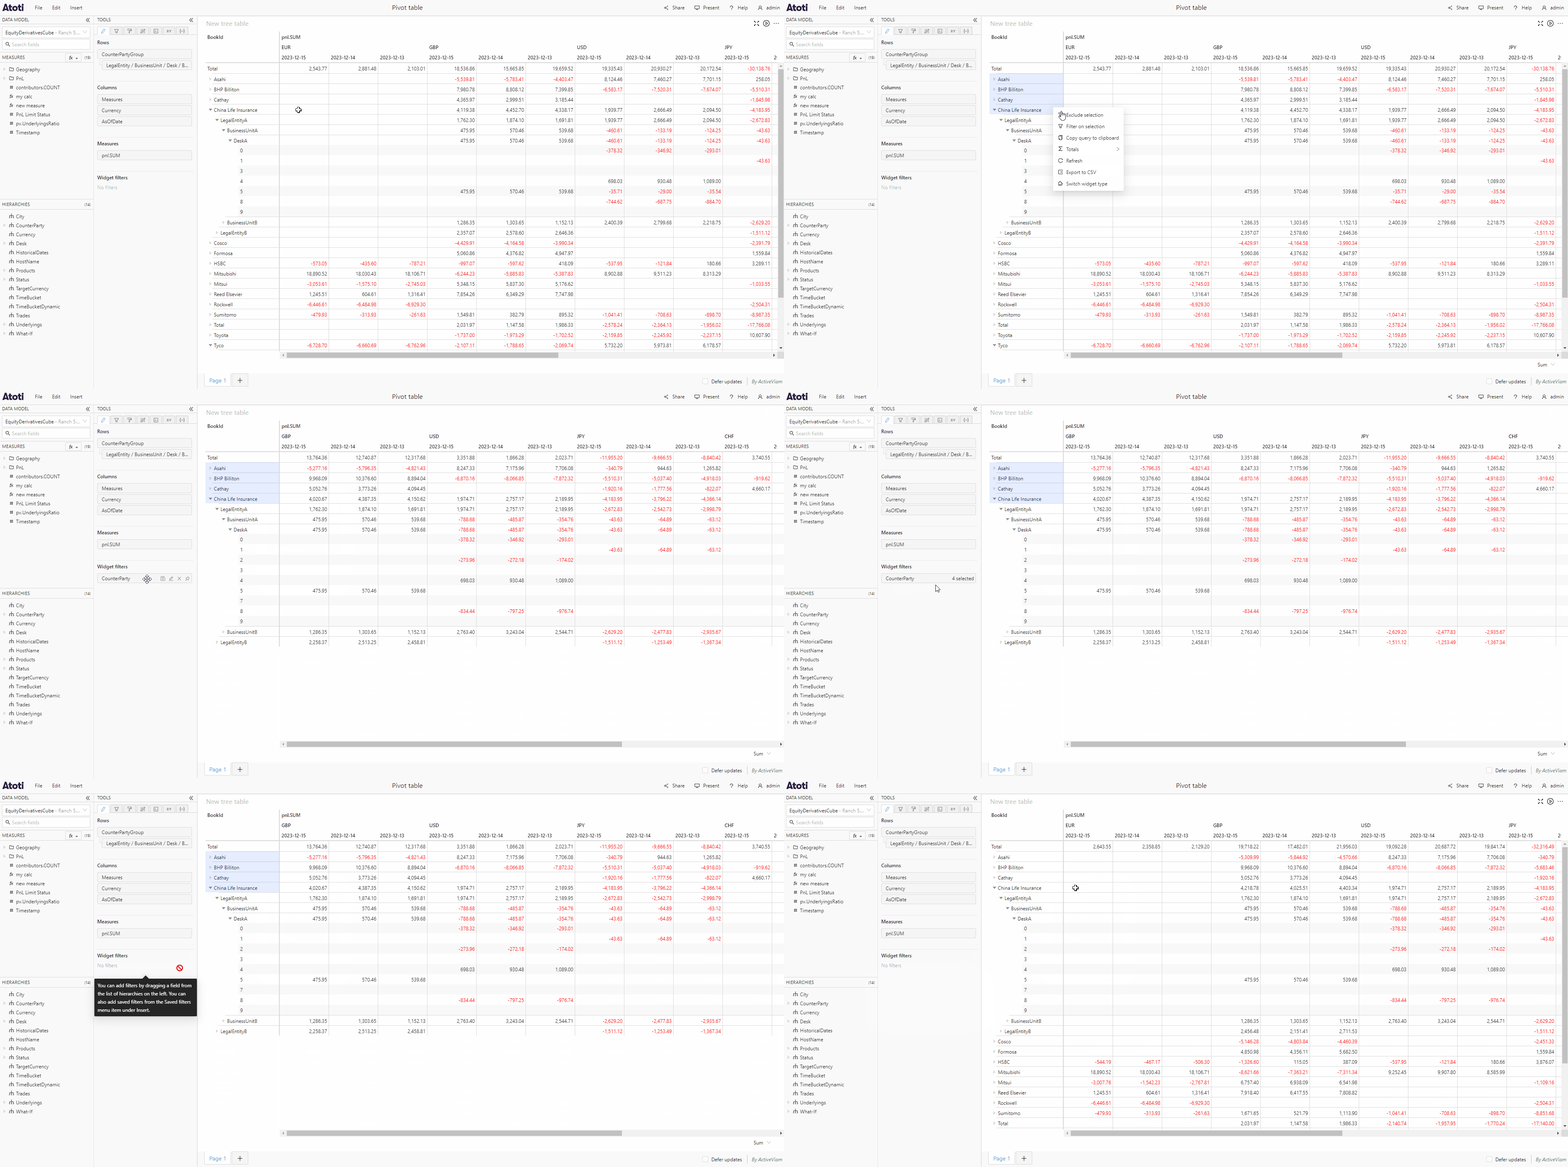
- Using Filter on member or Filter on selection from the context menu of a widget.
Open the filters popup
The Filters popup can be accessed from the Filters tab or the Fields tab. When the Fields tab is selected :- Drag a hierarchy from the Data model to the Widget filters section.
- Drag a hierarchy from the data model into one of the Filters sections (Dashboard filters, Page filters, Widget filters).
- Alternatively, you can also click on a hierarchy to add a filter on it. This new filter will be automatically added to the Widget filters section, after any existing filters.
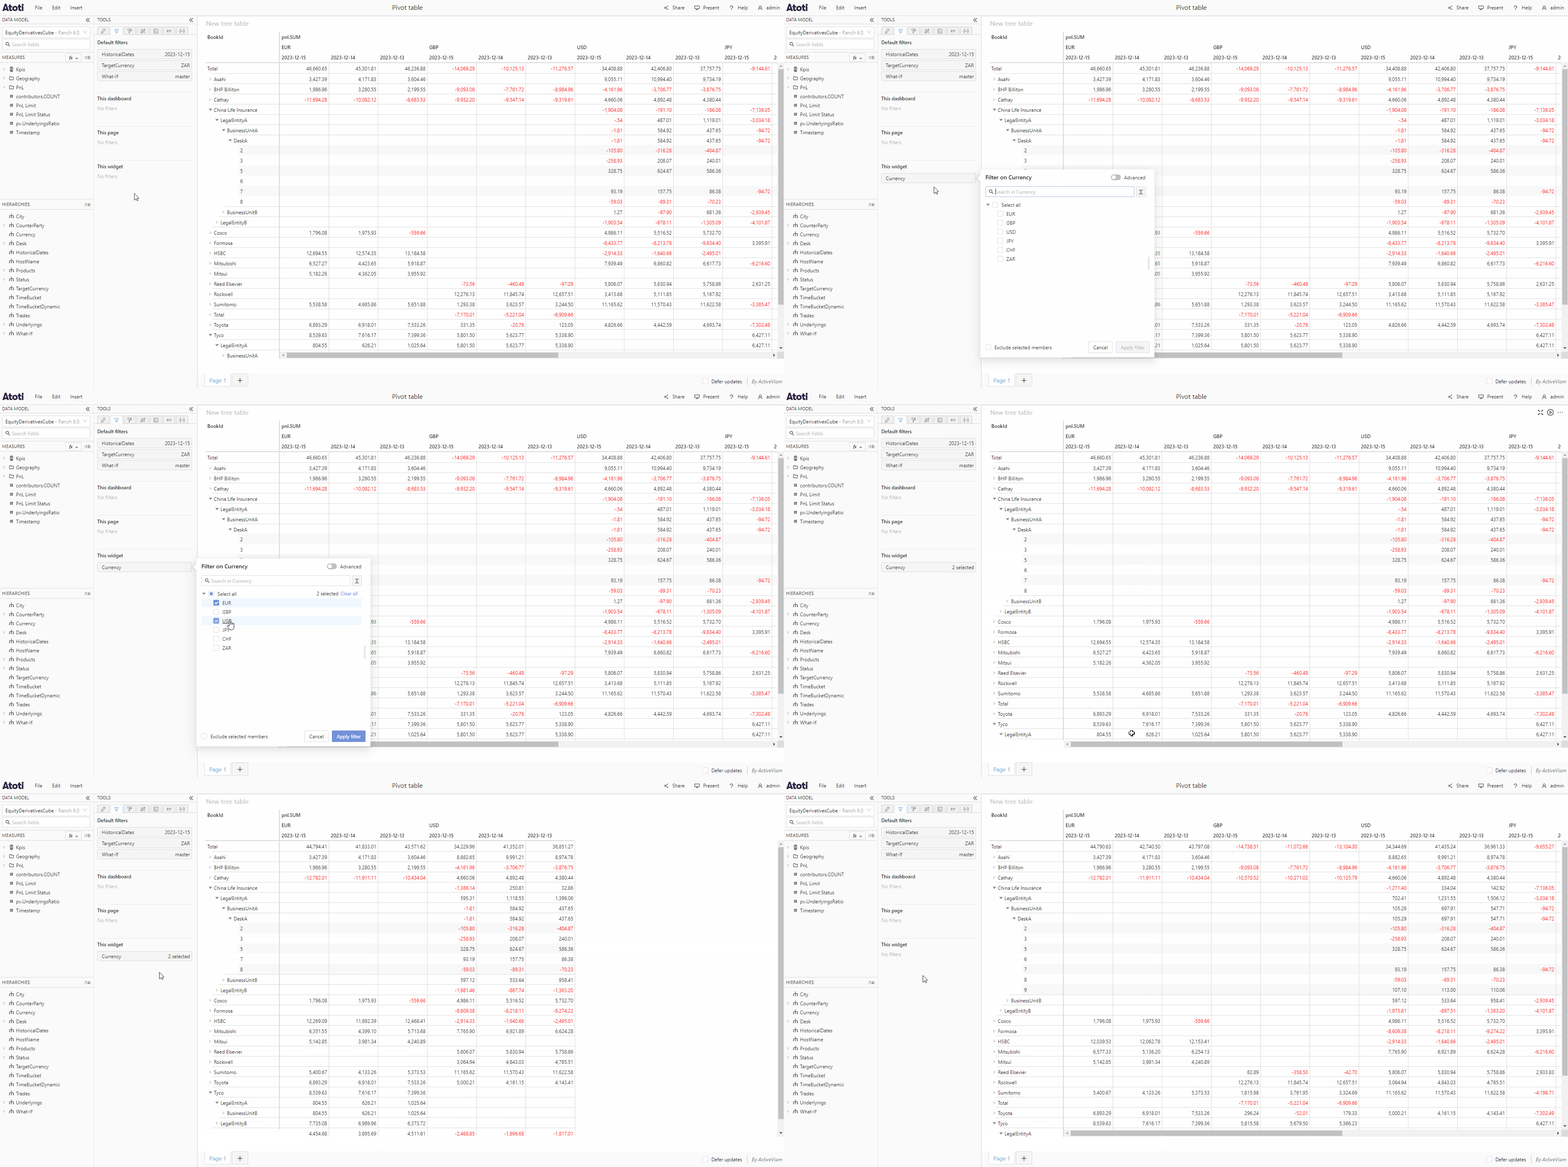
Add a filter using the filters popup
- Open the filters popup.
- Select the members you want to filter on by checking the checkbox next to their name.
- You may select all members by using the Select all checkbox, or use the search to find specific members.
- If you wish to apply an exclusion filter, check the Exclude selected members checkbox at the bottom of the popup.
- Click Apply filter.
If you choose to apply a filter using a virtual hierarchy, you will not see
the list of members when you open the popup as these cannot be loaded all at
once. You should use the search.
Add an Advanced filter
- Open the filters popup
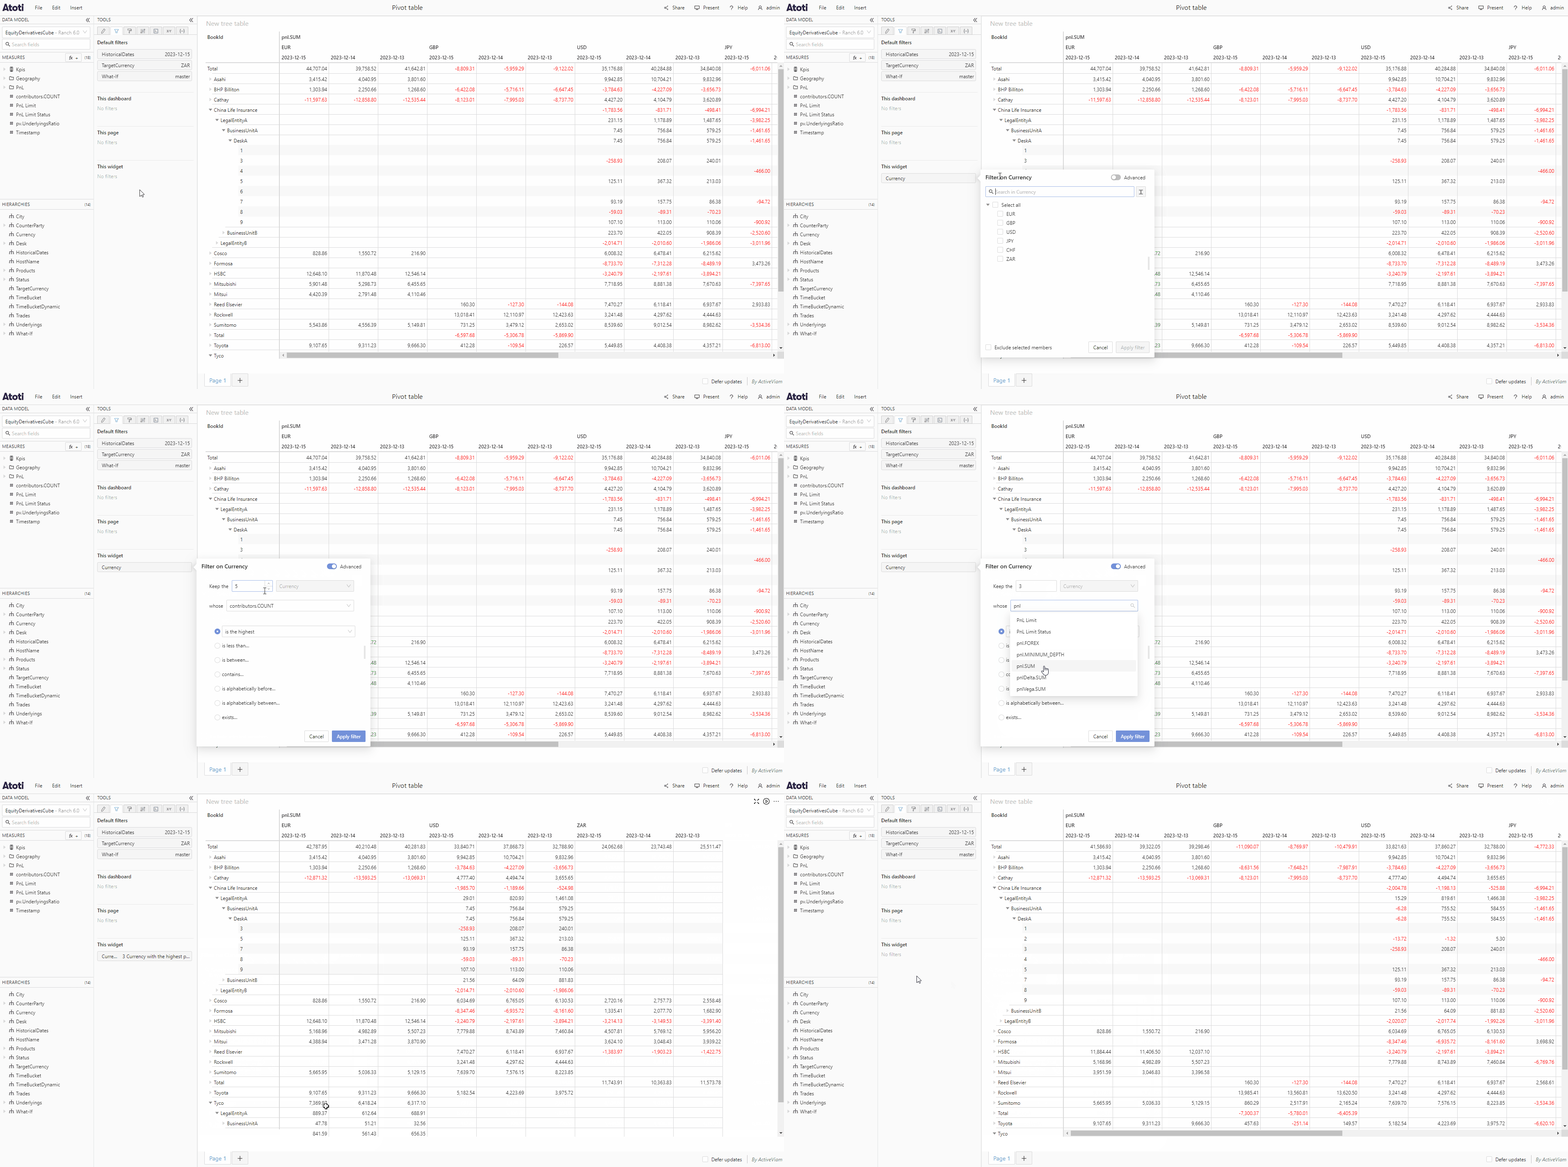
- In the top right of the popup, toggle the Advanced editor switch.
- Use the form to select the number of members, scope, measure and type of filter you require. For example, you could limit the view to the top three currencies with the highest pnl.SUM using the “is the highest” option.
- Click Apply filter.
Add a filter by typing or pasting members
- Open the filters popup.
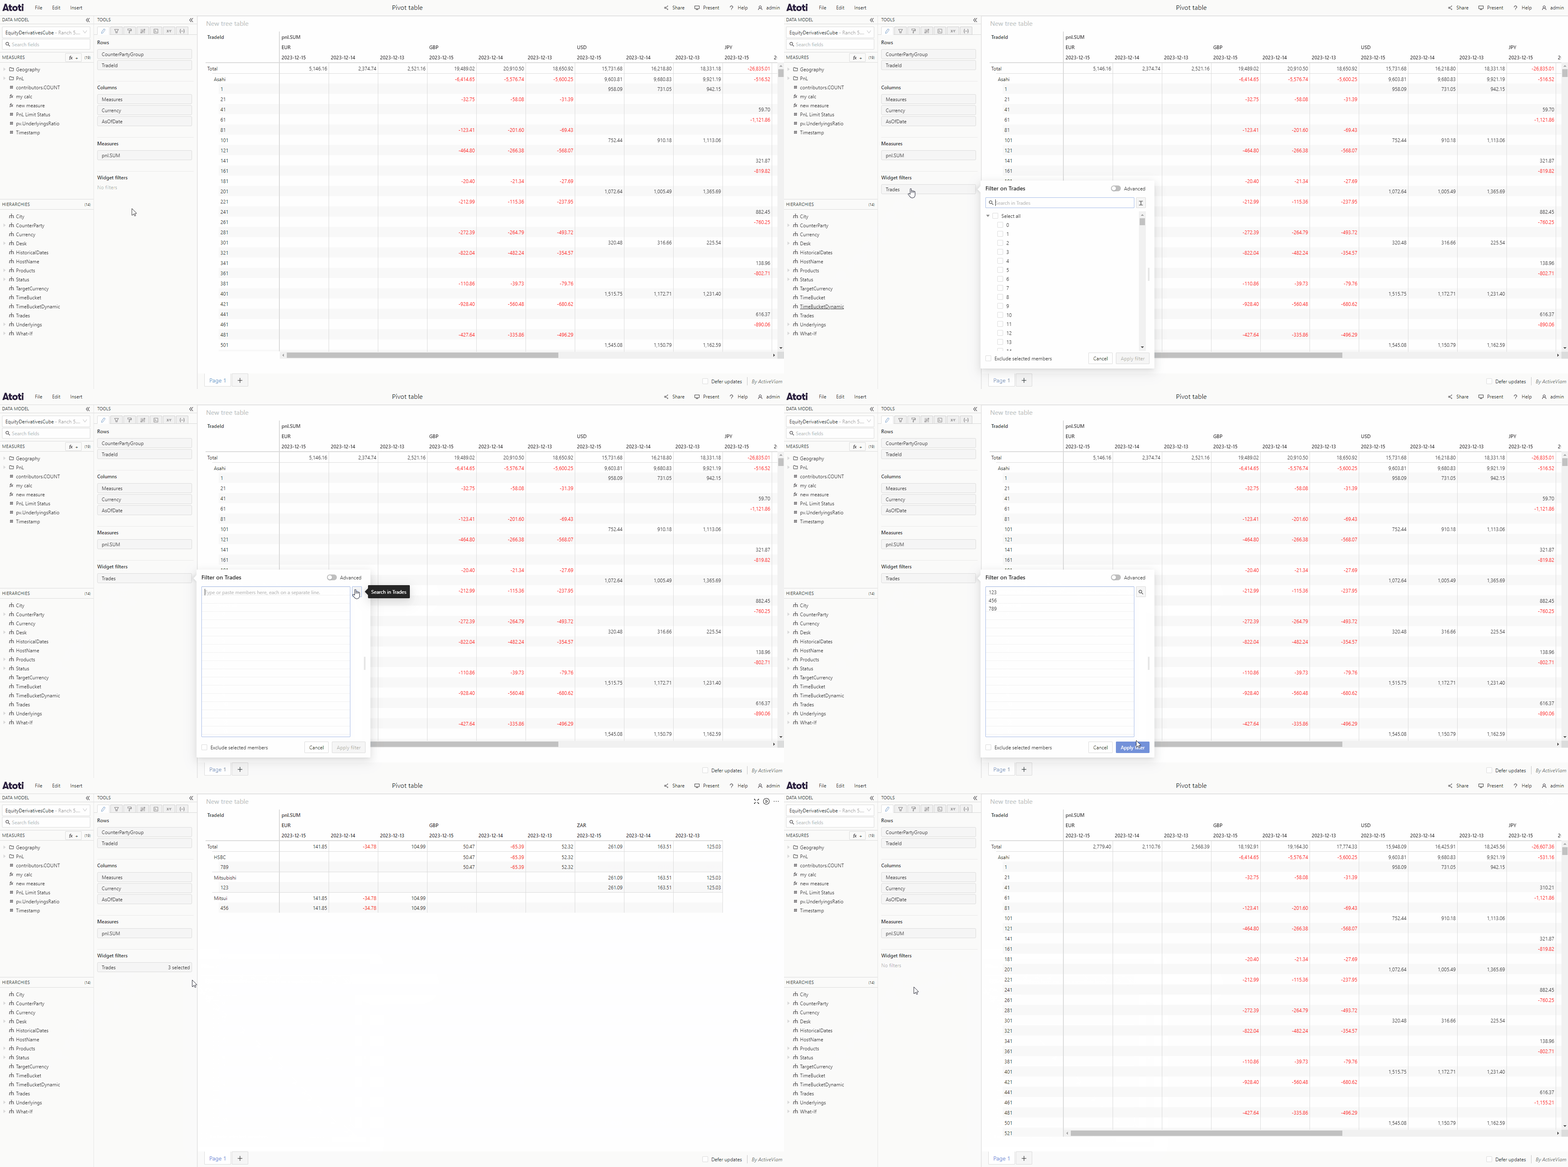
- Click the Type or paste members button, next to the search bar.
- Type or paste the members you wish to filter on. Each member needs to be on a separate line.
- Either click Apply filter directly, or toggle the button to return to the list of members, where you will see the members you have just added selected and you can further add or remove members before applying the filter.
Add a date filter
- Open the filters popup using a hierarchy of type time.
- You will see two different tabs in the popup: Tree and Calendar. Tree is selected by default.
- From the Tree tab, add a date filter by selecting members, as detailed above.
- Click Calendar to switch to the calendar tab.
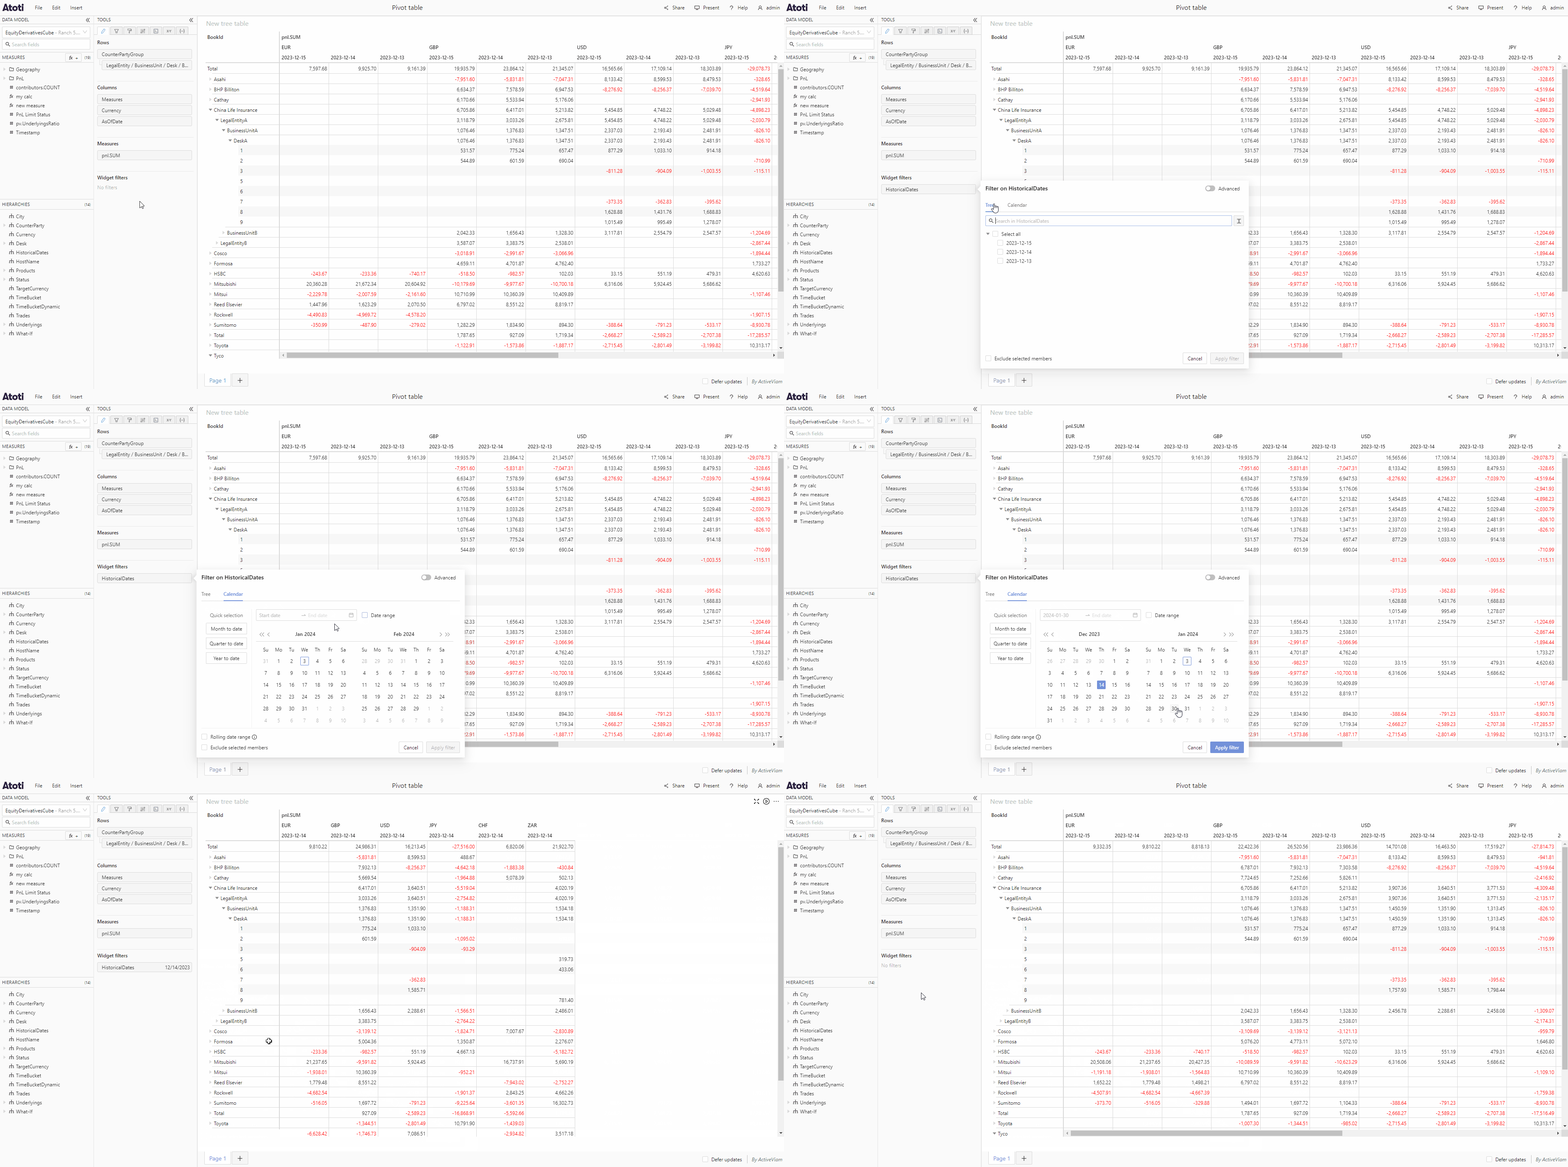
Add a single date filter
- Click the date on the calendar or type the date in the input box in the format YYYY-MM-DD.
- Uncheck the Date range checkbox.
- Click Apply filter.
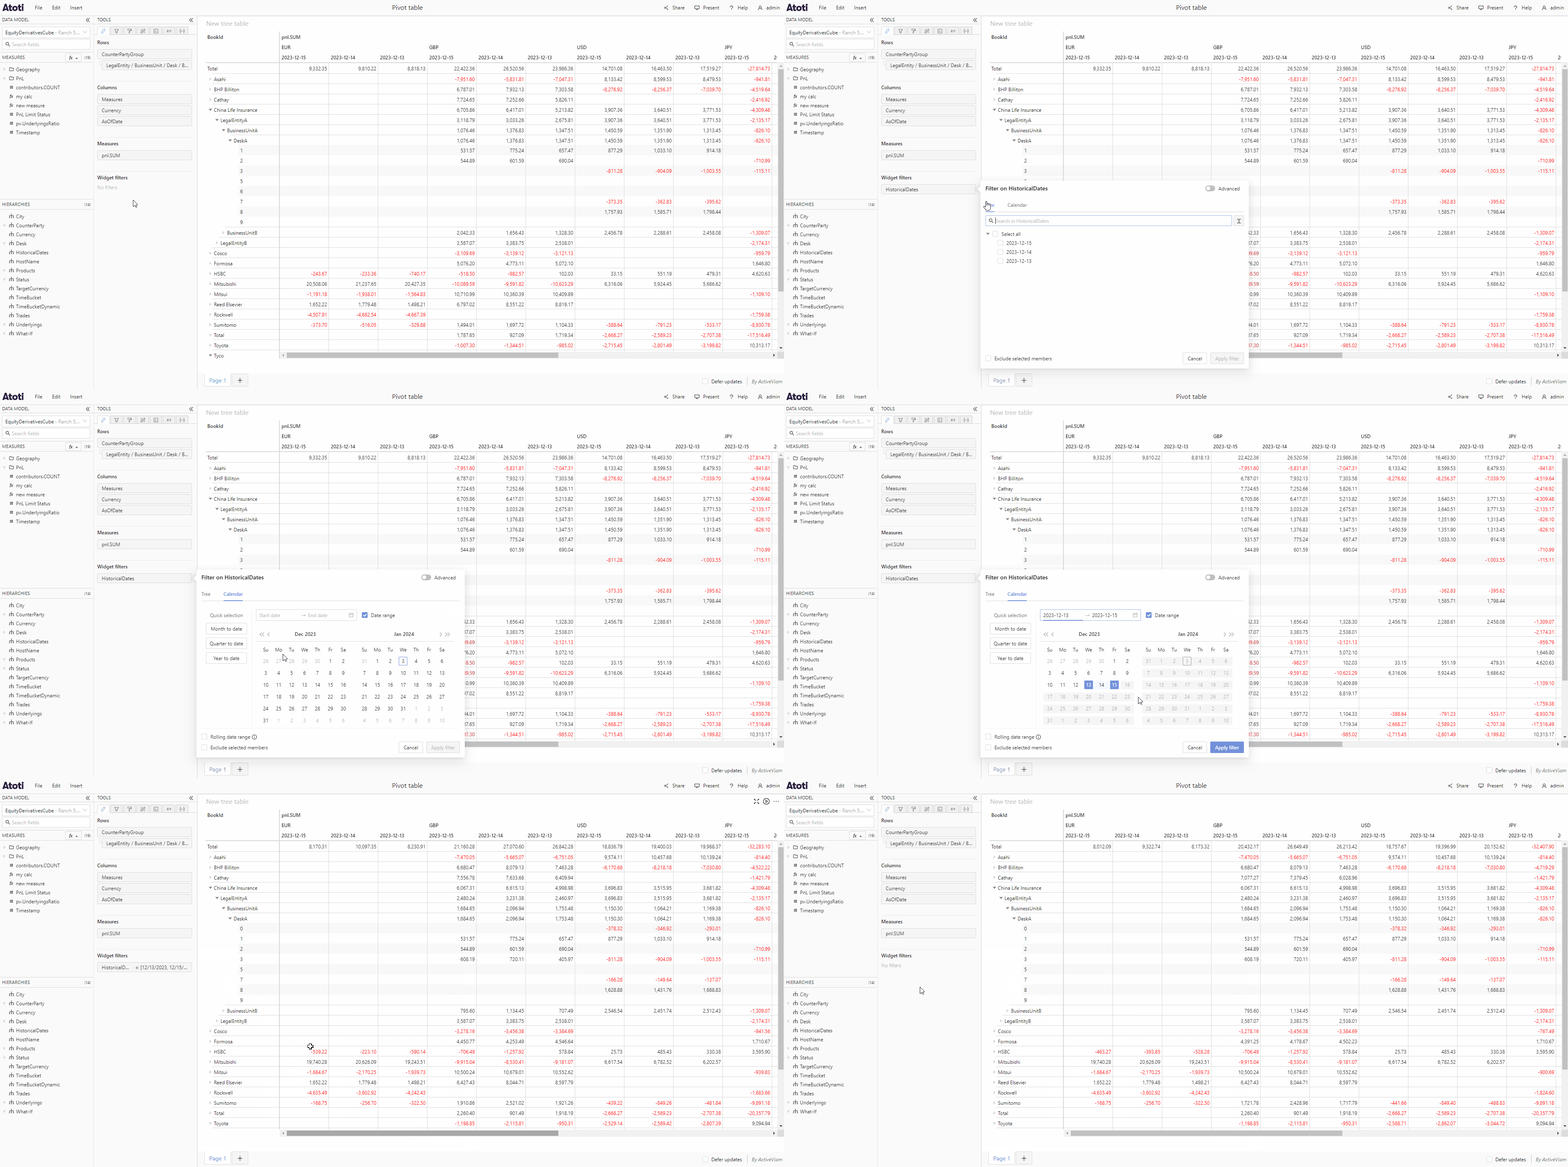
Add a date range filter
- Check the Date range checkbox.
- As for single date filters, click the date on the calendar or type the date in the input box to choose the start date, then choose the end date in the same way.
- Click Apply filter.
Add a rolling date filter
Rolling date filters keep up to date with today’s date, instead of always being on the same fixed dates. For example, you can use a rolling date filter to always show data from the last 7 days, meaning the start dates and end dates will move over time. They can be added from the calendar tab of the filter popup on a single date, or a date range. To add a rolling date filter:- Choose a single date or date range for your filter, in the same way as above.
- Check the Rolling date range checkbox.
- Click Apply filter.
Add a “Month/Quarter/Year to date” filter
Using the Quick selection panel on the left of the calendar, you can add a filter on Month to date, Quarter to date or Year to date. These filters allow you to filter on data from the first day of the current month, quarter or year until today, and they will automatically stay up to date with the current date. For example a widget with a Quarter to date filter on March 30th will show data from January 1st to March 30th, but on April 6th it will show data from April 1st to April 6th. To add a Month/Quarter/Year to date filter:- Open the filter popup and choose the Calendar tab.
- Click the button with the name of the filter you wish to apply.
- Click Apply filter.
Add a seasonal pattern filter
Seasonal pattern filters apply to recurring calendar periods regardless of the year. For example, you can use a seasonal pattern filter to always show data for every Monday and Wednesday, or for every Q1 and Q3. To add a seasonal pattern filter:- Open the filter popup and choose the Calendar tab.
- In the Quick selection panel on the left, set the time period to Day, Month or Quarter.
- Under Seasonal pattern, click the tags for the periods you want to include (for example Monday and Wednesday, or Q1 and Q3).
- Click Apply filter.
Add a filter using the “Filter on member” menu item
The ability to Filter on member or Filter on selection relies on a
plugin. If you cannot find this in your application, contact your system
administrator.
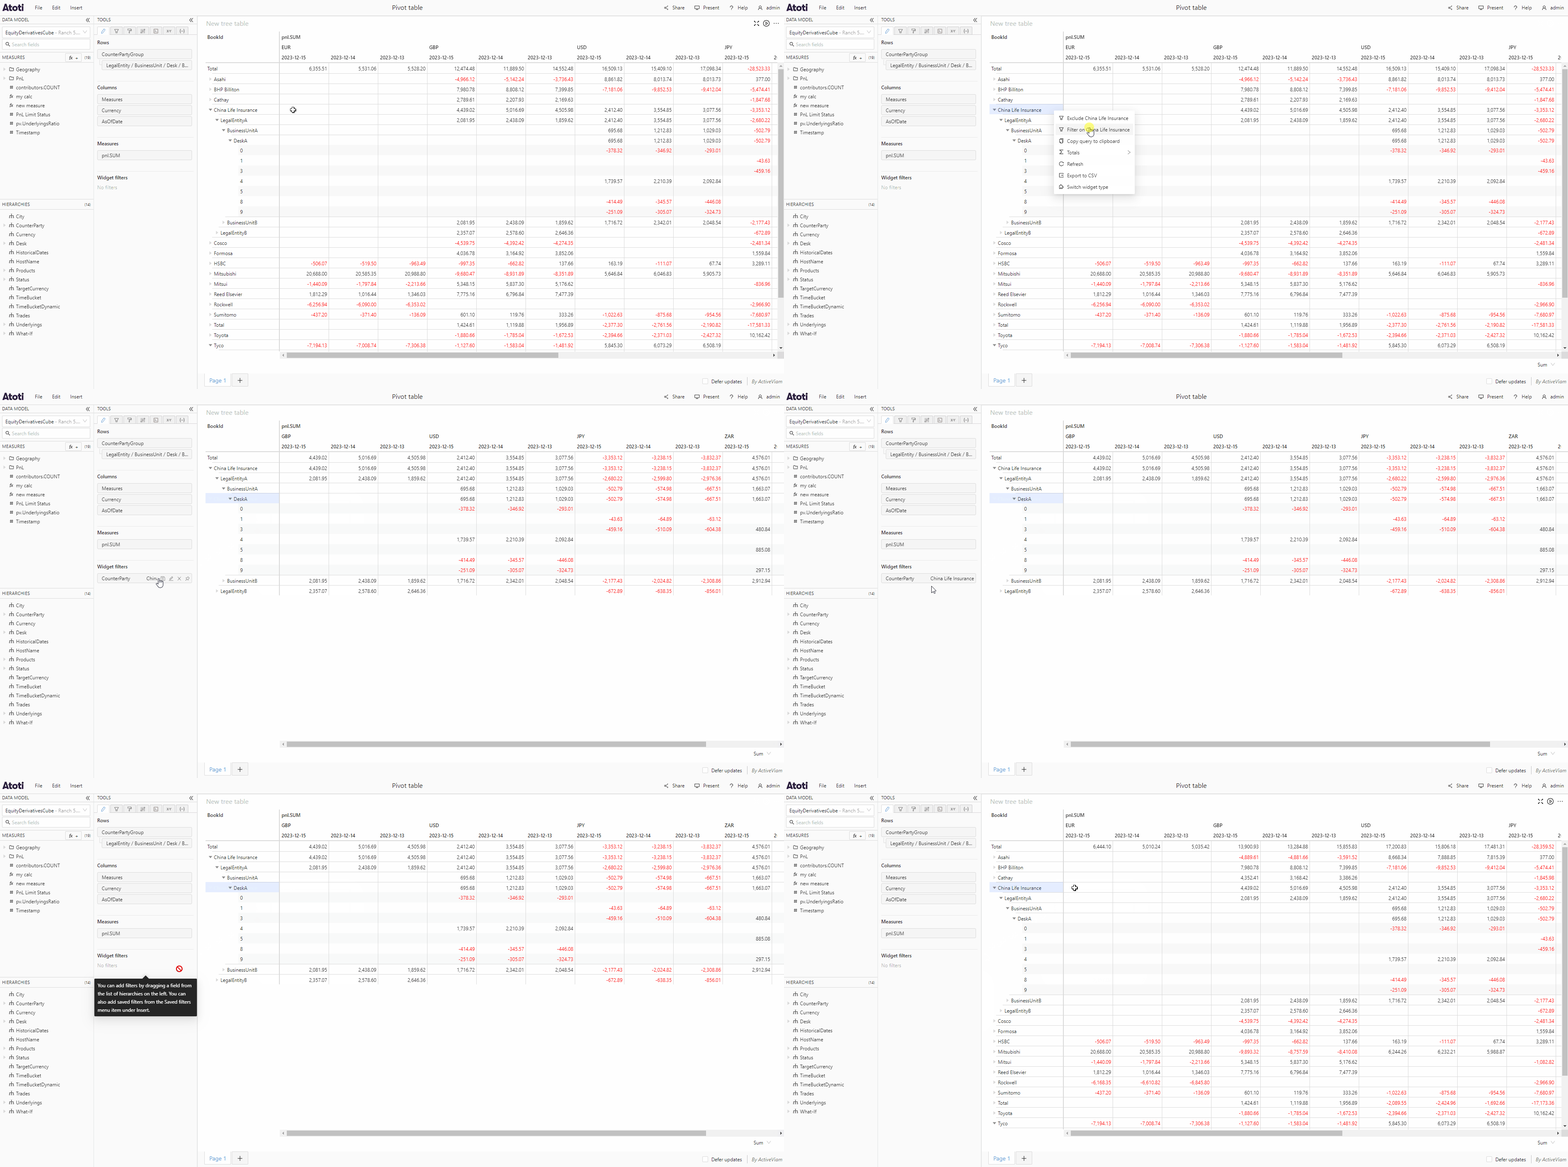
- Right-click the table cell, or trace of a chart, on the member you wish to filter on to open the context menu.
- Select Filter on member, for example, if you clicked on member “London” from the “City” hierarchy, select Filter on London.
- You can then choose the scope of filter you wish to apply: This widget will apply the filter to the selected widget, Other widgets will apply the filter to all other widgets on the page and All widgets will apply the filter to every widget on the current page.
- Alternatively you can apply an exclusion filter and filter on all members except for the selected one by clicking Exclude member, (for example Exclude London) from the context menu.
Add a filter using the “Filter on selection” menu item
- Select all the members you wish to filter on from a table widget by clicking and dragging, or from a chart using the Box select or Lasso select tool.
- Right-click to open the context menu.
- Select Filter on selection, then choose the scope of the filter as detailed above.
- Alternatively, select Exclude selection to apply an exclusion filter on the selection.