Default Limit Workflows
Atoti Limits provides a few workflows out of the box with Activiti. The complete tutorial of Activiti can be found on the Activiti website.
This section shows you how to use the out-of-box workflows.
You can find the Business Process Modeling Notation (BPMN) files in the limits-starter/src/main/resources/processes folder. bpmn files are in the XML format, however, we recommend that you install the Activiti Diagram Editor plugin in your IDE, such as Intellij or Eclipse, to edit and read the bpmn files in a nice UI workflow representation.
The events that trigger a workflow are:
- Limit change: a new limit is created or amended through the UI.
- An exception (breach or warning) occurs after the limit evaluation.
You can set up workflows for each of these events.
limit-process-four-eyes.bpmn
This workflow requires one approval. By default, one user creates the limit, and another approves it. Alternatively, if the limits.workflow-rules.can-approver-be-same-as-creator property in application.yml is enabled, the creator of the limit can also approve it.
note
See Section:limit workflow in the application.yml configuration file on configuring the workflow. The workflow names must match the process ID in the bpmn:
application.yml:
limits:
  limitWorkflows:
    FourEyes:
      key: limit-process-instance.four-eyes
limit-process-four-eyes.bpmn:
<process id="limit-process-instance.four-eyes ...>"
All serviceTasks need to have the associated Bean defined in the LimitsProcessInstanceWorkflowService.java or a delegate service:
Location: limits-activeviam/src/main/java/com/activeviam/limits/workflow/instance
File name: DeleteDelegateService.java

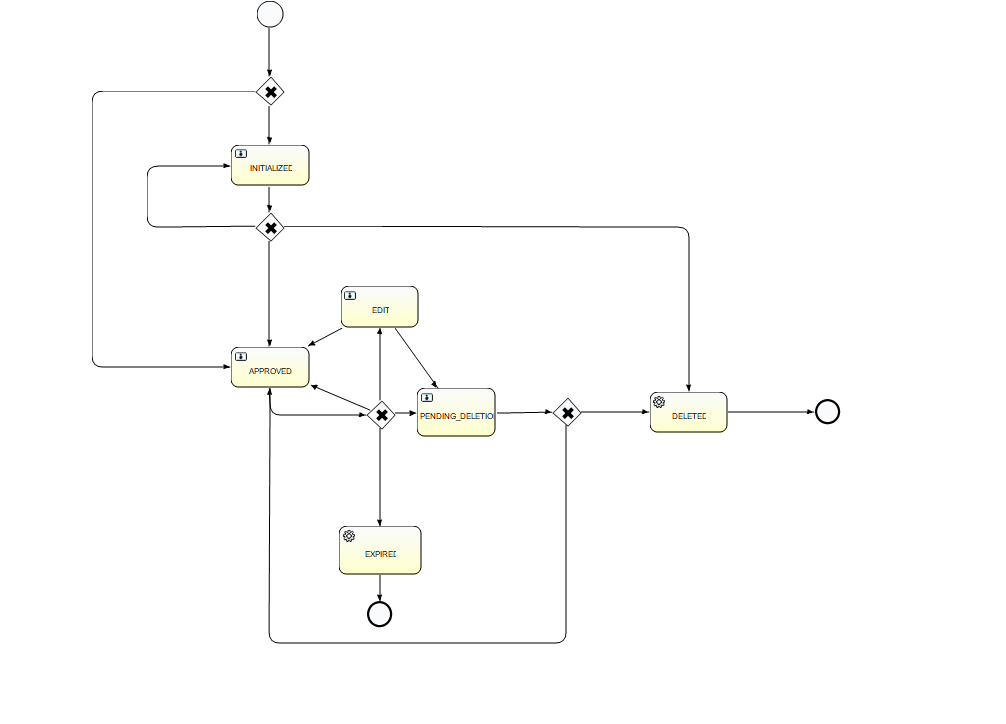
The possible actions in each of the actionable states are:
| Start state | Action | End state |
|---|---|---|
| Create | Initialized | |
| Initialized | Approve | Approved |
| Initialized | Reject | Initialized |
| Approved | Edit | Edit |
| Approved | Delete | Pending Deletion |
| Approved | Expire | Expired |
| Edit | Approve | Approved |
| Edit | Delete | Pending Deletion |
| Edit | Expire | Expired |
| Edit | Reject | Edit |
| Pending Deletion | Approve | Deleted |
| Pending Deletion | Reject | Approved |
| Deleted | System | End |
| Expired | System | End |
limit-process-six-eyes.bpmn
This workflow requires two approvals. One user creates the limit, and two others need to approve it.
note
See Section:limit in the application.yml configuration file on configuring the workflow. The workflow names must match the process ID in the bpmn:
application.yml:
limits:
  limitWorkflows:
    SixEyes:
      key: limit-process-instance.six-eyes
limit-process-six-eyes.bpmn:
<process id="limit-process-instance.six-eyes" ...>"
All serviceTasks need to have the associated Bean defined in the java file: Location: limits-activeviam/src/main/java/com/activeviam/limits/workflow/instance File name: LimitsProcessInstanceWorkflowService.java
limit-process-straight-through.bpmn
This workflow doesn’t require an approval. The limit is created in approved state. Limits created via DLC and Limit file upload use the Straight through workflow.
note
See Section:limit in the application.yml configuration file on configuring the workflow. The workflow names must match the process ID in the bpmn:
application.yml:
limits:
  limitWorkflows:
    StraightThrough:
      key: limit-process-instance.straight-through
limit-process-straight-through.bpmn:
<process id="limit-process-instance.straight-through ...>"
limit-process-exception.bpmn
This workflow handles breaches and warnings.
note
Please note the section of limits/workflow-types in application.yml, the workflow names need to match the process ID in the bpmn.
application.yml:
limits:
  exceptionWorkflows:
    Exception:
      key: limit-process-instance.exception
limit-process-exception.bpmn:
<process id="limit-process-instance.exception ...>"
note
See Section:limit in the application.yml configuration file on configuring the workflow. The workflow names must match the process ID in the bpmn:
application.yml:
limits:
exceptionWorkflows:
Exception:
key: limit-process-instance.exception
limit-process-exception.bpmn:
<process id="limit-process-instance.exception ...>"
All serviceTasks need to have the associated Bean defined in the java file: Location: limits-activeviam/src/main/java/com/activeviam/limits/workflow/instance File name: LimitsProcessInstanceWorkflowService.java
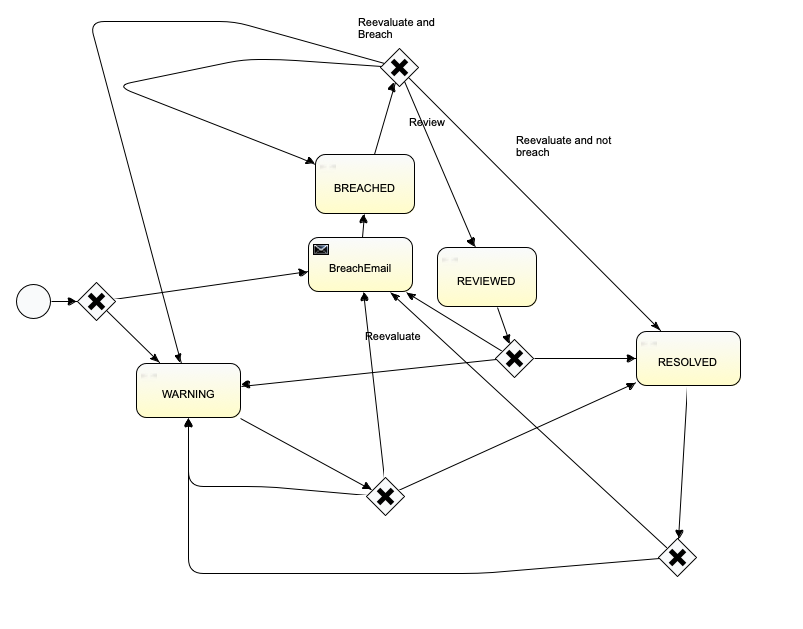
The following diagram represents the various possible states and actions in the Exception workflow:

| Start state | Action | End state |
|---|---|---|
| None | System Eval | Warning Breached Email |
| Breached Email | System Eval | Breached |
| Breached | User Review | Reviewed |
| Breached | System Eval | Breached Resolved Warning |
| Reviewed | System Eval | Breached Email Warning Resolved |
| Resolved | System Eval | Warning Breached Email Resolved |
| Warning | System Eval | Breached Email Warning Resolved |
Configuring breach email notifications
When a limit is breached, Atoti Limits notifies the specified users by email. Here’s how to configure the email:
In the limit-process-exception.bpmn, you can find the following BreachEmail section and configure the “to”, “from”, and “subject” fields, and the email body.
note
By default this implementation will not send emails. See Extending the Mail provider section below.
 <serviceTask id="mailtask1" name="BreachEmail" activiti:class="com.activeviam.limits.workflow.service.instance.activity.impl.TestMailActivityBehavior">
      <extensionElements>
        <activiti:field name="to">
          <activiti:string><![CDATA[bas.email.demo.test@gmail.com]]></activiti:string>
        </activiti:field>
        <activiti:field name="from">
          <activiti:string><![CDATA[breach@activeviam.com]]></activiti:string>
        </activiti:field>
        <activiti:field name="subject">
          <activiti:expression><![CDATA[Breach Notification - ${limitsName}]]></activiti:expression>
        </activiti:field>
        <activiti:field name="html">
          <activiti:expression><![CDATA[<html>
<head>
<style>
h3 {text-align: center;background-color:DodgerBlue;color:FloralWhite}
</style>
</head>
<body>

<h3>Breach Notification</h3>
<p>Dear Limit Controller, </p>


<p>Limit, ${limitsName}, with limit value, ${limitsValue}, is breached. Please investigate below:
<a href=${url}>Limits Inventory</a>
</p>

<p>
Thank you.
</p>

</body>
</html>]]></activiti:expression>
        </activiti:field>
      </extensionElements>
    </serviceTask>
note
Breach emails use out-of-the-box functionality from Activiti, which causes a performance decrease in the workflow. To avoid this, disable the breach email by removing the “BreachEmail” element from the bpmn file. Make sure that the paths to the “Breach Email” go to the “BREACHED” node after the change.
Extending the mail provider
If you’d like to use the default Activiti mail provider, replace the activiti:class="package.to.CustomClass" in the <serviceTask> description
with activiti:type="mail"
Note in the service task description the element activiti:class="com.activeviam.limits.workflow.service.instance.activity.impl.TestMailActivityBehavior". This is a way of providing a custom Java delegator to override the default MailActivityBehavior.
This is an Activiti feature that can be used to provide extra functionality to your project. For example, to avoid sending emails in a test environment, you can do the following:
public class TestMailActivityBehavior extends MailActivityBehavior {

    protected static final Logger LOGGER = LoggerFactory.getLogger(TestMailActivityBehavior.class.getSimpleName());

    @Override
    public void execute(DelegateExecution execution) {
        LOGGER.info("Sending test email for execution: " + execution);
        leave(execution);
    }
}
Uploading a limit already in a workflow state
When uploading limits in bulk, some limits may already be present in the module and in progress in one of the workflows. Here’s how the state of the affected limit changes when this happens:
FourEyes Workflow:
- “Pending Approval” becomes “Approved”.
- “Pending Deletion” becomes “Deleted”.
Straight-through:
A limit in the “Approved” state stays “Approved”.