Data access permissions
Atoti Limits supports custom roles and permissions to manage access to the Limits cube and the limits and incidents users can view. This page describes how to configure data access permissions for roles in Atoti Limits.
Prerequisite: define roles
Before configuring the permissions, ensure all users and roles have been defined. While it is possible, we strongly advise against configuring permissions for the predefined roles included with Atoti Limits. These roles control basic access to features of the module and will be shared by many users. Instead, define custom roles based on your business needs and assign them to users as required.
Once you have defined some roles, you can configure the permissions for each role.
Configuring permissions
Atoti Limits uses configuration properties to define the permissions for each role. You can configure these properties
in the application.yml file, and they are available in the application via the
LimitsRolePermissionsConfigurationProperties class. If defined, the application will use these properties to filter the
data that users can access.
Atoti Limits supports restricting access based on the following fields:
| Field | Sub property name |
|---|---|
| Group | structure-groups |
| Structure Name | structure-names |
| Structure ID | structure-ids |
| Measure | structure-measures |
| Limit ID | limit-ids |
Property structure
The configuration is stored in a nested map structure. The top-level keys are server names, which allow for defining separate permissions for different servers. The second-level keys are the role names, each mapping to a set of lists that define the member values available to the role.
Generic example:
limits:
  data-access-control:
    SERVER_NAME_1: # Define a separate set of permissions for each server as needed
      role-permissions:
        ROLE_EXAMPLE_1: # Define separate permissions for each role in the server
          structure-groups:
            - group1
            - group2
          structure-measures:
            - PnL
Choosing fields
Deciding which fields to use for restricting access will depend on your business requirements and data model. For example, let’s say
you have all Equity-related limits under the Equity Desk group, and you want users with role ROLE_EQUITY_DESK to only
see these limits and the incidents associated with them. In this case, you could configure the role to have a value defined
for the structure-groups field.
Here’s an example of this configuration:
limits:
  data-access-control:
    MyServer:
      role-permissions:
        ROLE_EQUITY_DESK:
          structure-groups:
            - Equity Desk
When choosing which fields to use, it is also important to consider the relationship between the fields and how your data is structured. The fields offer different levels of granularity for restricting access, and it is only necessary to define members for the most granular fields that you want access to be restricted on. This is because granting access to a member of one field will implicitly grant access to linked members of all other fields.
For example, say you have a limit with the following values:
- Group:
MyGroup - Structure Name:
MyStructure - Measure:
MyMeasure - Structure ID:
structure_1 - Limit ID:
limit_1
Defining a role with limit-ids: [limit_1] is the most granular way to grant access to this limit only. If this is the
only limit in the structure, the same result can be achieved with structure-ids: [structure_1] or structure-names: [MyStructure],
but the role will have access to any limits that may be added to the structure in the future.
Another reason to always use the most granular field(s) possible is that the values can conflict if not configured correctly,
resulting in unexpected behavior. Building on the example above, in addition to the limit-ids value, say you configure the role
with structure-ids: [structure_2]. This will not result in the role having access to both limit_1 and all limits
in structure_2, but rather no access at all. Instead, you should use the more granular of the two fields, limit-ids,
and list limit_1 plus the IDs of the limits in structure_2.
Applying the permissions
The permissions configured in application.yml are automatically applied to the Limits cube when viewed via Atoti UI,
as well as to the Inventory and Status screens.
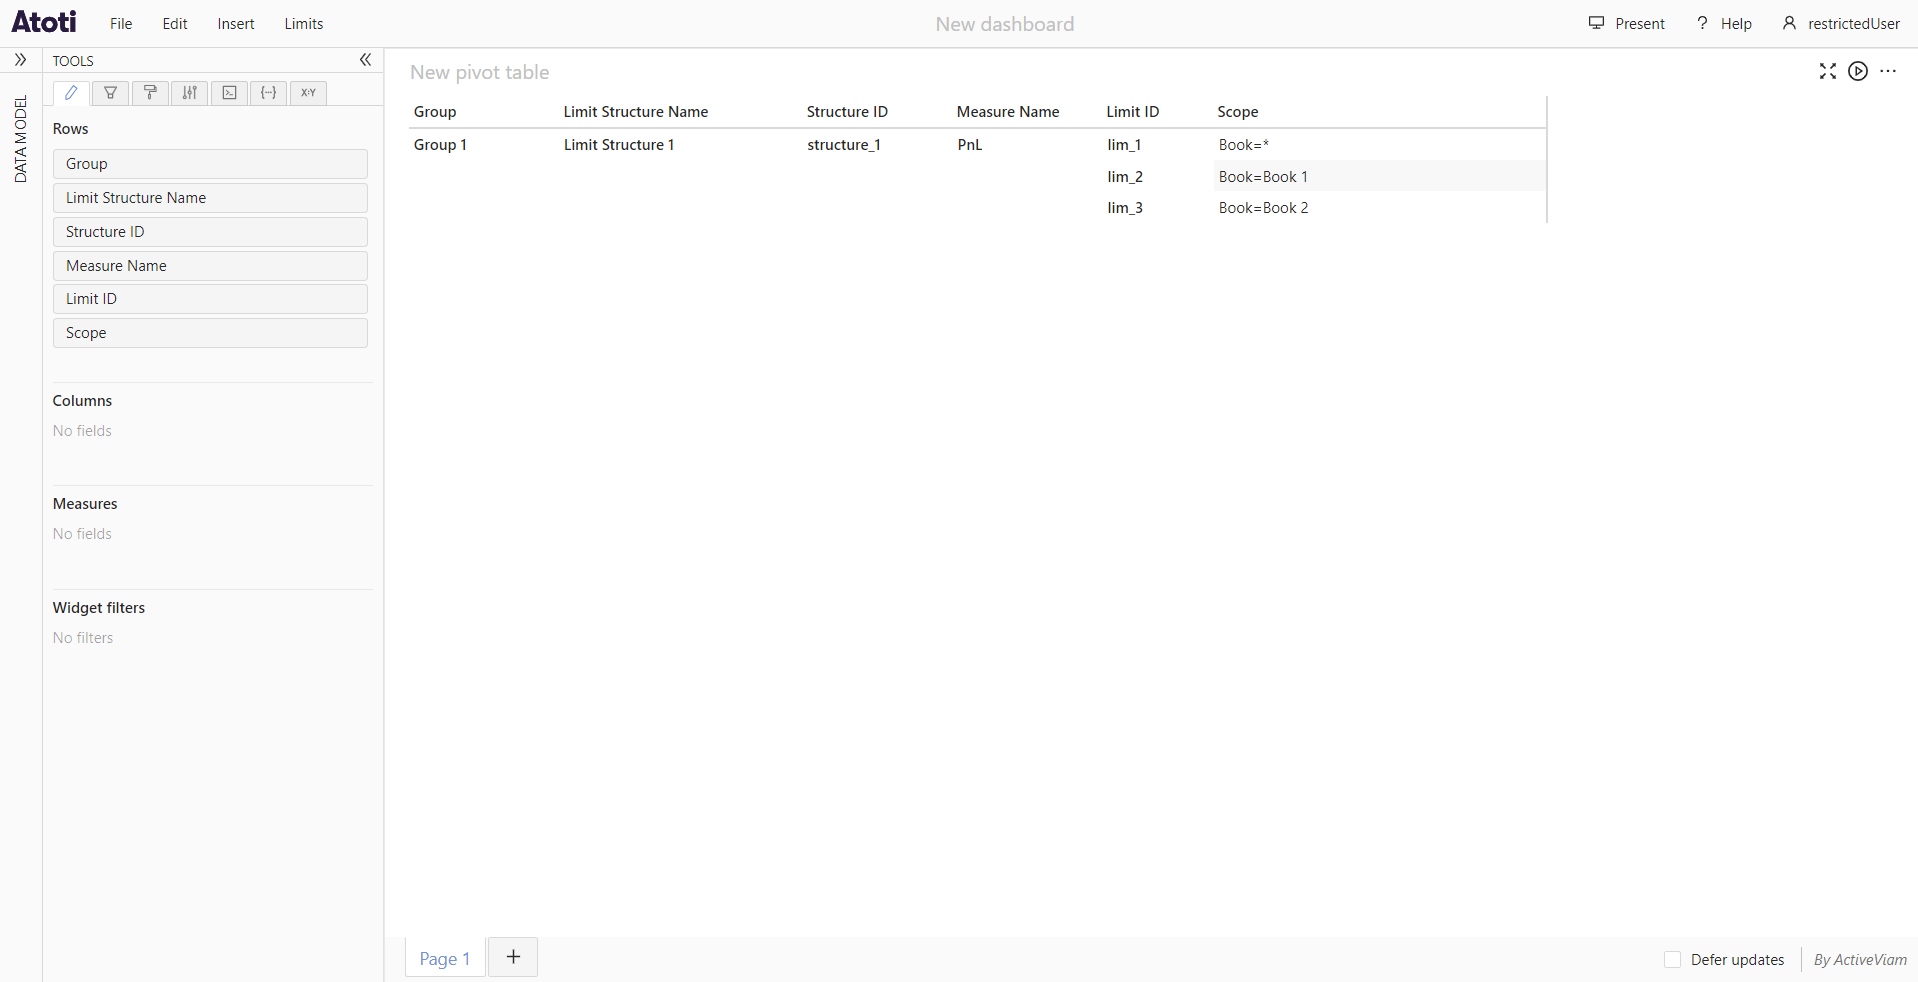
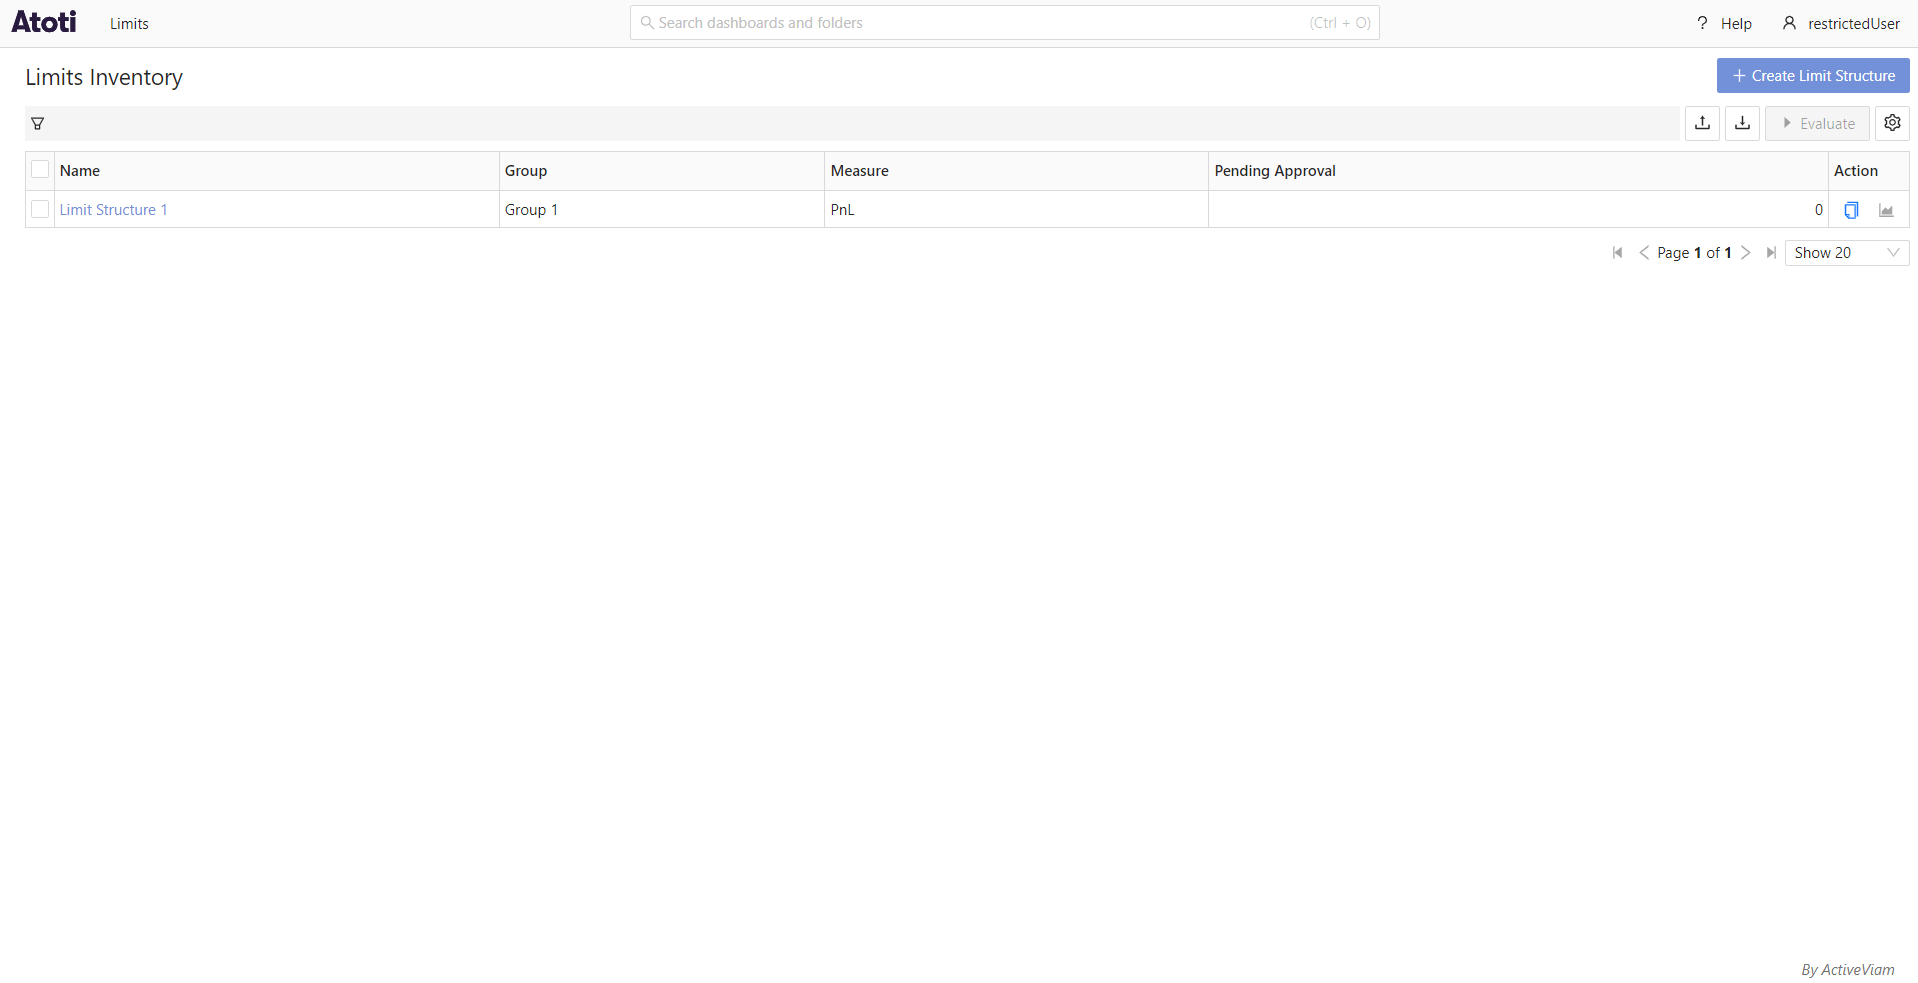
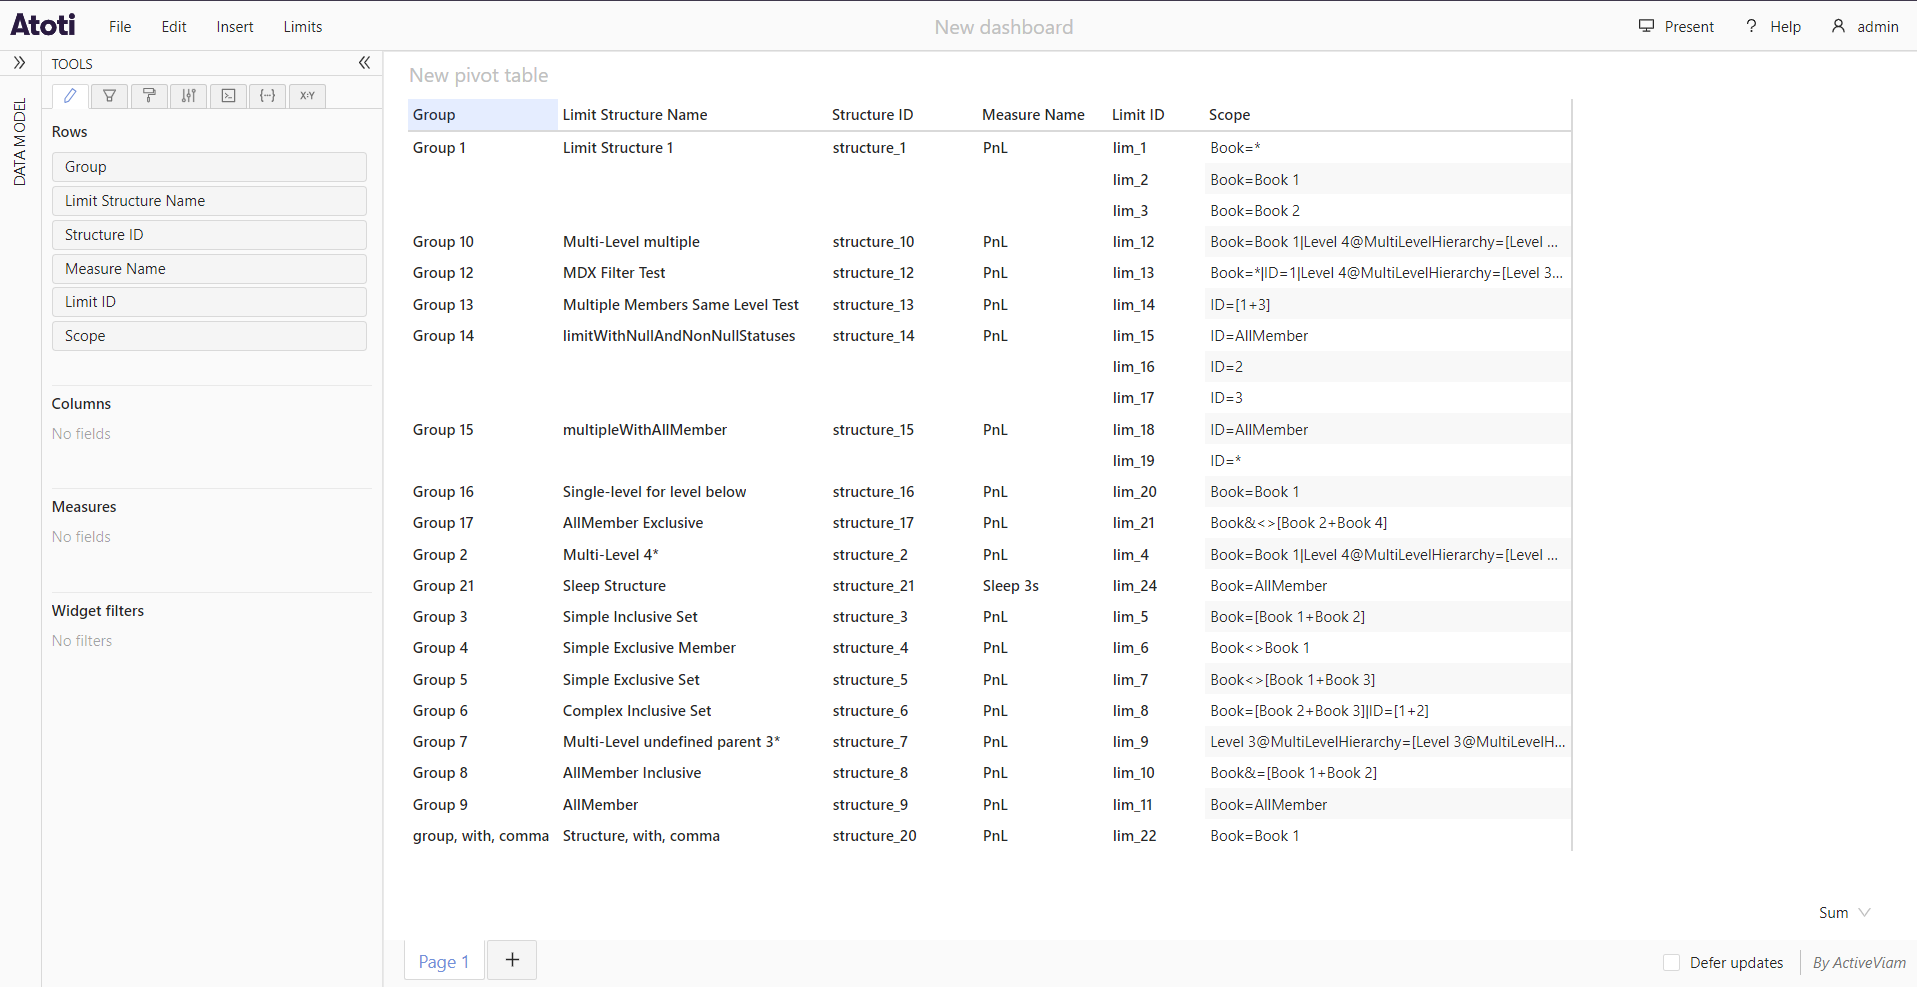
Example
The following screenshots show the data available to 2 different users in the application: admin who does not have any
data restrictions, and restrictedUser, who has been configured to only have access to limits within the group Group 1.
Configuration:
limits:
  data-access-control:
    servers:
      ConnectedAcc:
        role-permissions:
          ROLE_RESTRICTED_USER:
            structure-groups:
              - Group 1
admin:

restrictedUser: