Building and deploying the module
This project aims to be an example of how to run Atoti Limits with an Atoti Server Spring Boot application.
This project is a starting point for your own projects and implementations. You should be able to take this, customize it, and get a Cube up and running in a few minutes.
Set up Artifactory access
In addition to the repository zips, you can download all Maven dependencies from Artifactory by setting up your Maven settings file:
<settings>
    <profiles>
        <profile>
            <id>default</id>
            <activation>
                <activeByDefault>true</activeByDefault>
            </activation>

            <repositories>
                <repository>
                    <id>ActiveViamInternalRepository</id>
                    <name>ActiveViam Internal Repository</name>
                    <url>https://activeviam.jfrog.io/activeviam/activeviam-mvn-accelerators/</url>
                </repository>
            </repositories>
        </profile>
    </profiles>

    <servers>
        <server>
            <id>ActiveViamInternalRepository</id>
            <username>username</username>
            <password>password</password>
        </server>
    </servers>
</settings>
To download the dependencies for the UI, you need to set up access to Artifactory via npm:
npm login --scope @activeviam --registry https://activeviam.jfrog.io/artifactory/api/npm/activeviam-npm-accelerators/
The result is the following message:
Logged in as username to scope @activeviam on https://activeviam.jfrog.io/artifactory/api/npm/activeviam-npm-accelerators/.
If the scope isn’t mentioned in the message, change the command to the following:
npm login --scope=@activeviam --registry=https://activeviam.jfrog.io/artifactory/api/npm/activeviam-npm-accelerators/
Build and deploy the project
Requirements
- Java 17
- Maven 3
- Atoti Server JAR files
- Running the application requires a license for the Atoti Server software.
Maven Repositories
-
From the ActiveViam share page, download the Maven repository for the version of Atoti Server Atoti Limits is based on. This is specified in the Release notes of Atoti Limits you are deploying. The zip file containing the Maven repository is called maven-repository-<version number>.zip.
-
From the Atoti Limits Release Notes page, follow the directions to the Distribution Files section and download the Maven repository for Atoti Limits. This contains all dependencies required to build Atoti Limits that aren’t included in the Atoti Server download. A zip file containing the Maven repository is called atoti-limits-<version number>-maven-repository.zip.
Add these repositories to your existing Maven repository.
Source
Download and unzip the source zip from the Artifactory page.
Atoti Limits backend
- In order to compile the source code using Maven, you must set your
MAVEN_OPTSenvironment variable, like so:MAVEN_OPTS="-Xss8m". - Once you have added all the Maven repositories and extracted the source code, run
mvn clean installon the parent pom file to build the entire project.
This generates a JAR file, which can be run using standard Java commands:
- Windows:
    java
    --add-opens=java.base/java.util=ALL-UNNAMED
    --add-opens=java.base/java.util.concurrent=ALL-UNNAMED
    -Dinput.data.root.dir.path=<path\to\data-samples>
    -jar <path to>/limits-starter-<version>-exec.jar
- MacOS/Linux:
    java
    --add-opens=java.base/java.util=ALL-UNNAMED
    --add-opens=java.base/java.util.concurrent=ALL-UNNAMED
    -Dinput.data.root.dir.path=<path\to\data-samples>
    -Dactiveviam.chunkAllocatorClass=com.qfs.chunk.direct.allocator.impl.MmapDirectChunkAllocator
    -jar <path to>/limits-starter-<version>-exec.jar
The --add-opens options are required for Atoti Limits to run on Java 17.
For any concern about <version> not being generic, you may use limits-starter-*-exec.jar to call the jar in automations.
Atoti Limits custom project structure
If you’d like to add custom code, we recommend keeping it separate from our source code as much as possible. This will ease future migrations as you will have a distinction between our code that has been updated and your custom code that you should modify. Atoti Limits is designed to be extendable, so it should be straightforward for you to modify the code that is executed without modifying our source code by using Spring best practices.
In the source code, you will find the following two modules used to set up an Atoti Limits server:
limits-activeviam: This module contains all the core code for the Atoti Limits server. We strongly recommend that you do not modify this code. Instead, we advise that you append to the code inlimits-starter: This extremely lightweight module contains a Spring configuration class namedLimitsAppConfig. This class is the entry point for the Atoti Limits server. You should add your custom code here. For further details on how to extend our services, please see the extending the module section.
By having your custom code separated like this, it will enable you to:
- import the
limits-activevammodule as a dependency rather than storing it as source code in your project repository. - bump the version of the
limits-startermodule when migrating and only have to migrate your custom code.
warning
In theory, the dependency on limits-activeviam should be sufficient to run your own Atoti Limits server with customizations. Therefore, in future releases we may remove limits-activeviam
from released artifacts. We may do this in order to enforce best practices that will ultimately
improve the developer experience. If you have the need to customize code and you cannot do so, please
contact the Customer Success team or create a Jira ticket.
Atoti Limits UI
For details on activating the UI features, see UI Activation.
Configuration
Configure your Atoti server to point to where you will deploy the module, as laid out in How to Integrate Limits to an Atoti Server.
For information on configuring the properties files, data files, and ActiveViam components, see Project configuration.
Usage
Atoti Limits can be integrated with any Atoti Server instance with the same version. For more information, see How to Integrate Limits to Atoti.
As Of Date
The file as_of_date.csv sets the asOfDate for the limits application. This asOfDate is used for evaluating limits against connected Solutions.
Limit structures
The files limit_sructures_approve_frtb.csv and limit_sructures_mra.csv load the LimitStructures store, and can be found in src/test/resources/data-samples/data/{server name}. Limit
structures which have the same Name, CubeName, and ServerName fields create a single KPI on a connected server via REST calls.
For more information on the limit_structures.csv input file, see limit structures.
AlertTasks and the Incidents store
AlertTasks are created for each limit in the Limits store, which evaluates whether a limit is in breach or warning state. The
PollingFrequency field of a limit determines how often an AlertTask is run. When limits are in breach or warning status, the AlertTask writes to a file named incidents.csv.
You can find this file in today’s date folder inside the directory src/test/resources/data-damples/data/{serverName}/incident.
The files generated here will populate the Incidents store via a fetch topic on startup.
Limit workflow
In the resources/processes folder, the following Activiti workflow bpmn files can be found out of box.
- limit-process-four-eyes.bpmn
- limit-process-six-eyes.bpmn
- limit-process-straight-through.bpmn
- limit-process-exception.bpmn
Other
note
If running as a JAR file, the limit_sructures.csv file may not be found, and you will need to explicitly point to it.
- Atoti UI, ActiveViam’s user interface for exploring the Cube, will be available from
http://localhost:9090/ui
The default security credentials are admin:admin, but can be modified in the SecurityConfig class (we use Spring Security).
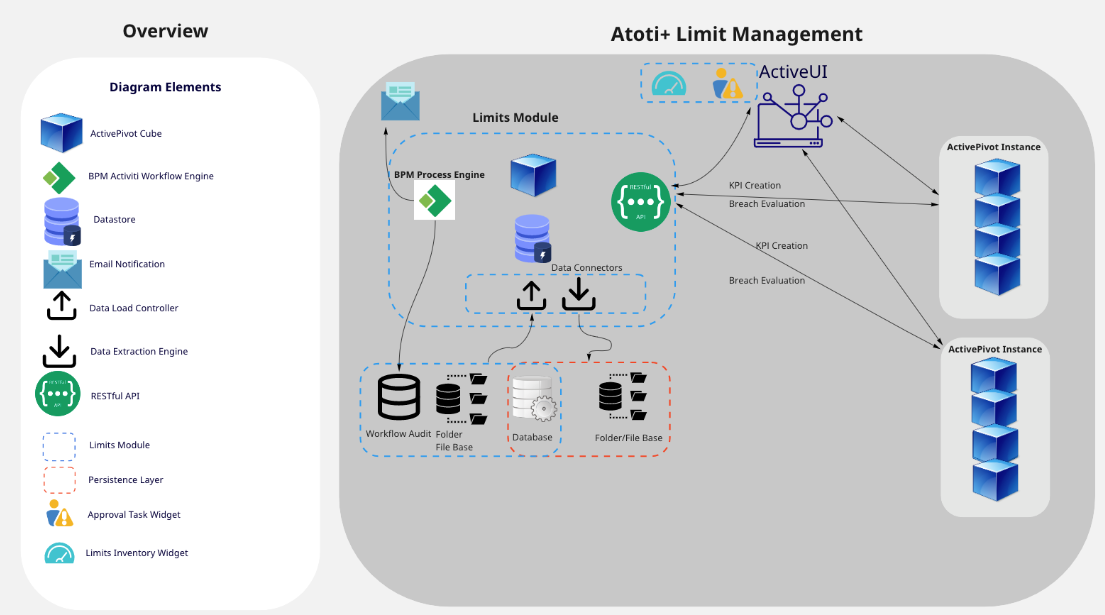
Limits ecosystem and architecture
In the ActiveViam ecosystem, Atoti Limits runs on its own JVM and is the one-stop shop to manage all the limits across all Atoti Server cubes. The workflow audit is automatically maintained in the persistent relational database. All users log into a combined Atoti UI to access all Atoti Server cubes.