Limit Workflow
Atoti Limits provides a few workflows out of the box with Activiti. The complete tutorial of Activiti can be found on the Activiti website.
This section shows you how to use the out-of-box workflow.
You can find the Business Process Modeling Notation (BPMN) files in the limits-starter/src/main/resources/processes folder. bpmn files are in the XML format, however, we recommend that you install the Activiti Diagram Editor plugin in your IDE, such as Intellij or Eclipse, to edit and read the bpmn files in a nice UI workflow representation.
The events when the workflow kicks in are:
- Limit change: a new limit is created or amended through the UI.
- When an exception (breach or warning) occurs after the limit evaluation.
You can set up the workflow for each of the above occasions.
limit-process-four-eyes.bpmn
This workflow requires one approval. By default, one user creates the limit, and another approves it. Alternatively, if the canTheApproverBeTheSameAsTheCreator property in limits.properties is enabled, the user who created the limit can also approve it.
note
Please note the section of limits/workflow-types in application.yml. The workflow names need to match the process ID in the bpmn.
application.yml:
limits: workflow-types: FourEyes: limit-process-instance.four-eyes
limit-process-four-eyes.bpmn:
<process id="limit-process-instance.four-eyes ...>"
All serviceTasks need to have the associated Bean defined in the LimitsProcessInstanceWorkflowService.java or a delegate service: Location: limits-activeviam/src/main/java/com/activeviam/limits/workflow/instance File name: DeleteDelegateService.java

The possible actions in each of the actionable states are:
| Start state | Action | End state |
|---|---|---|
| Create | Initialized | |
| Initialized | Approve | Approved |
| Initialized | Reject | Initialized |
| Approved | Edit | Edit |
| Approved | Delete | Pending Deletion |
| Approved | Expire | Expired |
| Edit | Approve | Approved |
| Edit | Delete | Pending Deletion |
| Edit | Expire | Expired |
| Edit | Reject | Edit |
| Pending Deletion | Approve | Deleted |
| Pending Deletion | Reject | Approved |
| Deleted | System | End |
| Expired | System | End |
limit-process-six-eyes.bpmn
This workflow requires two approvals. One user creates the limit, and two others need to approve it.
note
Please note the section of limits/workflow-types in application.yml. The workflow names need to match the process ID in the bpmn.
application.yml:
limits: workflow-types: FourEyes: limit-process-instance.six-eyes
limit-process-six-eyes.bpmn:
<process id="limit-process-instance.six-eyes" ...>
All serviceTasks need to have the associated Bean defined in the java file: Location: limits-activeviam/src/main/java/com/activeviam/limits/workflow/instance File name: LimitsProcessInstanceWorkflowService.java
limit-process-straight-through.bpmn
This workflow doesn’t require an approval. The limit is created in approved state. Limits created via DLC and Limit File Upload use the Straight through workflow.
note
Please note the section of limits/workflow-types in application.yml, the workflow names need to match the process ID in the bpmn.
application.yml:
limits: workflow-types: StrightThrough: limit-process-instance.straight-through
limit-process-straight-through.bpmn:
<process id="limit-process-instance.straight-through ...>"
limit-process-exception.bpmn
This workflow handles the breach and warning workflow.
note
Please note the section of limits/workflow-types in application.yml, the workflow names need to match the process ID in the bpmn.
application.yml:
limits: workflow-types: Exception: limit-process-instance.exception
limit-process-exception.bpmn:
<process id="limit-process-instance.exception ...>"
All serviceTasks need to have the associated Bean defined in the java file: Location: limits-activeviam/src/main/java/com/activeviam/limits/workflow/instance File name: LimitsProcessInstanceWorkflowService.java
The following diagram represents the various possible states and actions in the Exception workflow:
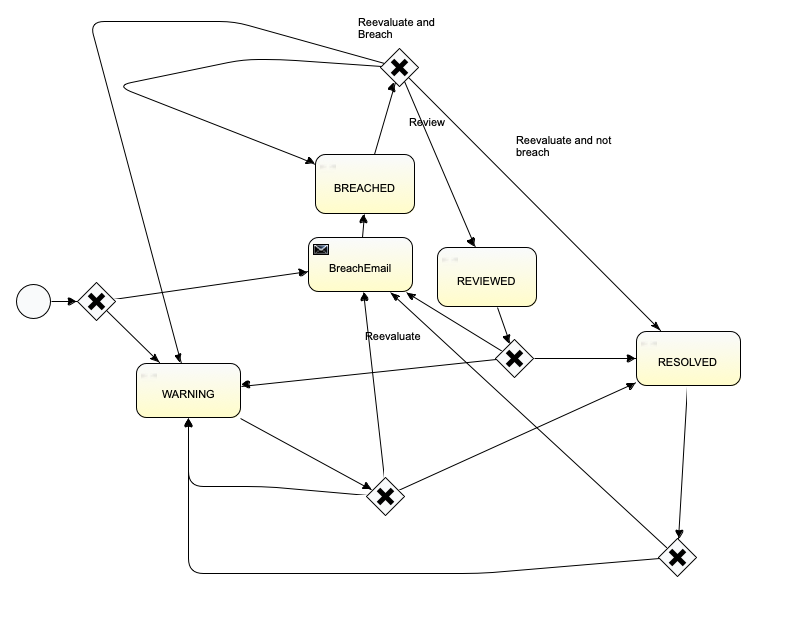
| Start state | Action | End state |
|---|---|---|
| None | System Eval | Warning Breached Email |
| Breached Email | System Eval | Breached |
| Breached | User Review | Reviewed |
| Breached | System Eval | Breached Resolved Warning |
| Reviewed | System Eval | Breached Email Warning Resolved |
| Resolved | System Eval | Warning Breached Email Resolved |
| Warning | System Eval | Breached Email Warning Resolved |
Adding a New Workflow
- Add the bpmn file
- Update the application.yml file
- Update the UI: update the limitsWorkflowMap in limits-ui.LimitsSettings.ts
limitsWorkflowMap: {
      FourEyes: {
        name: "FourEyes",
        participants: ["Examiners"],
      },
      SixEyes: {
        name: "SixEyes",
        participants: ["Examiners", "Approvers"],
      },
      StraightThrough: {
        name: "StraightThrough",
        participants: [],
      },
    },
note
When adding exception workflows, update the exceptionWorkflowMap in limits.ui.LimitsSettings.ts with the following:
   exceptionWorkflowMap: {
      Exception: {
        name: "Exception",
        participants: [],
      }
    },
Configuring workflow action buttons
For moving a limit to the next state of a workflow, we use buttons at the bottom of the Limits Drawer. The most common action buttons are Approve and Reject, which should be available to the user only in certain stages of the workflow. We determine the type of buttons we see at the bottom of the Limits Drawer by calling the getStatus() endpoint and passing in a limit’s key. In order to interact with the getStatus endpoint, several notable changes must be made to the BPMN file: see Update User Tasks.
The response object contains the following attributes:
editable: This is a boolean attribute, which determines whether the user should be allowed to edit the limit while the current set of buttons are rendered.decisionButtons: This attribute is an array of objects, each configuring a single action, or decision, that is presented to the user. Each object contains three attributes, ‘name’, ‘workflowKey’, and ‘style’name: This is the text on the button.workflowKey: This is a technical field, which determines the workflow we want to execute when the user clicks a given decision button.style: This is an object containing CSS elements and their corresponding values.
We open the Limits Drawer, we assess the given limit’s status, and loop through the array of decisionButtons, rendering them along the bottom of the drawer. Here is an example of the endpoint’s response and corresponding buttons:
{
        {
    "decisionButtons": [
        {
            "name": "Approved",
            "workflowKey": "APPROVED",
            "style": {
                "backgroundColor": "#0000ff",
                "color": "#ffffff"
            }
        },
        {
            "name": "Reject",
            "workflowKey": "REJECTED",
            "style": {
                "backgroundColor": "#ff0000",
                "color": "#ffffff"
            }
        }
    ],
    "editable": true
	}
}

Updating User Tasks
Displaying action buttons, which move a limit to the next state in the workflow, are only applicable for certain workflow states, where the user must decide the workflow path to take. We want to display buttons for every state where the user must Approve or Reject (or any custom workflow action). For example, the user needs to decide whether to approve or reject a “PENDING_DELETION” limit before the current limit is deleted. In addition to Approve or Reject, within the Exception Tab of a Breached or Warning limit, the user will be presented with either Review or Comment buttons, respectively.
Decision Buttons
An additional FormProperty tag must be added to a User Task’s note Every FormProperty tag used to define a Decision Button must include the ‘variable’ attribute equal to ‘button’. Including this variable allows an User Task to have more than one FormProperty tags with multiple FormValues. <activiti:formProperty id="approveBtn" name="Approve_Button" type="enum" required="true" variable="button">
Within each new Decision Button FormProperty must include several FormValue tags:
| Name | Purpose | Required | Example |
|---|---|---|---|
| name | The button’s name displayed in the UI. | Y | Approved |
| workflowKey | The value used to trigger the workflow for the corresponding button clicked. | Y | APPROVED |
| backgroundColor | The button’s color (Hex code values are supported. IE. blue = #0000FF) | N | #0000FF |
| color | The button’s text color.(Hex code values are supported. IE. white = #FFFFFF) | N | #FFFFFF |
note
The FormValue’s id is the workflowKey indicating which workflow this button should kick off. The FormValue’s name field will be the display name on the button, for example, APPROVED.
<activiti:value id="workflowKey" name="APPROVED"></activiti:value>
Example:
	<activiti:formProperty id="approveBtn" name="Approve_Button" type="enum" required="true" variable="button">
       		<activiti:value id="name" name="Approved"></activiti:value>
       		<activiti:value id="workflowKey" name="APPROVED"></activiti:value>
       		<activiti:value id="backgroundColor" name="#0000ff"></activiti:value>
       		<activiti:value id="color" name="#ffffff"></activiti:value>
   </activiti:formProperty>
note
To display buttons within the Limits Drawer’s Exception tab, add Button definition Form Property tags to Exception workflow BPMN files as well. Instead of rendering the button at the bottom of the Limits Drawer, they will render within the Exception tab. Here is an example of a button definition Form Property:
        <activiti:formProperty id="reviewBtn" name="Review_Button" type="enum" required="true" variable="button">
       		<activiti:value id="name" name="Review"></activiti:value>
       		<activiti:value id="workflowKey" name="REVIEW"></activiti:value>
       		<activiti:value id="backgroundColor" name="#0000ff"></activiti:value>
       		<activiti:value id="color" name="#ffffff"></activiti:value>
       	</activiti:formProperty>
Editable
In addition to Decision Buttons, the User Task must include a FormProperty tag for the JSON response’s editable attribute, which indicates if the limit can be edited at that particular workflow status. The FormProperty should be added to the User Task’s Extension Elements tag. Here is an example of the editable FormProperty:
<activiti:formProperty id="editable" name="true" type="boolean" required="true"/>
note
The FormProperty’s id must equal editable and the name equals the boolean value. If the ‘editable’ FormProperty is not included, the default value is false.
Example:
Here is a full, valid example of adding the decision buttons to a User Task:
Four Eyes workflow:
    <!-- Initialized UserTask -->
    <userTask id="initializedUserTask" name="INITIALIZED" activiti:candidateGroups="MANAGERS,USERS,USER">
      <extensionElements>
      <!-- Approve decision button -->
       	<activiti:formProperty id="approveBtn" name="Approve_Button" type="enum" required="true" variable="button">
       		<activiti:value id="name" name="Approved"></activiti:value>
       		<activiti:value id="workflowKey" name="APPROVED"></activiti:value>
       		<activiti:value id="backgroundColor" name="#0000ff"></activiti:value>
       		<activiti:value id="color" name="#ffffff"></activiti:value>
       	</activiti:formProperty>

       	<!-- Reject decision button -->
        <activiti:formProperty id="rejectBtn" name="Reject_Button" type="enum" required="true" variable="button">
       		<activiti:value id="name" name="Reject"></activiti:value>
       		<activiti:value id="workflowKey" name="REJECTED"></activiti:value>
       		<activiti:value id="backgroundColor" name="#ff0000"></activiti:value>
       		<activiti:value id="color" name="#ffffff"></activiti:value>
       	</activiti:formProperty>
       	<!-- Edit boolean value -->
       	<activiti:formProperty id="editable" name="true" type="boolean" required="true"/>

       	<!-- Actions variable, defining the different workflow paths -->
        <activiti:formProperty id="action" name="Do you want to approve, edit or delete" type="enum" required="true">
          <activiti:value id="edit" name="InitializedEdit"></activiti:value>
          <activiti:value id="delete" name="InitializedDelete"></activiti:value>
          <activiti:value id="approve" name="InitializedApprove"></activiti:value>
          <activiti:value id="reject" name="InitializedReject"></activiti:value>
        </activiti:formProperty>
      </extensionElements>
    </userTask>
Exception workflow:
 <userTask id="handleBreach" name="BREACHED" activiti:candidateGroups="USERS,MANAGERS,USER">
     <documentation>${employeeName} would like to review the exception.</documentation>
     <extensionElements>
       <activiti:formProperty id="reviewBtn" name="Review_Button" type="enum" required="true" variable="button">
      		<activiti:value id="name" name="Review"></activiti:value>
      		<activiti:value id="workflowKey" name="REVIEW"></activiti:value>
      		<activiti:value id="backgroundColor" name="#0000ff"></activiti:value>
      		<activiti:value id="color" name="#ffffff"></activiti:value>
      	</activiti:formProperty>
      	<activiti:formProperty id="editable" name="false" type="boolean" required="true"/>
       <activiti:formProperty id="breachedAction" name="Do you review this exception" type="enum" required="true">
         <activiti:value id="breached" name="revaluateBreach"></activiti:value>
         <activiti:value id="reviewed" name="reviewed"></activiti:value>
         <activiti:value id="warning" name="revaluateWarning"></activiti:value>
         <activiti:value id="resolved" name="revaluateResolved"></activiti:value>
       </activiti:formProperty>
       <activiti:formProperty id="exceptionCategory" name="ExceptionCategory" type="string"></activiti:formProperty>
       <activiti:formProperty id="exceptionComment" name="ExceptionComment" type="string"></activiti:formProperty>
     </extensionElements>
   </userTask>
Configuring breach email notifications
When a limit is breached, Atoti Limits notifies the specified users by email. Here’s how to configure the email:
In the limit-process-exception.bpmn, you can find the following BreachEmail section and configure the “to”, “from”, and “subject” fields, and the email body.
note
By default this implementation will not send emails. See Extending the Mail provider section below.
 <serviceTask id="mailtask1" name="BreachEmail" activiti:class="com.activeviam.limits.workflow.service.instance.activity.impl.TestMailActivityBehavior">
      <extensionElements>
        <activiti:field name="to">
          <activiti:string><![CDATA[bas.email.demo.test@gmail.com]]></activiti:string>
        </activiti:field>
        <activiti:field name="from">
          <activiti:string><![CDATA[breach@activeviam.com]]></activiti:string>
        </activiti:field>
        <activiti:field name="subject">
          <activiti:expression><![CDATA[Breach Notification - ${limitsName}]]></activiti:expression>
        </activiti:field>
        <activiti:field name="html">
          <activiti:expression><![CDATA[<html>
<head>
<style>
h3 {text-align: center;background-color:DodgerBlue;color:FloralWhite}
</style>
</head>
<body>

<h3>Breach Notification</h3>
<p>Dear Limit Controller, </p>


<p>Limit, ${limitsName}, with limit value, ${limitsValue}, is breached. Please investigate below:
<a href=${url}>Limits Inventory</a>
</p>

<p>
Thank you.
</p>

</body>
</html>]]></activiti:expression>
        </activiti:field>
      </extensionElements>
    </serviceTask>
note
Breach emails use out-of-the-box functionality from Activiti, which causes a performance decrease in the workflow. To avoid this, disable the breach email by removing the “BreachEmail” element from the bpmn file. Make sure that the paths to the “Breach Email” go to the “BREACHED” node after the change.
Extending the mail provider
If you’d like to use the default Activiti mail provider, replace the activiti:class="package.to.CustomClass" in the <serviceTask> description
with activiti:type="mail"
Note in the service task description the element activiti:class="com.activeviam.limits.workflow.service.instance.activity.impl.TestMailActivityBehavior". This is a way of providing a custom Java delegator to override the default MailActivityBehavior.
This is an Activiti feature which can be used to provide extra functionality to your project. For example, to avoid sending emails in a test environment, you can do the following:
public class TestMailActivityBehavior extends MailActivityBehavior {

    protected static final Logger LOGGER = LoggerFactory.getLogger(TestMailActivityBehavior.class.getSimpleName());

    @Override
    public void execute(DelegateExecution execution) {
        LOGGER.info("Sending test email for execution: " + execution);
        leave(execution);
    }
}
Uploading a limit already in a workflow state
When uploading limits in bulk, some of the limits may already be present in the module and in progress in one of the workflows. Here’s how the state of the affected limit changes when this happens:
FourEyes Workflow:
- “Pending Approval” becomes “Approved”.
- “Pending Deletion” becomes “Deleted”.
Straight-through:
A limit in the “Approved” state stays “Approved”.