Limits Inventory
Overview
The Limits Inventory widget is where you can view and create new limit definitions.
To access the widget, click and drag its icon from the top menu bar onto your dashboard:
![]()
The Widget contains a table of limit definitions and three buttons:

Table columns
The number and order of columns in the Limits Inventory Widget table differ from the input CSV file. You can still upload an input CSV file despite differences in columns and order.
| Field Name | Description | Example |
|---|---|---|
| Group | Name of a group of limits. Group is a way of grouping similar limits. | Equity Desk |
| Name | The KPI name created in the business cube. | SA Desk Limit |
| Start Date | Effective start date. | 2018-09-28 |
| End Date | Effective end date | 2020-01-01 |
| Server Name | The server where the limit is created. | MRA |
| Cube Name | Name of the business cube for the KPI/Limit. | Sensitivity Cube |
| Measure Name | Measure of the KPI. | FX Risk Charge |
| Scope | This determines which members the new limit applies to. The scope is made up of any level of the currently selected cube and a corresponding value from said level. An example scope filter is “Desk=Rates”. One limit definition can have multiple scope filters. Every scope filter is separated by a pipe. | Desk=Bonds |
| KPI Type | The KPI type. For details, see Select a rule. | Greater Than |
| AbsoluteValueIndicator | Specifies whether the limit value is an absolute value. | false |
| Workflow Status | Status of a limit’s workflow. | APPROVED |
| Actions | Limit operations you can execute. The available operations are: * View: view and edit (if permissioned) the limit’s full definition. The inventory table displays a subset of the full limit definition. * Delete: Removes the limit and associated KPIs from the table. |
View |
Widget buttons
- Create New Limit: Opens a form where you can enter and select information for your new limits definition.
- Upload: Allows you to add new limits to the widget’s table by specifying a CSV file from files on your local machine.
- Download: Exports the table from the widget into a CSV file. All limits are exported, regardless of any filters applied.
Create a new limit
To create a new limit definition, click the Create New Limit button and enter all the necessary information. Some information fields are required.
Only authorized users are able to create a limit. The Create New Limit button is disabled for unauthorized users.
-
From the Limits Inventory widget, click Create New Limit. The Create New Limit panel is displayed.
-
In the Parameters section, enter information for the required fields.
Required fields are marked with a red asterisk in the UI.
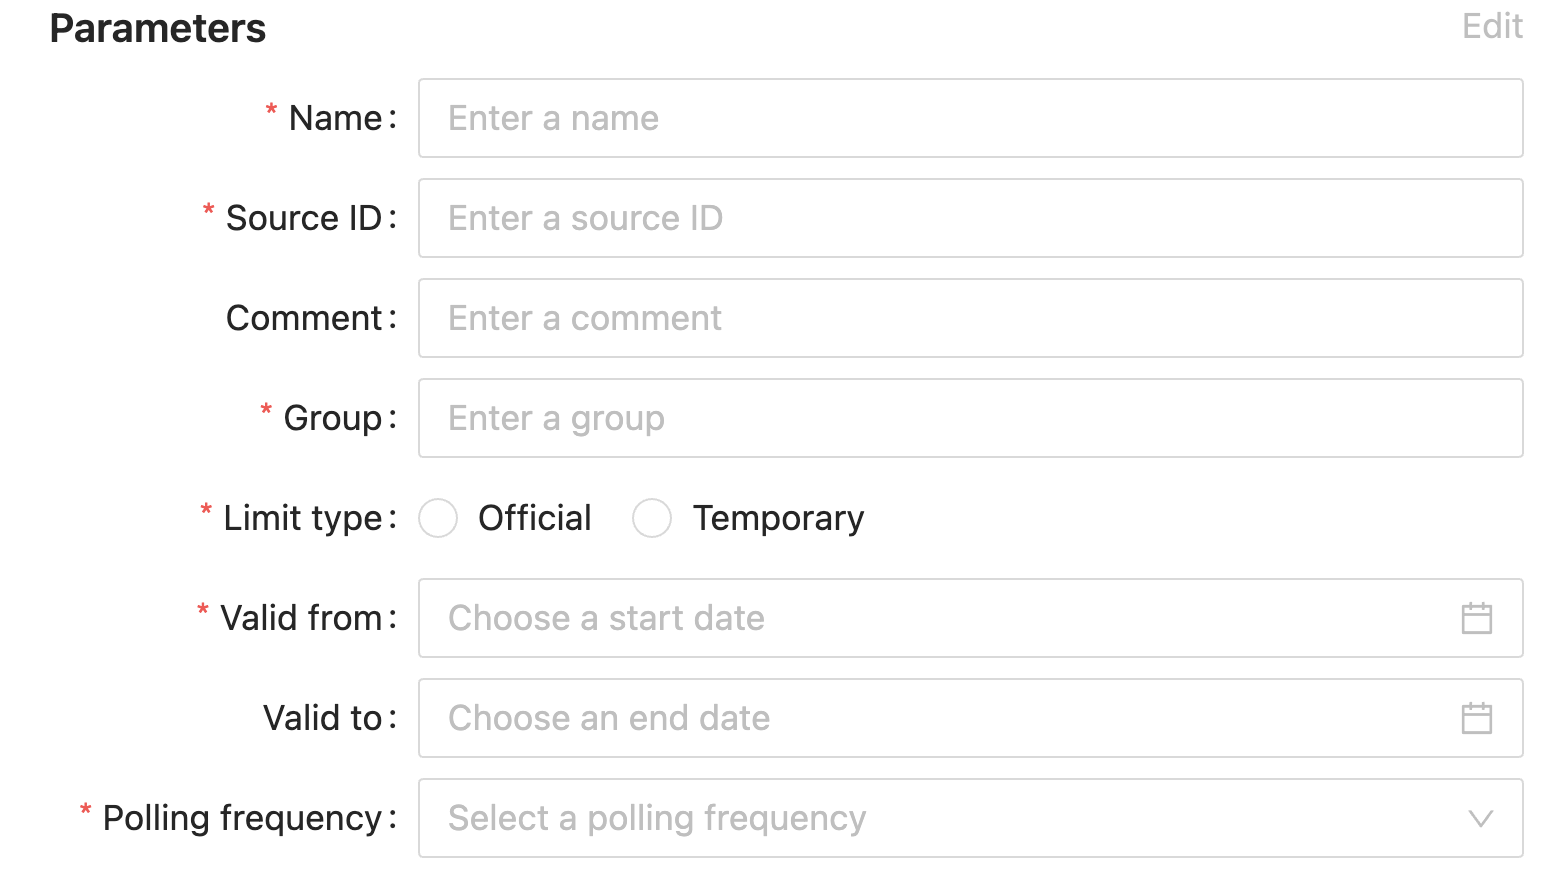
| Field Name | Description | Example |
|---|---|---|
| Name | The KPI name created in the business cube. | SA Desk Limit |
| Source ID | The Reference ID to the limits golden source upstream. | id_12345 |
| Comment | Note about the limit. | This is a comment |
| Group | Name of a group of limits. Group is a way of grouping similar limits. | Equity Desk |
| Limit type | The type of limit: either OFFICIAL or TEMPORARY. These are categories with no logic or processing tied to them. | OFFICIAL |
| Valid from | Effective start date. | 2020-01-01 |
| Valid to | Effective end date. | 2020-01-01 |
| Polling frequency | How often should the limit be checked for a breach. If the value is Intraday, a scheduler to evaluate the limit is automatically created and run every 20 minutes. The scheduler frequency can be changed in the limits.properties: task-scheduler-thread-pool-size=4 sample-rate-minutes=* sample-rate-seconds=0 | EOD |
- In the Limit Values section, select and enter information to define a scope for the limit:
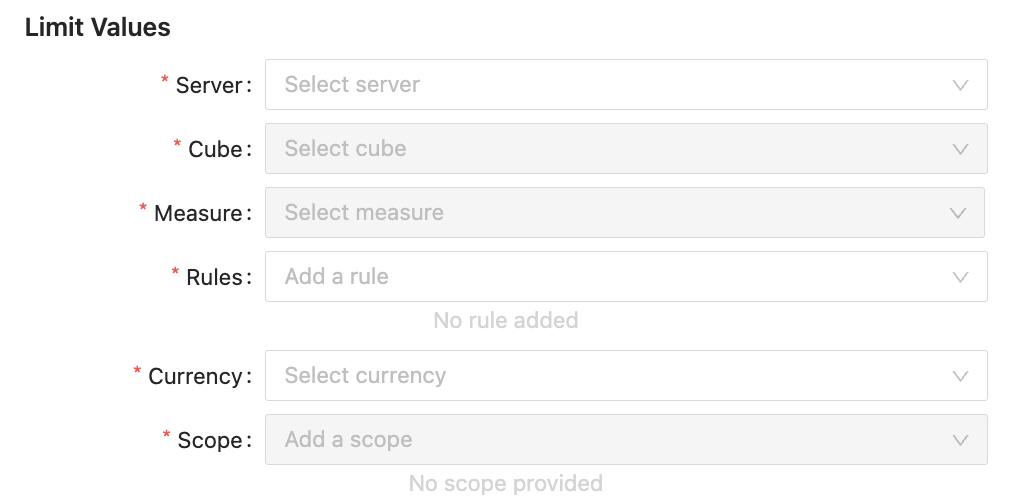
| Field Name | Description | Example |
|---|---|---|
| Server | The server where the limit is created. | MRA |
| Cube | Name of the business cube for the KPI/Limit. | Sensitivity Cube |
| Measure | Measure of the KPI. | FX Risk Charge |
| Rules | The KPI type. For details, see Select a rule. | Greater Than |
| Currency | Currency in which the value of the KPI is expressed. The FX Conversion has not been implemented yet. |
USD |
| Scope | This determines which members the new limit applies to. You can choose any level of the currently selected cube and a corresponding value from said level. An example scope filter is “Desk=Rates”. Multiple scope filters can be added to a single limit definition. Every scope filter is separated by a pipe. There is no limit on the amount of conditions that can be added to a limit’s scope. See Multiple level scope | Desk=Rates |
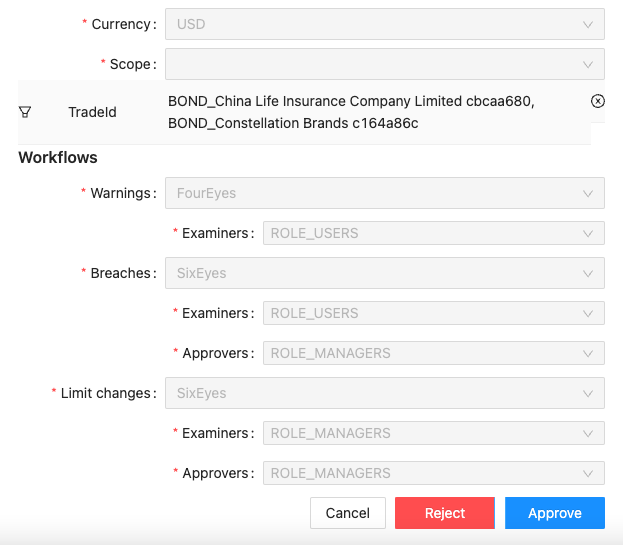
- In the Workflow section, select the type of workflow and the level of scrutiny for each workflow. The fields are:
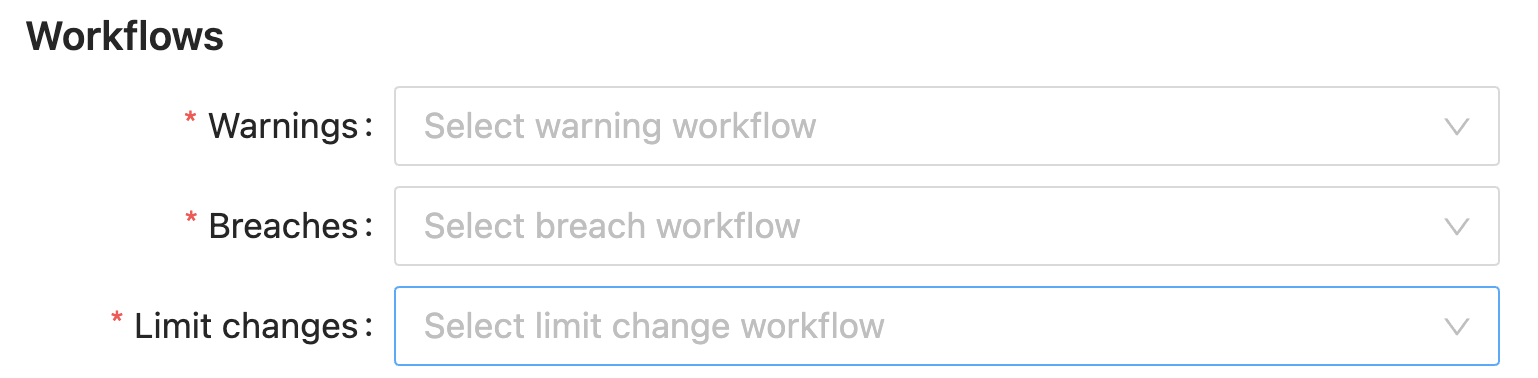
| Field Name | Description | Example |
|---|---|---|
| Warnings | Warning workflow type. This workflow is triggered if the limit was configured with the Warning flag enabled and the limit is within the defined percentage. You can select the approval type: FourEyes, SixEyes or StraightThrough. | |
| Breaches | Breach workflow type. This workflow is triggered if the limit has crossed the limit threshold (either above or below depending on limit definition). You can select the approval type: FourEyes, SixEyes or StraightThrough. | |
| Limit changes | Limit changes and creation workflow type. This workflow is required for amending the limit value on a defined/approved limit. You can select the approval type: FourEyes, SixEyes or StraightThrough. When a limit is created in Limits Inventory, the Limit changes workflow is applied. When a limit is created through upload, the StraightThrough workflow is applied and the limit goes directly into “APPROVED” status. |
When you select FourEyes, a new field appears for assigning Examiners for the given workflow. When you select SixEyes, two new fields appear for assigning Examiners and Approvers for the given workflow. When you select StraightThrough, no fields appear for Examiners or Approvers.
The workflows that are part of the core solution are:
- StraightThrough: There is no approval needed.
- FourEyes: In addition to the person doing the action, another person needs to approve for the action to be effective. When this workflow is selected, you need to select an Examiners user group for approval.
- SixEyes: In addition to the person doing the action, Two other persons need to approve for the action to be effective. When this workflow is selected, you need to select an Examiners and Approvers user group for approval.
For details on extending the workflows, see Limit Workflow
- Click Submit to create a new limit.
Select a rule
The supported KPI types are Greater Than and Less Than.
Examples:
-
Greater Than: The KPI has a breach status when the measure value is greater than the specified value.
-
Less Than: The KPI has a breach status when the measure value is less than the specified value.
When selecting a rule, a popup appears with the following fields:

| Field Name | Description | Example |
|---|---|---|
| Value/Absolute Value | Whether the measure should be interpreted as an absolute value when comparing to limit value. | Value |
| 1st Value | The limit value used. | |
| Warning when within | Enables or disables warning status when within % of breach limit value. | Disabled |
| Percent % of breach | A percent value which defines a percent threshold from our limit value which would return an amber status for our KPI. For a Greater Than limit, this will be the % of utilization where a warning is triggered. For example, on a limit where there is a breach at 10,000 and a warning at 90%, the warning will be triggered at 9,000. For a Less Than limit, this will be the % of the limit over the breach. For example, if a limit is defined as breaching when less than 10,000 and a warning of 10%, it will create a warning when the value is 11,000. |
Here’s an example of using the Greater than rule:
Multiple level scope
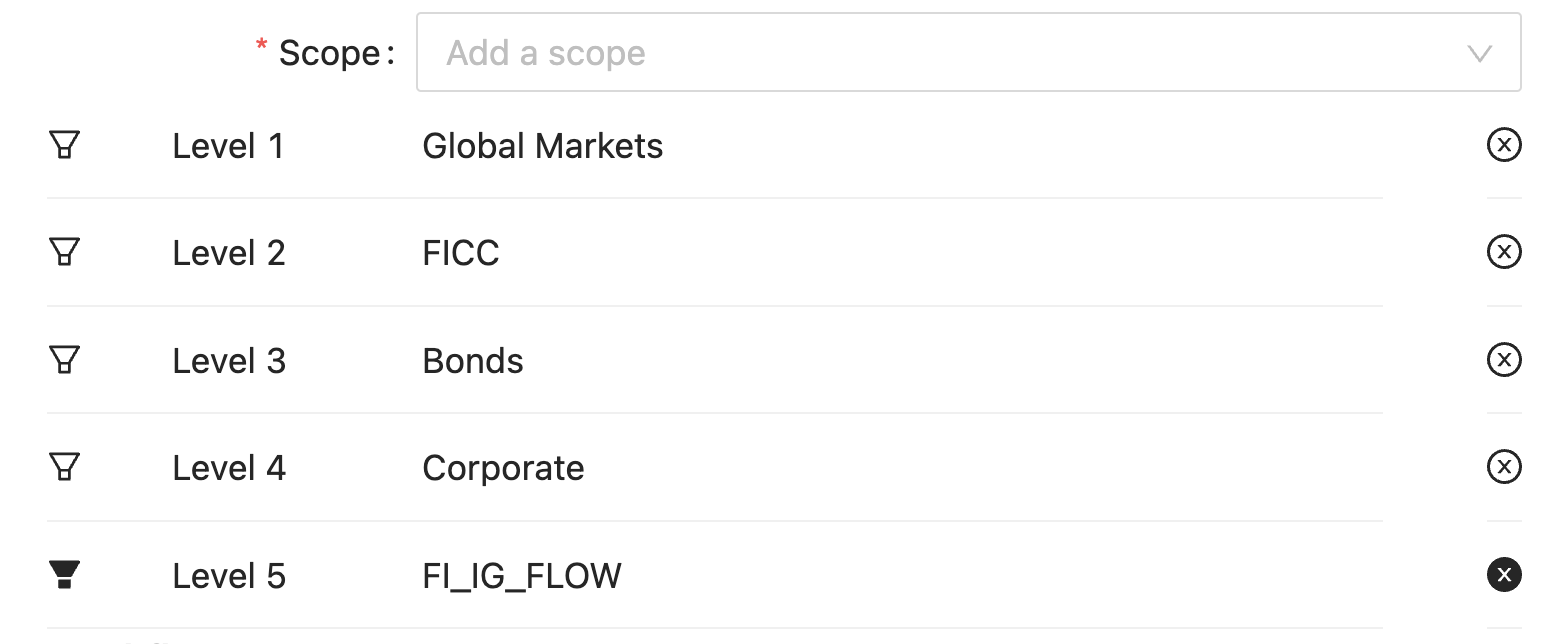
Some levels, when displayed in a pivot table, will display all previous elements in the same hierarchy. These types of levels are called Parent-Child levels. For example, FRTB’s BookHierarchy consists of levels Level 1 through Level 15. If Level 5 is brought into a pivot table, levels Level 1 - Level 4 will populate the table as well.
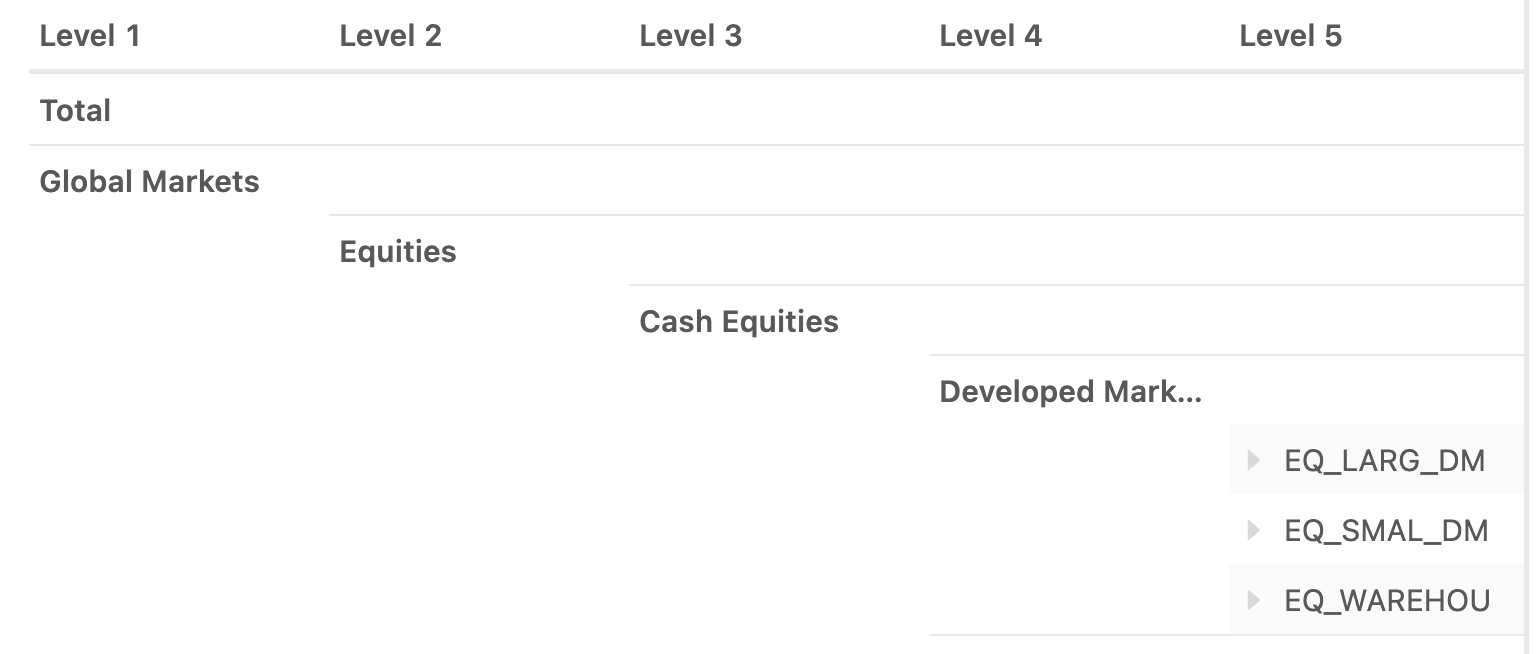
This same behavior is supported when creating a limit’s scope. Using the previous example, if you select Level 5 as the level, and a member, all previous levels will automatically generate an individual scope.
The last level can be deleted from the final scope. This will also delete all of the corresponding generated scopes. You can also change the member value selected by clicking on the ‘filter’ button. Changing the member selected will update the last level, as well as all of the previously generated scopes.
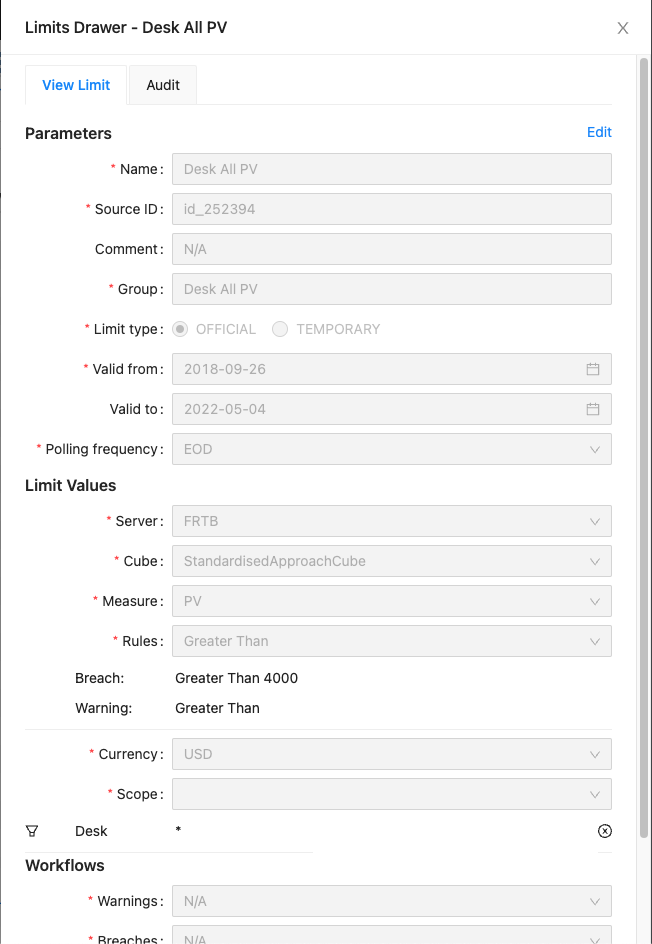
View a limit
To view a Limit, click the View button located at the end of a limit’s row in the Inventory table. This opens the Limits definition (the same drawer you use to create a limit) with all form fields pre-populated with the limit you want to view. Click the Cancel button at the bottom to close the panel.
Click the Cancel button at the bottom to close the panel.
Editing a Limit
Only limits that are in the Initiated or Approved state can be edited.
To edit a limit:
- Click the View action on any of the limit you would like to edit. This opens the Limits definition.
- At the top right of the Limits definition you will see an Edit button. If authorized, click this to modify some of the fields inside of the Limits definition.
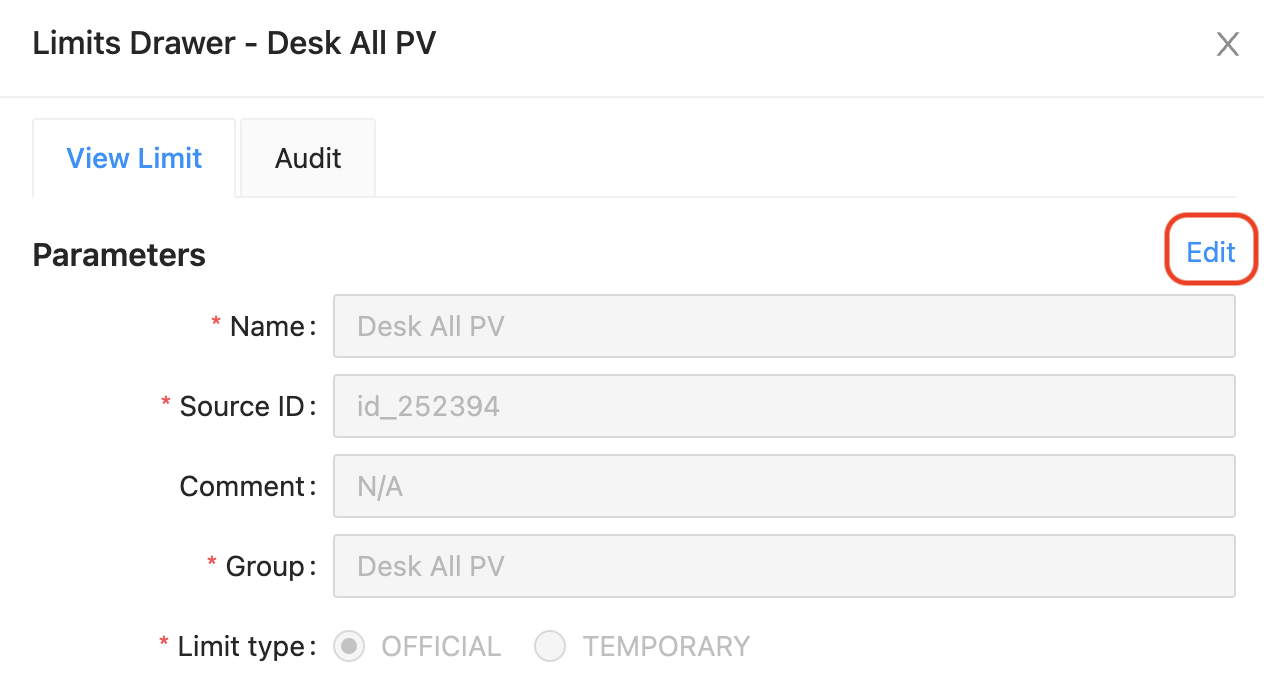
- Once you’ve made your changes, click Update Limit at the bottom of the drawer.
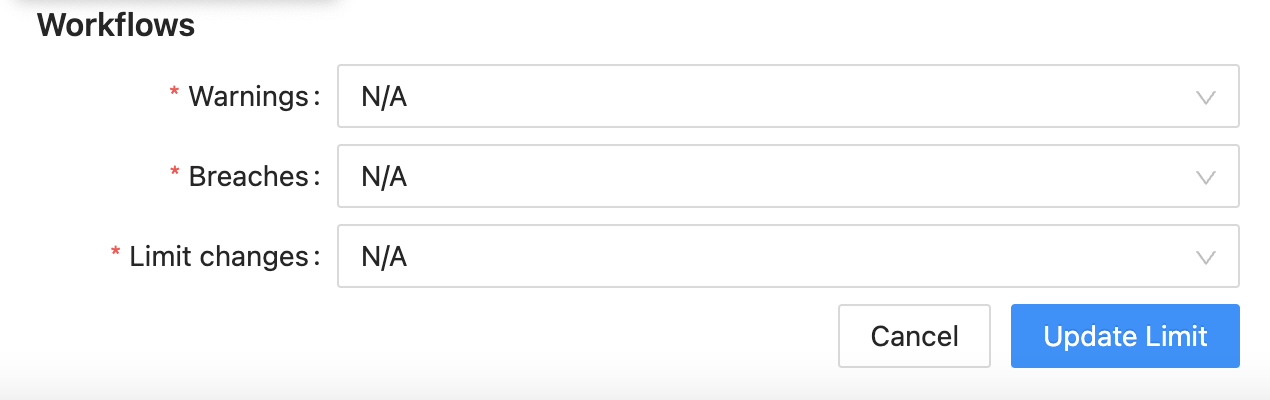
After updating the limit, the workflow state of the limit will depend on the Limit Changes workflow that was specified during the creation of the limit.
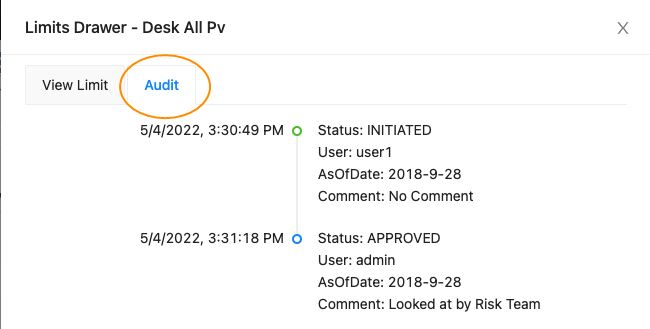
Viewing the audit history
At the top of the drawer, click the Audit tab to see the audit history of the selected limit. Here you can find details on when and who created and approved the limit, and any comments that were added during the process.
Delete a limit
To delete a Limit, click the Delete button at the end of a limit in the table. This removes the limit from the datastore. If no other limits are using the KPI associated with the deleted limit, the KPI is also removed.
The View/Delete Limit button:

Approving or rejecting a limit
You can approve or reject limits in the Limits Inventory.
There are a few limitations to approving a limit:
- The limit must be in a state other than the final state of the workflow. Usually, these are either the
Approved, orRejectedstates. - The active user must have a role required to approve the limit. When you create a limit, the creator sets which roles are in charge of moving the limit along the workflow. If you do not have the specified role, you will not be able to move the limit along the workflow.
- You cannot be the one to have last created or edited the limit.
Once you’ve made sure that the above conditions are satisfied, follow these steps:
- Click the View action on the limit you want to review in the Limits Inventory Widget table.
- Scroll down to the bottom of the Limits Inventory Widget and you’ll find the Approve and Reject buttons.
The states of the workflow can vary from project to project, depending on what kind of workflows are implemented in the project. However, no matter what the workflows are and what kind of states are possible, the buttons to progress or reject these workflows will always be found here.
If the button is not available there, this means that you either don’t have permission to approve it, or that the limit is in a state which cannot be approved.
- After clicking your desired action, you will need to add a comment to attach to the process. This comment will be shown in the Audit screen.
Upload new limits
You can upload and view new limits within the Limits Inventory widget.
To upload limits:
- Click Upload.
- Choose a valid CSV file from your local drive and click Upload. The widget automatically updates and displays the newly uploaded limits.
A valid CSV file to upload has the following column order: Group, ID, Name, Comment, Start Date, End Date, Frequency Type, Polling Frequency, Ccy, Measure Name, Scope, Workflow Status, Warning Workflow, Warning Workflow Parameters, Breach Workflow, Breach Workflow Parameters, Limit Changes Workflow, Limit Changes Workflow Parameters, User ID, Cube Name, Server Name
Make sure to have “APPROVED” Workflow Status in the limits as the reference implementation assumes the limits are valid without any further approval.
A CSV file of limits must contain every single field in the CSV file in order to be considered valid.
Download creates a CSV file line by line. This feature utilizes the DEE for better performance.
Download Limits
You can download Limit definitions from the Limits Inventory widget. The Download button will download a CSV file of limit definitions into your browser. The CSV table downloaded contains the same columns and order as the table displayed within the Limits Inventory Widget. You can also download the CSV file by right-clicking anywhere within the Limits Inventory Widget and selecting the Export to CSV menu action. Both the Download button and the menu action Export to CSV will download the CSV file to your browser.
Measures
A limit has an underlying measure that the will be evaluated on. Under the hood, Limits will create a KPI on that measure to allow for monitoring. A limit can be defined on any Cube Measure (normal PostProcessed or Copper measures) as well as Calculated Measures.
Cube Measures
Cube Measures are measures that exist within a particular cube. These measures can be selected when creating a limit through the UI or can be specified in an input file.
Calculated Measures
A Calculated Measure is a user defined measure created on the UI and is not particular to any cube or even server. A Calculated Measure exists in the context of the UI and does not exist in the Cube. Because of this, in order to create a limit on a Calculated Measure, the limit definition has to be uploaded through a CSV file. The UI does not have any functionality to create a limit on a Calculated Measure. A limit on a Calculated Measure functions the same as any other limit.
When viewing a limit whose underlying measure is a Calculated Measure, you will have to bring the Calculated Measure into your Pivot Table.
You need to bring the Calculated Measure into your Pivot Table so the Calculated Measure exists within the context of the MDX query. Calculated Measures are always defined at runtime and do not persist within the Cube, instead, they persist in the Content Server which the UI manages. Because of this the Calculated Measure adds its definition to the MDX Query any time it is evaluated. Our limit KPI will need this in order to evaluate in a Pivot Table, otherwise our KPI will not be able to find the Calculated Measure.