How to override the default JPA entity classes in Atoti Limits to customize column lengths, add fields, change attribute converters, or add Hibernate filters, using the same class and package names as the defaults
Atoti Limits provides several objects out-of-the-box
that are managed by the default EntityManager. Each of these objects is defined as a JPA entity using the @Entity
and @Table annotations. The default entity classes are:
To customize these entities, you’ll need to override the default entity classes. The following steps outline how to
correctly configure your custom entity classes:
1. Copy the existing entity class to your project with the same class and package names
It is critical that the class and package names remain the same so that the EntityManager recognizes your custom
entity class as an override of the default entity class and doesn’t treat it as a new entity. For example, to customize
the LimitEntity class, you need to create a LimitEntity.java file at the following path in your project:
Removing or renaming existing fields may break Atoti Limits.
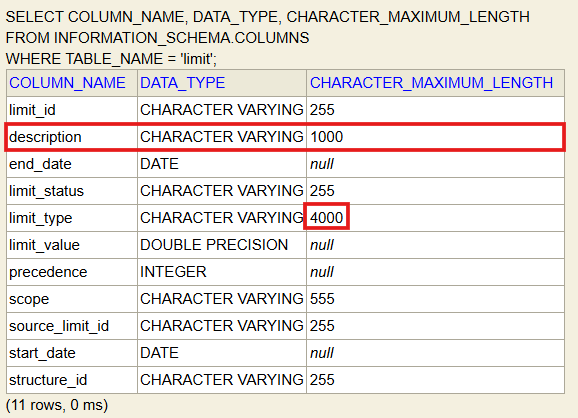
You can now modify the entity class as needed. The following example increases the length of the limit_type field from
the default of 255 characters to 4000 and adds a new description field with a length of 1000 characters, all other
fields and methods remain unchanged:
If you have an existing database and you modify the physical structure of the data in your schema, you may need to
migrate the schema in order for your changes to take effect.
The next time you start Atoti Limits, it will use your custom entity class for the Limit managed object. You
can verify the change is applied by checking the schema for the limits table in your database to verify that the
limit_type column has a length of 4000 and that the new description column exists: