Creating and publishing notifications
This section walks you through creating and publishing notifications using the Atoti Notification Service.
Create your notification
To create a notification, there are a number of building blocks you need to specify. These are the user-defined fields, actions, and any potential restrictions you might want to apply to specific users. You also have a few builder methods to choose from.
User-defined fields
Notifications in the Atoti Notification Service are represented by the Notification class. The user-defined fields of a
Notification are:
| Field | Description |
|---|---|
title |
The headline for the notification. |
description |
The details of the notification. |
severity |
The severity of the notification, represented by a color in the Atoti UI (LOW - green, MEDIUM - yellow, HIGH - red). |
classifiers |
Tags that can be used to filter published notifications. |
notificationActions |
The available actions that can be performed on the notification. |
status |
The current state of the notification. This field can be updated after a notification is published to indicate the notification is obsolete. |
sourceId |
Links the notification to an object in the application. This can be used after publishing to retrieve the notification from the service using the getNotificationBySourceId method. |
Actions
Notifications may have actions users can take once received, represented by the NotificationAction class. The
following default actions are provided when using the Notification.notificationWithDefaultActionsBuilder() method:
| Action | Description |
|---|---|
MARK_READ |
Marks the notification as read. Only enabled if the notification is unread (isRead=false). |
MARK_UNREAD |
Marks the notification as unread. Only enabled if the notification is read (isRead=true). |
DELETE |
Deletes the notification. |
Restricting notifications to specific users
In some cases, you may want to control which users receive a specific notification. You can use the following optional fields to only publish notifications to specific users:
| Field | Description |
|---|---|
users |
A list of usernames that the notification is intended for. If set, the notification is only sent to these users. |
userRoles |
A list of roles that the notification is intended for. If set, the notification is only sent to users with at least one of these roles. |
tip
Most use cases should only use one of these optional fields. If both are set, the notification are only sent to users
who are in the users list AND have one of the roles in userRoles.
Builders
In the Notification class, you can build your notification with the following builder methods:
| Method | Description |
|---|---|
Notification.notificationWithDefaultActionsBuilder() |
Creates a notification with the default actions. For more information, see Notification actions. This is the recommended builder to use in most scenarios. |
Notification.builder() |
Creates a bare notification with no actions. |
Once you have chosen the builder method to use, create the notification:
Notification notification = Notification.notificationWithDefaultActionsBuilder()
    .title("My Custom Notification")
    .description("This is a sample notification")
    .severity(NotificationSeverity.MEDIUM)
    .classifiers(List.of("category 1", "custom-classifier"))
    .build();
Publish your notification
All management of notifications is handled by the INotificationService. Follow these steps to publish your notifications:
1. Inject the INotificationService where you need to publish notifications
This a Spring service, so you can inject it into your components using your preferred method. For example:
@Autowired private INotificationService notificationService;
2. Create your notifications
Referencing the Create your notification section above, create your notification(s) using the builder methods provided.
3. Publish your notifications
Once you have your notifications created, use the service to publish them:
notificationService.publishNotification(notification);
OR
notificationService.publishNotifications(List.of(notification1, notification2, notification3));
note
There is no logical difference between publishing a single notification or a list of notifications. Both methods are provided for convenience, allowing you to publish notifications individually or as a batch depending on your use case.
Publishing technical notifications
The service also supports publishing technical notifications. These are notifications that are not intended for end-users, but rather for communicating information to REST clients.
Technical notifications are not stored in the service and are not sent to new listeners upon subscription. They are only sent to eligible listeners that are currently subscribed at the time the notification is received by the service.
You can publish technical notifications using the following method, which accepts a variable number of Notification
objects:
notificationService.publishTechnicalNotifications(notification);
OR
notificationService.publishTechnicalNotifications(List.of(notification1, notification2, notification3));
Updating notifications
When a notification is published, it is stored in the server so that when a user logs in, they receive all the
notifications that are relevant to them. Some notifications may become obsolete after a certain period of time or
based on a server event and need to be updated. In such cases, the status of the notification can be updated.
When updating the status, you’ll also specify a status code that indicates if the notification should continue being
published for new subscriptions. The update will trigger an UPDATE_STATUS event in the EventStream to notify listeners.
To update the status of a notification, use the updateNotificationStatus method of the service and provide the
following:
- The ID of the notification to update. You can use the
getLiveNotificationsorgetNotificationsBySourceIdmethod to retrieve the notifications after being published and determine their IDs. - The new status of the notification.
- A NotificationStatusCode value:
OBSOLETE: The notification is no longer relevant and won’t be published for new subscriptions.LIVE: The notification is still relevant and will still be published for new subscriptions.
// Create and publish a notification
Notification notification = Notification.notificationWithDefaultActionsBuilder()
    .title("My Custom Notification")
    .description("This is a sample notification")
    .severity(NotificationSeverity.MEDIUM)
    .classifiers(List.of("category 1", "custom-classifier"))
    .sourceId("task-123") // Used below to retrieve the notification ID
    .status("To do")
    .build();
notificationService.publishNotification(notification);
...
// Retrieve the notification ID and update the status
Integer notificationId = notificationService.getNotificationsBySourceId("task-123").getFirst().getId();
notificationService.updateNotificationStatus(notificationId, "Task completed by user1", NotificationStatusCode.OBSOLETE);
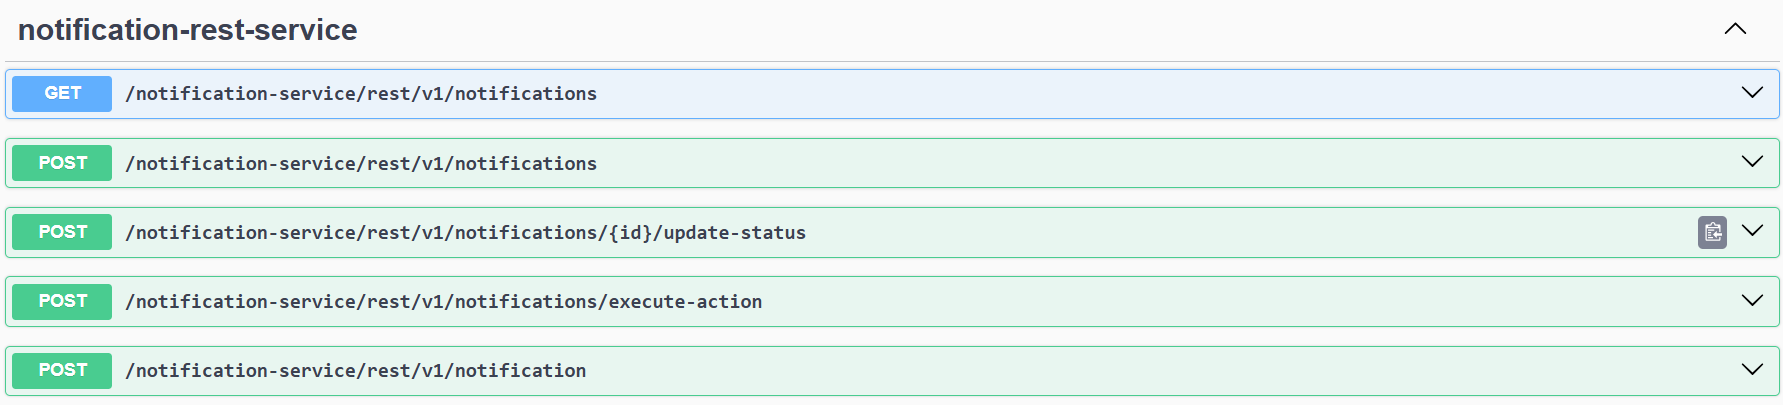
Atoti Notification Service REST API
warning
The REST API is available for early adoption for edge cases like integration with the Atoti Python API. It is not intended to replace the Java API for general use cases.
The Atoti Notification Service provides a REST API that allows you to create and manage notifications in a running application.
You can see the endpoints for your application in Swagger UI, under notification-rest-service: