Building and deploying the Solution
Building the project
Maven repositories
-
From the ActiveViam share page, download the Maven repository for the version of Atoti Server the Solution is based on (will be specified in the release notes of the Solution you are deploying). The zip file containing the Maven repository will be called maven-repository-<version number>.zip.
-
On the Atoti CVA Risk Capital Release Notes page, follow the directions to the Distribution Files section and download the Maven repository for the Solution (contains all dependencies required to build the Solution that aren’t included in the Atoti Server download). A zip file containing the Maven repository will be called cvarc-accelerator-<version number>-maven-repository.zip.
Add these repositories to your existing Maven repository.
Set up Artifactory access
In addition to the repository zips, you can download all of the Maven dependencies from Artifactory by setting up your Maven settings file like so:
<settings>
    <profiles>
        <profile>
            <id>default</id>
            <activation>
                <activeByDefault>true</activeByDefault>
            </activation>

            <repositories>
                <repository>
                    <id>ActiveViamInternalRepository</id>
                    <name>ActiveViam Internal Repository</name>
                    <url>https://activeviam.jfrog.io/activeviam/activeviam-mvn-accelerators/</url>
                </repository>
            </repositories>
        </profile>
    </profiles>

    <servers>
        <server>
            <id>ActiveViamInternalRepository</id>
            <username>username</username>
            <password>password</password>
        </server>
    </servers>
</settings>
In order to download the dependencies for the UI, it is required to set up access to Artifactory via npm, like so:
npm login --scope @activeviam --registry https://activeviam.jfrog.io/artifactory/api/npm/activeviam-npm-accelerators/
The result should be the following message:
Logged in as username to scope @activeviam on https://activeviam.jfrog.io/artifactory/api/npm/activeviam-npm-accelerators/.
If the scope isn’t mentioned in the message, they might have to change the command to:
npm login --scope=@activeviam --registry=https://activeviam.jfrog.io/artifactory/api/npm/activeviam-npm-accelerators/
Source
Download and unzip the source zip from the Artifactory page.
Build
-
In order to compile the source code using Maven, you must set your
MAVEN_OPTSenvironment variable, like so:MAVEN_OPTS="-Xss8m" -
Once you have added all the Maven repositories and extracted the source code, run
mvn installon the parent pom file to build the entire project.This will build the Atoti Server executable JAR file (cvarc-starter/target/cvarc-starter-exec.jar), ActiveMonitor executable JAR file (cvarc-activemonitor/target/cvarc-activemonitor-4.0.3-exec.jar) .
-
When the build is complete, you must deploy it. See Deployment.
-
Build the standalone UI application using npm or yarn.
-
Deploy the UI application.
Configuration
The only configuration required to start is to edit cvarc-starter/src/main/resources/properties/cvarc.properties
Set input.data.root.dir.path to the directory you want to put your data.
Alternatives
- If you only want to use the sample data embedded in the project along with the Jetty server, then you don’t need to configure the data directory.
- You can copy the sample data (
cvarc-starter/src/test/resources/data-samples/data/) intocvarc-starter/src/main/resources/then the sample data will be included in the .jar file and you won’t need to set the data directory.
Deployment
Atoti Server and ActiveMonitor
From 2.1.0 onwards, the cvarc-starter and cvarc-activemonitor are Spring Boot applications that build to an executable JAR. To deploy the executable JAR files, simply use the following commands:
java -jar cvarc-starter-exec.jar
and
java -jar cvarc-activemonitor-4.0.3-exec.jar
note
Each executable JAR will publish the application on a different port. The default port for cvarc-starter is 9090, and for cvarc-activemonitor is 9091.
Atoti Server will be available at: http://<your hostname>:9090/cvarc-starter/
ActiveMonitor will be available at: http://<your hostname>:9091/cvarc-activemonitor/
You can change the port by either of the following:
-
Use the argument
server.port.For example:
java -jar cvarc-starter-exec.jar --server.port=<port> -
Externalize the properties files (see Externalizing Properties Files )
[Eclipse / IntelliJ] + Jetty
MAVEN_OPTS="-Xms2048m -Xmx4096m -Xss8m"
- Use Maven to run an initial build of the Accelerator
$ mvn clean install. - Start the server by running
CVAWebApplication.javaincvarc-starter/src/java/com/activeviam/cvarc/starter. - The server will run at https://localhost:9090/cvarc-starter
- You will need to compile and serve up the ui from the ui source code, as described in the Atoti UI section.
Extra steps to run in IntelliJ
To successfully run CVA Risk Capital inside IntelliJ, you need to allocate more memory to the IntelliJ compiler. Add the necessary memory flags inside the ‘User-local build process VM options’ field found here:
Preferences | Build, Execution, Deployment | Compiler | 'User-local build process VM options'.
Example value: -Xms2048m -Xmx4096m -Xss8m
Set the values to allocate enough memory to the compiler considering the amount of RAM available in your machine.
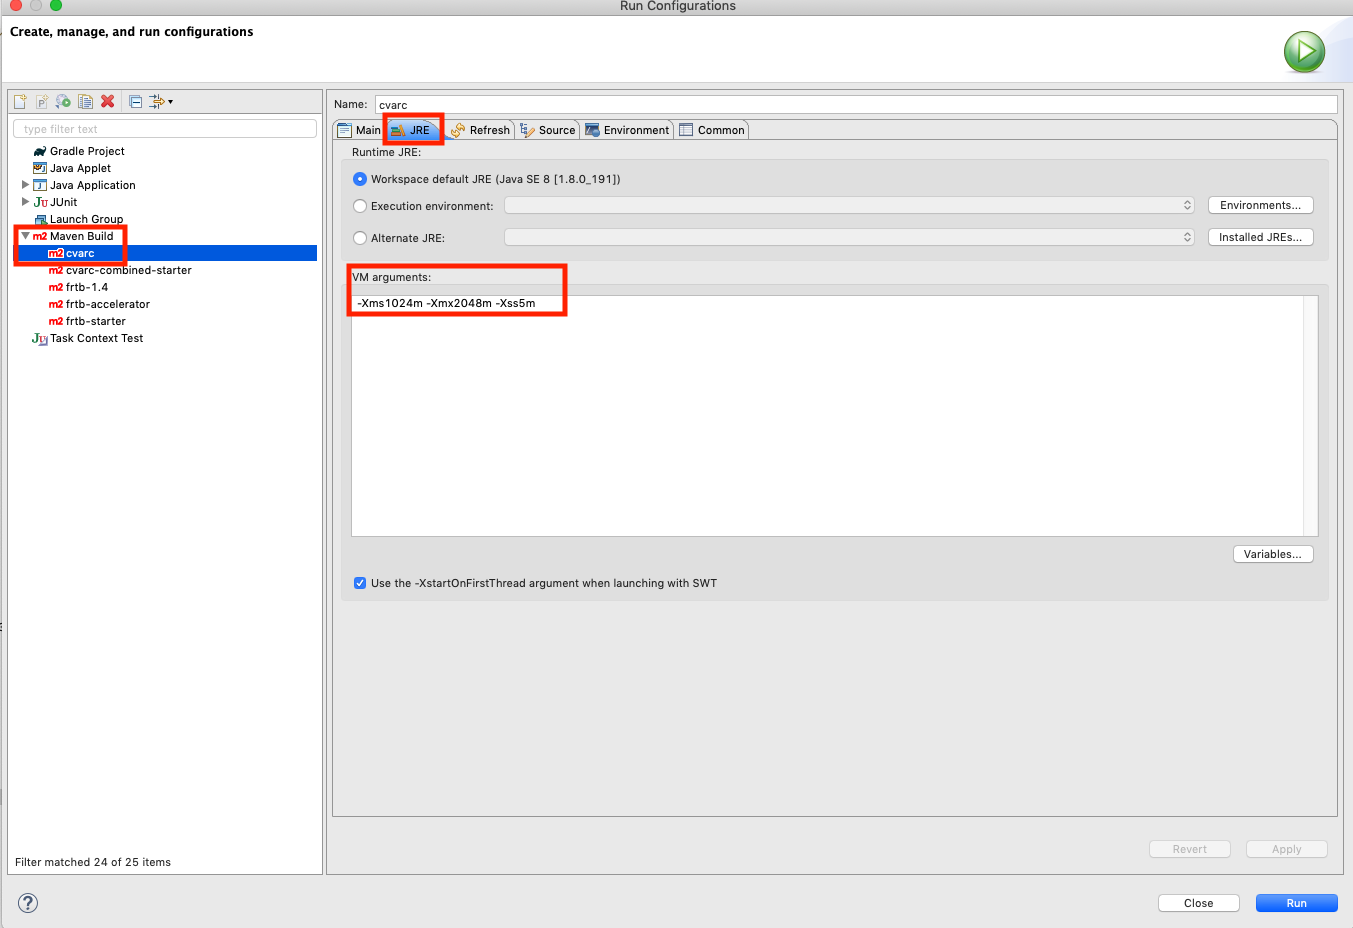
Extra steps to run in Eclipse
To Successfully run CVA Risk Capital inside Eclipse, you will need to allocate more memory to the Eclipse Maven Build:
-Xms1024m -Xmx2048m -Xss5m
How to run all tests
mvn clean install -P IT
Atoti UI
Atoti UI is a static website that can be deployed in any way you see fit. All the necessary files are to be found in the ./build folder of the standalone application after the project has been built.
As an example, the UI can be deployed on Tomcat using the following instructions:
-
Build the standalone application:
- Set up artifactory access for node dependencies
- Download the ui source code from artifactory.
- Copy the lockfile for the build tool you use (i.e. package-lock.json for npm, yarn.lock for yarn) into the project’s main directory.
- Run
npm ciif using npm, oryarn install --frozen-lockfileif using yarn. - Run
npm run buildif using npm, oryarn buildif using yarn.
-
Place the deployment in the webapps folder of your Tomcat:
- Find where the webapps folder is for your Tomcat.
- Create a folder called cvarc-activeui in the Tomcat webapps folder.
- Copy the contents from the build folder into your new folder webapps/cvarc-activeui/.
-
Start the Tomcat server. You can now access the UI on the address http://<your hostname>:<port>/cvarc-activeui/.
Externalizing properties files
In the default implementation, all the necessary properties are within the project. A number of properties files have been externalized and can be overridden with an external file using JVM variables. You may wish to use this functionality if you are running the project in different environments. Below is a list of the files together with their respective variable names:
There are three options to override default properties:
- OPTION 1: Command line arguments, e.g.
<span class="measure"> --csvSource.dataset=/path/to/folder</span>.
note
We use “–” to set properties with Spring Boot.
-
OPTION 2: Create a properties file (e.g.
<span class="measure">application.properties</span>)and add your property overrides. Then pass it to the main using the command line argument<span class="measure">--spring.config.additional-location=/<path> application.properties</span> -
OPTION 3: Change the path to the default properties file using the appropriate variable specified below:
File Variable Name cvarc.properties app.env.properties.file.path hibernate.properties hibernate.env.properties.file.path If any of the above variables are not set, the default properties files will be used.
Example values for these properties files include:
-
classpath:<filename>
-
file:/home/etc/<filename>; - Unix Environment
-
file:///C:/Users/john/config/<filename> - Windows environment
-
tip
Options 1 and 2 are recommended because they only override the properties you specify and use the defaults for other ones. Additionally, they can be used to override any property.
Option 3 only works for specific properties files (i.e. the ones specified in the table above), and replaces the default file completely, meaning you need to make a copy of the default file and have all properties in your external custom file even if they have the same value as the default file.