> ## Documentation Index
> Fetch the complete documentation index at: https://docs.activeviam.com/llms.txt
> Use this file to discover all available pages before exploring further.

# File Upload

The **File Upload** widget enables you to create or append a WhatIf scenario by uploading TSV files into the Cube.

To use File Upload:

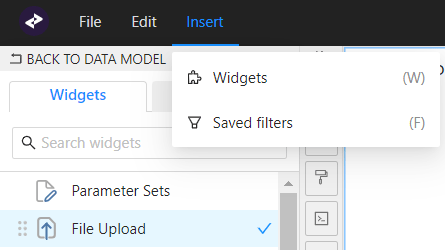
1. In the top left menu, click **Insert** > **Widgets**, then drag and drop the **File Upload** widget into the view:

<img src="https://mintcdn.com/activeviam/9HwjpAnCRKd_31pF/solutions/simm/3.0/images/file-upload-icon.png?fit=max&auto=format&n=9HwjpAnCRKd_31pF&q=85&s=f1e16ee254eef66988744beeecfabfa2" alt="File Upload icon" width="445" height="250" data-path="solutions/simm/3.0/images/file-upload-icon.png" />

On initial display, you will be asked to select from a list of topics which are configured and have available data.
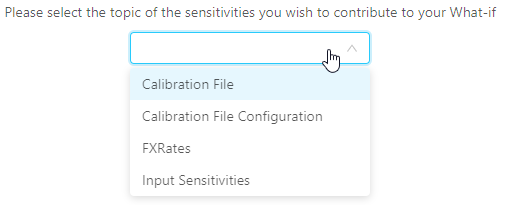
<img src="https://mintcdn.com/activeviam/9HwjpAnCRKd_31pF/solutions/simm/3.0/images/whatif-topic-select.png?fit=max&auto=format&n=9HwjpAnCRKd_31pF&q=85&s=d4a4657717b7cf4edf0dfd52932aef63" alt="Illustrating Sensitivity Upload topic Selector" width="505" height="205" data-path="solutions/simm/3.0/images/whatif-topic-select.png" />

| File                           | Description                                                                                                                                                        |
| ------------------------------ | ------------------------------------------------------------------------------------------------------------------------------------------------------------------ |
| Calibration File               | Loads calibration data.                                                                                                                                            |
| Calibration File Configuration | Defines the necessary configuration data for adding a new calibration dataset. See note on ["Calibration File Configuration" usage](#calibration-file-config-note) |
| FxRates                        | Loads data to the FXRates data store.                                                                                                                              |
| Input Sensitivities            | Loads sensitivity input data.                                                                                                                                      |
<br />

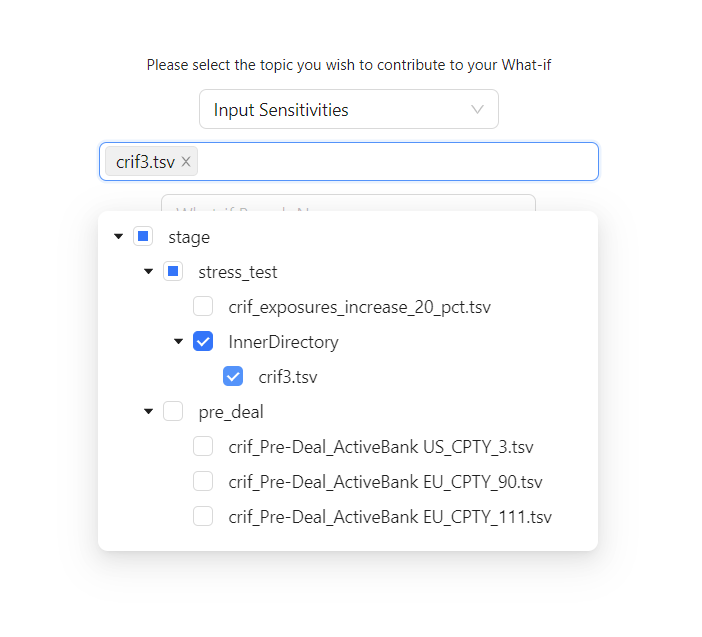
2. The next step is to select a file. Below the topic selector you can expand a directory structure containing the files available for the upload associated with the selected topic.

<img src="https://mintcdn.com/activeviam/9HwjpAnCRKd_31pF/solutions/simm/3.0/images/whatif-upload-select-file.png?fit=max&auto=format&n=9HwjpAnCRKd_31pF&q=85&s=dceb5b703d71ed4916ac027234c1ac77" alt="Illustrating Sensitivity Upload File Selector" width="702" height="637" data-path="solutions/simm/3.0/images/whatif-upload-select-file.png" />

3. Once files have been selected, you can give the branch a name and upload.
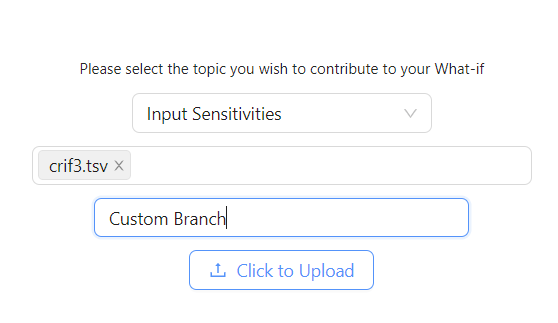
<img src="https://mintcdn.com/activeviam/9HwjpAnCRKd_31pF/solutions/simm/3.0/images/whatif-upload-branch-name.png?fit=max&auto=format&n=9HwjpAnCRKd_31pF&q=85&s=e3b9873ad0c200ccb3ddbb33e088d40a" alt="Illustrating Sensitivity Upload Branch Name" width="558" height="323" data-path="solutions/simm/3.0/images/whatif-upload-branch-name.png" />

By clicking upload, a branch with the given name is created or appended with the tuples from the uploaded files<sup><a id="fnref:1" /><a href="#fn:1" className="footnote-ref" role="doc-noteref">1</a></sup>.

<Note>
  <span id="calibration-file-config-note" /> **Calibration File Configuration usage**<br />To define an entirely new calibration dataset, you must first upload a "Calibration File Configuration" file which defines the necessary configuration for a new calibration dataset.
  Once the branch is created with the "Calibration File Configuration" you can upload the "Calibration File" to the same branch. The "Calibration File Configuration" is used to populate the [Calibration Support Store](../datastores/calibrations-support)
</Note>

<Tip>To view the experimental calculations, add the [Epoch](../cube/dimensions/epoch) hierarchy into the view, for example, on columns of your Pivot Table. You may also want to set a filter on this hierarchy and select: "master" and your branch.</Tip>

<div className="footnotes" role="doc-endnotes">
  <hr />

  <ol>
    <li><a id="fn:1" /><p>The Data Load Controller will load the experimental data. For more details on the DLC, see the [Data Connectors](https://docs.activeviam.com/products/modules/data-connectors/latest/online-help/dlc-overview.html) documentation. <a href="#fnref:1" className="footnote-backref" role="doc-backlink">↩︎</a></p></li>
  </ol>
</div>
