> ## Documentation Index
> Fetch the complete documentation index at: https://docs.activeviam.com/llms.txt
> Use this file to discover all available pages before exploring further.
# Integrate Atoti UI components
> How to embed Atoti UI components into a React application using PluginsProvider, ClientsProvider, IntlProvider, ThemeProvider, and UserProvider from @activeviam/atoti-ui-sdk, with the Widget component as a worked example.
This page shows how to integrate Atoti UI components into a [React](https://reactjs.org/) application.
To understand what follows, you must be familiar with [React
Components](https://reactjs.org/docs/components-and-props.html) and
[Context](https://reactjs.org/docs/context.html).
The list of all Atoti UI components is available [here](./reference/components).
Integrating these components into a React application presents common challenges. We will consider the [Widget](./reference/components#widget) component as an example, in order to understand these challenges and learn how to overcome them.
To integrate Atoti UI components, you must first add `@activeviam/atoti-ui-sdk` as a dependency. To do it, you can open a terminal in the root folder of your project and run:
```bash theme={"languages":{"custom":["/engine/python-sdk/0.9/languages/pycon.tmLanguage.json"]}}
npm add @activeviam/atoti-ui-sdk
```
## The Widget component
Widget is a versatile component: it can be used to display different things. For instance, it can be a pivot table, a line chart or a gauge. In Atoti, this component is displayed within [dashboards](../user-guide/create-a-dashboard/dashboards). Let's leverage it to integrate a pivot table into a React application.
The following is a naive attempt at displaying a `Widget`. It will not work because it omits two mandatory props: `queryId` and `widgetState`.
```tsx theme={"languages":{"custom":["/engine/python-sdk/0.9/languages/pycon.tmLanguage.json"]}}
import { Widget } from "@activeviam/atoti-ui-sdk";
const App = () => {
return ;
};
```
### queryId
`queryId` allows to share queries and their associated results across your application. Assuming that only one pivot table is displayed, its value does not matter as long as it remains constant.
```tsx theme={"languages":{"custom":["/engine/python-sdk/0.9/languages/pycon.tmLanguage.json"]}}
import { Widget } from "@activeviam/atoti-ui-sdk";
const App = () => {
return ;
};
```
### widgetState
`widgetState` defines what `Widget` represents. In Atoti, this object is saved when a user saves a dashboard. It can take different values, depending on what you wish to display.
`widgetState` must be deserialized before being used. See
[deserializeWidgetState](./reference/functions#deserializewidgetstate).
Here is a possible value for `widgetState`:
```tsx theme={"languages":{"custom":["/engine/python-sdk/0.9/languages/pycon.tmLanguage.json"]}}
import { Widget, deserializeWidgetState } from "@activeviam/atoti-ui-sdk";
const serializedWidgetState = {
widgetKey: "pivot-table",
mapping: {
rows: ["[Countries].[Country].[Country_Name]"],
columns: ["ALL_MEASURES"],
measures: ["[Measures].[contributors.COUNT]"],
},
query: {
mdx: `SELECT
[Countries].[Country].[Country_Name].Members ON ROWS,
[Measures].[contributors.COUNT] ON COLUMNS
FROM [Green-growth]`,
},
serverKey: "my-server",
name: "Count by country",
};
const widgetState = deserializeWidgetState(serializedWidgetState);
const App = () => {
return ;
};
```
## PluginsProvider
The code above yields a [PluginNotFoundError](./reference/errors#pluginnotfounderror). This is because it refers to the `widgetKey` *"pivot-table"* without providing any widget plugin for this key.
This can be fixed by wrapping `Widget` in a [PluginsProvider](./reference/context-providers#pluginsprovider) and passing the corresponding widget plugin.
```diff theme={"languages":{"custom":["/engine/python-sdk/0.9/languages/pycon.tmLanguage.json"]}}
import {
deserializeWidgetState,
Widget,
+ PluginsProvider,
+ pluginWidgetPivotTable,
} from "@activeviam/atoti-ui-sdk";
+ const plugins = {
+ widget: {
+ "pivot-table": pluginWidgetPivotTable
+ }
+ };
const App = () => {
return (
+
+
);
};
```
## ClientsProvider
After fixing the `PluginNotFoundError`, you will face a [ClientsNotFoundError](./reference/errors#clientsnotfounderror). This is because `Widget` needs to interact with servers in order to run its query and retrieve user settings. To fix this error, you must use a [ClientsProvider](./reference/context-providers#clientsprovider) and provide two clients:
* an [AtotiClient](./reference/types#atotiClient), allowing children components to run MDX queries.
* a [ContentClient](./reference/types#contentclient), allowing them to interact with a content server.
This can be done as follows. Note that you should replace the URLs in the snippet below in order to target your own servers.
```diff theme={"languages":{"custom":["/engine/python-sdk/0.9/languages/pycon.tmLanguage.json"]}}
import {
deserializeWidgetState,
Widget,
PluginsProvider,
pluginWidgetPivotTable,
+ createAtotiClient,
+ createContentClient,
+ ClientsProvider,
} from "@activeviam/atoti-ui-sdk";
+ const atotiClient = createAtotiClient({
+ url: "https://activeui-tutorial-server.activeviam.com:9090",
+ serverVersion: "5.10.1",
+ serviceVersion: {
+ id: "5",
+ restPath: "/pivot/rest/v5",
+ wsPath: "/pivot/ws/v5",
+ },
+ });
+
+ const contentClient = createContentClient({
+ url: "https://activeui-tutorial-server.activeviam.com:9090",
+ serverVersion: "5.10.1",
+ serviceVersion: {
+ id: "5",
+ restPath: "/content/rest/v5",
+ wsPath: "/content/ws/v5",
+ },
+ });
+
+ const clients = {
+ atoti: {
+ "my-server": atotiClient
+ },
+ content: contentClient
+ }
const App = () => {
return (
+
+
);
};
```
For the widget to work, you must call `atotiClient.loadDataModel`. Otherwise, you will be prompted with an infinite *"Loading data model for “my-server”* message later on.
These functions can be called just once, when `App` is mounted.
```diff theme={"languages":{"custom":["/engine/python-sdk/0.9/languages/pycon.tmLanguage.json"]}}
+ import { useEffect } from "react";
const App = () => {
+ useEffect(() => {
+ atotiClient.loadDataModel();
+ }, [])
return (
);
};
```
## IntlProvider
After fixing the `ClientsNotFoundError`, you will see a [react-intl](https://formatjs.io/docs/react-intl/) error:
```
[React Intl] Could not find required `intl` object. needs to exist in the component ancestry.
```
This is because `Widget` requires translations, in order to work for different locales.
To fix this error, you must first add `react-intl` as a dependency:
```bash theme={"languages":{"custom":["/engine/python-sdk/0.9/languages/pycon.tmLanguage.json"]}}
npm add react-intl
```
`IntlProvider` can be imported from `react-intl` and used to provide the translations:
```diff theme={"languages":{"custom":["/engine/python-sdk/0.9/languages/pycon.tmLanguage.json"]}}
import {
deserializeWidgetState,
Widget,
PluginsProvider,
pluginWidgetPivotTable,
createAtotiClient,
createContentClient,
ClientsProvider,
+ fetchTranslations,
} from "@activeviam/atoti-ui-sdk";
import {
useEffect,
+ useState,
} from "react";
+ import { IntlProvider } from "react-intl";
const App = () => {
+ const [translations, setTranslations] = useState | null>(null);
useEffect(() => {
atotiClient.loadDataModel();
+ const initTranslations = async () => {
+ const fetchedTranslations = await fetchTranslations("en-US");
+ setTranslations(fetchedTranslations);
+ };
+ initTranslations();
}, []);
+ if (translations === null) {
+ return null;
+ }
return (
+
+
)
};
```
## ThemeProvider
Next, you will encounter a *"Missing theme"* error:
```
Missing theme. Remember to add at the top of your application.
```
Atoti UI components require a [Theme](./reference/types#theme), defining their style.
Styling will require additional steps in order to work entirely. These steps are detailed in [the last section in this page](#styling).
But first, you must use a [ThemeProvider](./reference/context-providers#themeprovider) to provide a theme and get past this error:
```diff theme={"languages":{"custom":["/engine/python-sdk/0.9/languages/pycon.tmLanguage.json"]}}
import {
deserializeWidgetState,
Widget,
PluginsProvider,
pluginWidgetPivotTable,
createAtotiClient,
createContentClient,
ClientsProvider,
fetchTranslations,
+ ThemeProvider,
+ lightActiveViamTheme,
} from "@activeviam/atoti-ui-sdk";
const App = () => {
return (
+
+
)
};
```
## UserProvider
You are finally facing the last error of this stack: [UserNotFoundError](./reference/errors#usernotfounderror).
`Widget` is attempting to know who the current user is, in order to retrieve her settings. But no user is provided.
To fix this error, you must provide a user through [UserProvider](./reference/context-providers#userprovider). This depends on how users are managed in your application, which goes beyond the scope of this guide.
To move forward, we will provide a dummy user. We will also create a new `useEffect` hook, which will call the `contentClient.loadSettings` function whenever `user.username` changes. This will ensure that the appropriate user settings are loaded.
```diff theme={"languages":{"custom":["/engine/python-sdk/0.9/languages/pycon.tmLanguage.json"]}}
import {
deserializeWidgetState,
Widget,
PluginsProvider,
pluginWidgetPivotTable,
createAtotiClient,
createContentClient,
ClientsProvider,
fetchTranslations,
ThemeProvider,
lightActiveViamTheme,
+ UserProvider,
} from "@activeviam/atoti-ui-sdk";
+ const user = {
+ username: "anonymous",
+ userRoles: ["ROLE_USER"]
+ };
+ useEffect(() => {
+ contentClient.loadSettings(user.username);
+ }, [user.username]);
const App = () => {
return (
+
+
)
};
```
## Styling
Providing a [Theme](./reference/types#theme) (as shown above) is not enough to style the pivot table correctly.
Depending on the structure of your DOM, you might see a blinking message and then nothing:
 If you do not see this problem, you can safely skip the section below.
### Fix invisible pivot table
In the case illustrated above, the pivot table unexpectedly remains invisible after the data model finishes loading.
To fix this issue, you must make sure that the pivot table's parent element has a non-zero height. Indeed, the pivot table is virtualized: it only appends children elements to the DOM depending on how much room is available for them, which makes it performant even in the case of very big datasets. In order to do so, it requires its parent element to have a defined height.
This fix depends on your project. For instance, if you generated it using [create-react-app](https://github.com/facebook/create-react-app) and are rendering the pivot table at the root of the application, like the snippets in this page do, then you can fix it by adding the following to your `index.css`:
```css theme={"languages":{"custom":["/engine/python-sdk/0.9/languages/pycon.tmLanguage.json"]}}
html,
body,
#root {
height: 100%;
}
```
### Fix alignment
At this point, the pivot table is visible but looks broken:
If you do not see this problem, you can safely skip the section below.
### Fix invisible pivot table
In the case illustrated above, the pivot table unexpectedly remains invisible after the data model finishes loading.
To fix this issue, you must make sure that the pivot table's parent element has a non-zero height. Indeed, the pivot table is virtualized: it only appends children elements to the DOM depending on how much room is available for them, which makes it performant even in the case of very big datasets. In order to do so, it requires its parent element to have a defined height.
This fix depends on your project. For instance, if you generated it using [create-react-app](https://github.com/facebook/create-react-app) and are rendering the pivot table at the root of the application, like the snippets in this page do, then you can fix it by adding the following to your `index.css`:
```css theme={"languages":{"custom":["/engine/python-sdk/0.9/languages/pycon.tmLanguage.json"]}}
html,
body,
#root {
height: 100%;
}
```
### Fix alignment
At this point, the pivot table is visible but looks broken:
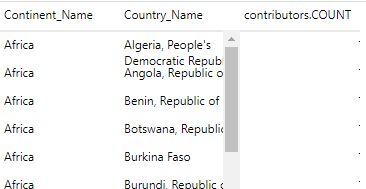 To fix this, you must generate and attach the CSS corresponding to your theme.
To generate this CSS, you will require a new dependency called `@activeviam/atoti-ui-scripts`:
```bash theme={"languages":{"custom":["/engine/python-sdk/0.9/languages/pycon.tmLanguage.json"]}}
npm add @activeviam/atoti-ui-scripts
```
Run it as follows:
```bash theme={"languages":{"custom":["/engine/python-sdk/0.9/languages/pycon.tmLanguage.json"]}}
npm atoti-ui-scripts generate-css --output-path ./src/style
```
Notice that it created a couple files under `src/styles`.
Import the one corresponding to your theme, in `App.tsx`:
```tsx theme={"languages":{"custom":["/engine/python-sdk/0.9/languages/pycon.tmLanguage.json"]}}
import "./style/light-activeviam.antd.css";
```
In order for these styles to taken into account, `Widget` must have a parent with the `"ant-root"` className. Note that everything below the element with the `"ant-root"` className will be impacted by global styles, which can cause visual bugs to your application. You can therefore add this element just once at the top of your application if it works for you, or more locally around Atoti UI components otherwise.
```diff theme={"languages":{"custom":["/engine/python-sdk/0.9/languages/pycon.tmLanguage.json"]}}
+
```
To fix this, you must generate and attach the CSS corresponding to your theme.
To generate this CSS, you will require a new dependency called `@activeviam/atoti-ui-scripts`:
```bash theme={"languages":{"custom":["/engine/python-sdk/0.9/languages/pycon.tmLanguage.json"]}}
npm add @activeviam/atoti-ui-scripts
```
Run it as follows:
```bash theme={"languages":{"custom":["/engine/python-sdk/0.9/languages/pycon.tmLanguage.json"]}}
npm atoti-ui-scripts generate-css --output-path ./src/style
```
Notice that it created a couple files under `src/styles`.
Import the one corresponding to your theme, in `App.tsx`:
```tsx theme={"languages":{"custom":["/engine/python-sdk/0.9/languages/pycon.tmLanguage.json"]}}
import "./style/light-activeviam.antd.css";
```
In order for these styles to taken into account, `Widget` must have a parent with the `"ant-root"` className. Note that everything below the element with the `"ant-root"` className will be impacted by global styles, which can cause visual bugs to your application. You can therefore add this element just once at the top of your application if it works for you, or more locally around Atoti UI components otherwise.
```diff theme={"languages":{"custom":["/engine/python-sdk/0.9/languages/pycon.tmLanguage.json"]}}
+
```