> ## Documentation Index
> Fetch the complete documentation index at: https://docs.activeviam.com/llms.txt
> Use this file to discover all available pages before exploring further.
# Set up
> How to install and start Atoti UI using the atoti-ui-starter or atoti-ui-starter-source from Artifactory, covering the three setup paths: no customizations, with customizations using ExtensionModule, and integrating Atoti UI components into an existing application.
**Atoti UI** is an off-the-shelf web application allowing users to create and share real-time dashboards, based on large amounts of data stored in [Atoti](https://docs.activeviam.com/engine/java-sdk/latest/).
It is extensible via [plugins](../reference/types#plugin).
**The Atoti JavaScript API** is the [TypeScript](https://www.typescriptlang.org/) library behind Atoti. It exports building blocks, usable in any application.
## Log into Artifactory
You need to download the appropriate artifacts from our [Artifactory](https://activeviam.jfrog.io/ui/repos/tree/General/activeui-generic-release).
In the left bar, expand the `activeui-generic-release` folder. Inside that, expand the latest available release folder.
To download ActiveViam artifacts you need credentials to access our private JFrog Artifactory. Raise a support ticket to request these if needed.
## Use Atoti UI
There are three ways to get started with Atoti UI.
1. [Use Atoti UI with no customizations](./set-up#use-atoti-ui-with-no-customizations).
2. [Use Atoti UI with customizations](./set-up#use-atoti-ui-with-customizations).
3. [Integrate Atoti UI components into an existing application](./set-up#integrate-atoti-ui-components-into-an-existing-application).
### Use Atoti UI with no customizations
1. Download atoti-ui-starter-5.2.25.zip from Artifactory.
2. Unzip it.
3. Edit `env.js` to [configure server connections](./set-up#configure-server-connections-env-js).
### Use Atoti UI with customizations
Make sure you have [NodeJS](https://nodejs.org/en/download/) version 18.12.1 or greater installed.
Download the artifact called *"atoti-ui-starter-source-5.2.25.zip"*.
In the terminal, run the following command:
```bash theme={"languages":{"custom":["/engine/python-sdk/0.9/languages/pycon.tmLanguage.json"]}}
npm install
```
This installs the Atoti UI starter. In particular, it downloads all the dependencies our project needs.
The first time you run it, you will encounter the following error:
> An unexpected error occurred: "[https://registry.yarnpkg.com/@activeviam/atoti-ui-scripts](https://registry.yarnpkg.com/@activeviam/atoti-ui-scripts): Not found".
This is expected: `@activeviam` modules are published to Artifactory, not NPM.
To fix this, run the following command where `{username}` and `{password}` must be replaced with your ActiveViam credentials:
```bash Bash theme={"languages":{"custom":["/engine/python-sdk/0.9/languages/pycon.tmLanguage.json"]}}
curl -u '{username}:{password}' https://activeviam.jfrog.io/artifactory/developer-guide/reference/npm/activeui-npm-release/auth/activeviam >> ~/.npmrc
```
```bash Windows cmd theme={"languages":{"custom":["/engine/python-sdk/0.9/languages/pycon.tmLanguage.json"]}}
curl -u "{username}:{password}" https://activeviam.jfrog.io/artifactory/developer-guide/reference/npm/activeui-npm-release/auth/activeviam >> %USERPROFILE%\.npmrc
```
After running this command, your .npmrc file should include the following lines:
```
@activeviam:registry=https://activeviam.jfrog.io/artifactory/developer-guide/reference/npm/activeui-npm-release/
//activeviam.jfrog.io/artifactory/developer-guide/reference/npm/activeui-npm-release/:_password={base64_encoded_password}
//activeviam.jfrog.io/artifactory/developer-guide/reference/npm/activeui-npm-release/:username={username}
//activeviam.jfrog.io/artifactory/developer-guide/reference/npm/activeui-npm-release/:email={email}
//activeviam.jfrog.io/artifactory/developer-guide/reference/npm/activeui-npm-release/:always-auth=true
```
From here you can [extend](../customize-atoti-ui/reuse-extensions/create-reusable-extensions) your application or create [customizations](../customize-atoti-ui/customize-the-dashboard/create-a-custom-widget).
### Integrate Atoti UI components into an existing application
See the following [documentation page](../integrate-atoti-ui-components) for a step by step guide.
## Configure server connections (env.js)
`env.js` specifies which servers Atoti UI connects to.
The file can be edited in an existing deployment at any time.
Changes take effect on the next page refresh, with no rebuild and no server restart required.
This makes it possible to promote the same artifact across environments (for example, from UAT to production) or to redirect a deployment to a different server.
### `env.js` structure
The file assigns a plain object to `window.env` with three required top-level properties.
The following example shows a minimal configuration:
```javascript theme={"languages":{"custom":["/engine/python-sdk/0.9/languages/pycon.tmLanguage.json"]}}
window.env = {
jwtServer: {
url: "https://my-server.com",
version: "6.0.5",
},
contentServer: {
url: "https://my-server.com",
version: "6.0.5",
},
atotiServers: {
"my-server": {
url: "https://my-server.com",
version: "6.0.5",
},
},
};
```
### Properties
Each of the three top-level properties — `jwtServer`, `contentServer`, and each entry in `atotiServers` — is a server object with the following fields:
| Field | Type | Description |
| --------- | ------ | ---------------------------------------------------------------------------------------------------------- |
| `url` | string | The URL at which the server is reachable from the browser. |
| `version` | string | The version of [Atoti Server](https://docs.activeviam.com/engine/java-sdk/latest/) running on that server. |
The top-level properties are described below.
#### `jwtServer`
The server exposing the [JWT authentication](../authentication) service.
Atoti UI authenticates once against this server.
The resulting JWT is used for all subsequent requests to every configured server.
#### `contentServer`
The server hosting the [content server](https://docs.activeviam.com/engine/java-sdk/latest/content_server/cs_overview/), where dashboards, widgets, filters, and settings are persisted.
#### `atotiServers`
A map of Atoti servers the application can query, keyed by a string server key.
The map must contain at least one entry.
Multiple entries are supported.
A single Atoti Server instance can act as both the JWT server and the content
server. In that case, the `url` values for `jwtServer`, `contentServer`, and
the `atotiServers` entry are all identical.
Changing the keys of `atotiServers` breaks previously saved widgets and
dashboards, because each saved widget references its server by key. To rename
a key, also update the `serverKey` attribute of every affected widget on the
content server.
## Initialize the Content Server
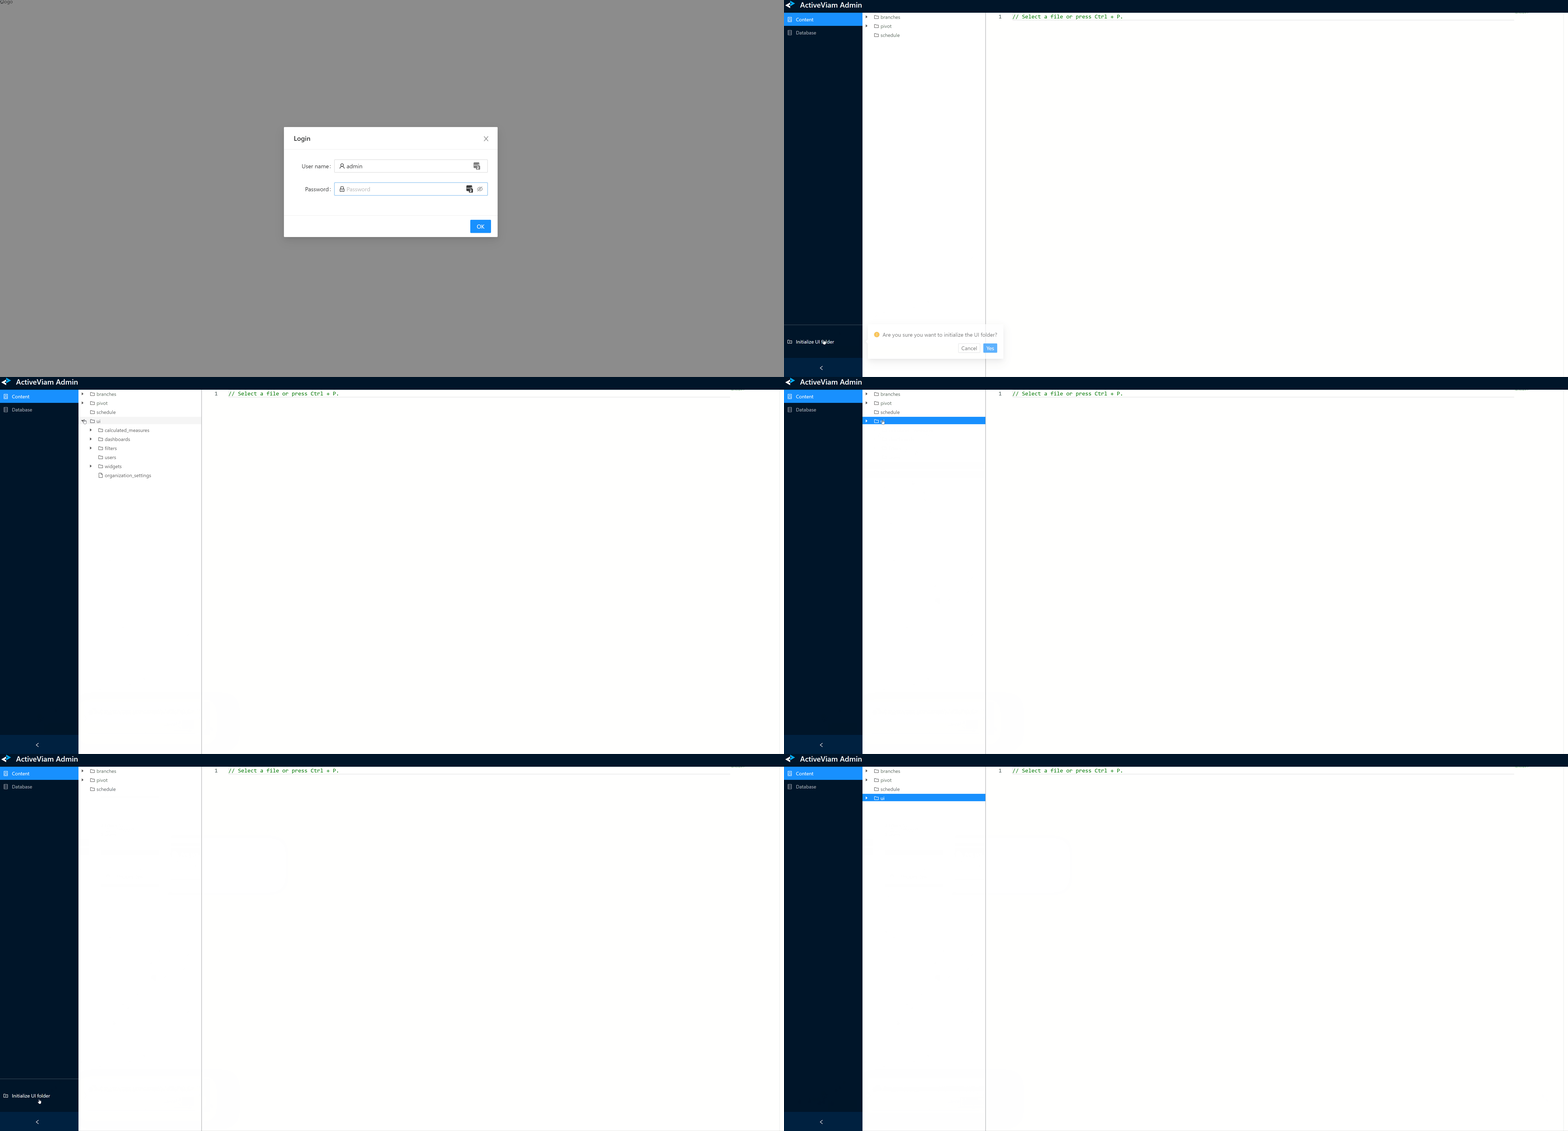
Connect to **Atoti Admin UI** (usually accessible at */admin* under your server URL) as a user with admin privileges, and click the dedicated button shown below:
 Then serve the