> ## Documentation Index
> Fetch the complete documentation index at: https://docs.activeviam.com/llms.txt
> Use this file to discover all available pages before exploring further.
# View, edit, copy, and delete limits
> How to view, edit, copy, and delete limits in the Inventory, including how to open a limit's detail panel and review its change history.
This section walks you through the various actions you can carry out on individual limits.
## View limits
To view a limit structure and the limits associated with it, click its name in the [Inventory](./limits-inventory) table.
This opens the limit’s structure details as well as the list of limit scopes/values.
 You can view only your active limits by selecting “Active limits” from the filter. Alternatively, you can choose “All limits” to see every limit, including those that have been deleted or have expired.
To close the limit structure details, at the bottom of the **Limit Structure** panel, click **Cancel**.
## Limit actions
Once you have the list of limits open, you can do the following:
* [View the limit history](#view-the-limit-history)
* [Create temporary limit](#create-temporary-limit)
* [Edit a limit](#edit-a-limit)
* [Copy a limit](#copy-a-limit)
* [Delete a limit](#delete-a-limit)
You can view only your active limits by selecting “Active limits” from the filter. Alternatively, you can choose “All limits” to see every limit, including those that have been deleted or have expired.
To close the limit structure details, at the bottom of the **Limit Structure** panel, click **Cancel**.
## Limit actions
Once you have the list of limits open, you can do the following:
* [View the limit history](#view-the-limit-history)
* [Create temporary limit](#create-temporary-limit)
* [Edit a limit](#edit-a-limit)
* [Copy a limit](#copy-a-limit)
* [Delete a limit](#delete-a-limit)
 Some actions can also be done in bulk, on multiple selected limits.
For adding a new limit, see [Add limit values](./create-limit/create-limit-ui#add-limit-values).
### Create temporary limit
A temporary limit is a limit that co-exists with an official limit for a given period of time. On evaluation, a temporary limit takes precedence over the official limit. It is used to handle extraordinary non-lasting events.
For example, a trader may have an official limit of 1mm on Book A, with no expiration. The trader has an open position on Book A of 900,000, so she is not in breach of her limit. However, due to market volatility, prices have increased and her position has risen to 1.1mm, putting her in breach. She consults her risk manager, and the risk manager envisages that volatility in the market will subside in the next month, but he grants her a temporary limit on Book A of 1.15mm for 6 months. Now, the temporary limit will take precedence over the official limit for 6 months, so the trader’s position of 1.1mm is no longer in breach.
1. In the limits table, on the right, click the Create Temporary Limit button next to the relevant limit.
A new row is added below the selected limit, with type “temporary”.
2. Update the required fields: Value, Start Date, End Date, then click **Save**.
Temporary limits cannot be created with a Start Date prior to the [Limits as-of-date](../input-files/as_of_date). This is to prevent an invalid retrospective
resolution of a breach by a rogue actor. Furthermore, by definition of being temporary, these limits require an End Date.
A temporary limit follows the workflow of the original limit. If the original limit is StraightThrough, the temporary limit goes to the `Approved` status. If not, it will go through the same approval steps as the original.
### Edit a limit
Only limits in the `Initialized` or `Approved` state can be edited.
To edit a limit:
1. In the limits table, on the right, click the Edit button next to the relevant limit. If authorized, this lets you modify some of the fields in the limit.
Some actions can also be done in bulk, on multiple selected limits.
For adding a new limit, see [Add limit values](./create-limit/create-limit-ui#add-limit-values).
### Create temporary limit
A temporary limit is a limit that co-exists with an official limit for a given period of time. On evaluation, a temporary limit takes precedence over the official limit. It is used to handle extraordinary non-lasting events.
For example, a trader may have an official limit of 1mm on Book A, with no expiration. The trader has an open position on Book A of 900,000, so she is not in breach of her limit. However, due to market volatility, prices have increased and her position has risen to 1.1mm, putting her in breach. She consults her risk manager, and the risk manager envisages that volatility in the market will subside in the next month, but he grants her a temporary limit on Book A of 1.15mm for 6 months. Now, the temporary limit will take precedence over the official limit for 6 months, so the trader’s position of 1.1mm is no longer in breach.
1. In the limits table, on the right, click the Create Temporary Limit button next to the relevant limit.
A new row is added below the selected limit, with type “temporary”.
2. Update the required fields: Value, Start Date, End Date, then click **Save**.
Temporary limits cannot be created with a Start Date prior to the [Limits as-of-date](../input-files/as_of_date). This is to prevent an invalid retrospective
resolution of a breach by a rogue actor. Furthermore, by definition of being temporary, these limits require an End Date.
A temporary limit follows the workflow of the original limit. If the original limit is StraightThrough, the temporary limit goes to the `Approved` status. If not, it will go through the same approval steps as the original.
### Edit a limit
Only limits in the `Initialized` or `Approved` state can be edited.
To edit a limit:
1. In the limits table, on the right, click the Edit button next to the relevant limit. If authorized, this lets you modify some of the fields in the limit.
 2. Once you’ve made your changes, click **Save** in the top right of the screen.
After updating the limit, the workflow state of the limit will depend on the limit workflow that was specified during the [creation of the limit](./create-limit/create-limit-ui).
### Copy a limit
The Copy action allows you to easily create new limits by duplicating existing ones.
1. In the limits table, on the right, click the Copy button next to the relevant limit.
This adds a new limit to the table with all the fields filled in.
2. Edit the fields you need, then click **Save**.
### View the limit history
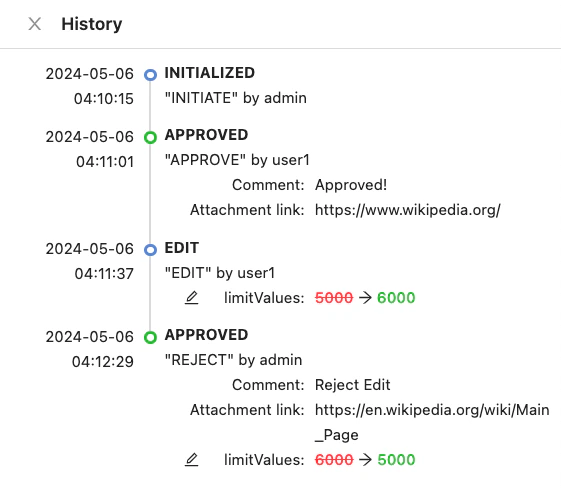
Click the History button to see the audit history of the selected limit. This opens the **History** panel, where you can find details on who created and approved the limit and when, plus any edits, comments or attachment links that were added during the process.
2. Once you’ve made your changes, click **Save** in the top right of the screen.
After updating the limit, the workflow state of the limit will depend on the limit workflow that was specified during the [creation of the limit](./create-limit/create-limit-ui).
### Copy a limit
The Copy action allows you to easily create new limits by duplicating existing ones.
1. In the limits table, on the right, click the Copy button next to the relevant limit.
This adds a new limit to the table with all the fields filled in.
2. Edit the fields you need, then click **Save**.
### View the limit history
Click the History button to see the audit history of the selected limit. This opens the **History** panel, where you can find details on who created and approved the limit and when, plus any edits, comments or attachment links that were added during the process.
 ### Delete a limit
There are a few limitations to deleting a limit:
* The limit must be in a state other than the final state of the workflow. Usually, these are the `Initialized` or `Approved` states.
* For the StraightThrough limit change workflow type, the limit is immediately deleted.
* For the FourEyes limit change workflow type, deleting the limit results in a `Pending Deletion` state, and it has to be approved for it to be deleted. The active user must be authorized to approve the deletion of the limit.
For details on approving/rejecting limits, see [Approve limits](./approve-reject-limit).
To delete limits:
1. In the list of limits, tick the checkbox in front of the limit or limits to delete, then click **Delete** above the table.
### Delete a limit
There are a few limitations to deleting a limit:
* The limit must be in a state other than the final state of the workflow. Usually, these are the `Initialized` or `Approved` states.
* For the StraightThrough limit change workflow type, the limit is immediately deleted.
* For the FourEyes limit change workflow type, deleting the limit results in a `Pending Deletion` state, and it has to be approved for it to be deleted. The active user must be authorized to approve the deletion of the limit.
For details on approving/rejecting limits, see [Approve limits](./approve-reject-limit).
To delete limits:
1. In the list of limits, tick the checkbox in front of the limit or limits to delete, then click **Delete** above the table.
 2. When prompted to confirm the deletion, click **OK**.
The selected limits are deleted, or moved into the `Pending Deletion` state, depending on the workflow.
To delete a limit structure, click **Delete** at the bottom of the **Limit Structure** panel.
2. When prompted to confirm the deletion, click **OK**.
The selected limits are deleted, or moved into the `Pending Deletion` state, depending on the workflow.
To delete a limit structure, click **Delete** at the bottom of the **Limit Structure** panel.