> ## Documentation Index
> Fetch the complete documentation index at: https://docs.activeviam.com/llms.txt
> Use this file to discover all available pages before exploring further.
# Getting started
> How to install and configure the Atoti Limits starter project for development, including Maven and npm repository access, Atoti Server connection setup, and Spring-based customization options
## Prerequisites
Before you begin, ensure you have the following installed:
* JDK21
\+
* Maven 3.8+
### Maven configuration
You will need to add the following repositories in your Maven `settings.xml` or project pom
as described [here](https://maven.apache.org/guides/mini/guide-multiple-repositories.), before installation.
Additionally, please ensure you have access to our private Maven repositories and you are able to [Connect your Maven Client to Artifactory](https://jfrog.com/help/r/jfrog-artifactory-documentation/connect-your-maven-client-to-artifactory).
#### Atoti Server repository
This repository contains all the dependencies required to run Atoti Server. Atoti Limits is itself an
Atoti Server product, which is why this repository is required.
```xml theme={"languages":{"custom":["/engine/python-sdk/0.9/languages/pycon.tmLanguage.json"]}}
ActiveViamInternalRepository
ActiveViam Internal Repository
https://activeviam.jfrog.io/activeviam/mvn/
default
false
```
#### Business Solutions server repository
This repository contains all the dependencies required to run ActiveViam Business Solutions.
```xml theme={"languages":{"custom":["/engine/python-sdk/0.9/languages/pycon.tmLanguage.json"]}}
ActiveViamBusinessSolutionsRepository
ActiveViam Business Solutions Repository
https://activeviam.jfrog.io/activeviam/activeviam-mvn-accelerators/
default
false
```
#### Activiti repository
This repository contains the Activiti dependencies required to run the workflows in Atoti Limits.
```xml theme={"languages":{"custom":["/engine/python-sdk/0.9/languages/pycon.tmLanguage.json"]}}
activiti-releases
https://artifacts.alfresco.com/nexus/content/repositories/activiti-releases
```
### Node Package Manager configuration
Atoti Limits also requires some npm packages to run the UI.
To download the dependencies for the UI, you need to set up access to Artifactory via npm:
```
npm login --scope @activeviam --registry https://activeviam.jfrog.io/artifactory/api/npm/activeviam-npm-accelerators/
```
The result is the following message:
`Logged in as username to scope @activeviam on https://activeviam.jfrog.io/artifactory/api/npm/activeviam-npm-accelerators/.`
If the scope isn’t mentioned in the message, change the command to the following:
```
npm login --scope=@activeviam --registry=https://activeviam.jfrog.io/artifactory/api/npm/activeviam-npm-accelerators/
```
### License
To use Atoti Server, you will need a valid license. Atoti Limits is itself an Atoti Server
product, which is why this license is required. For details on how to install the license, see
[the Atoti Server documentation](https://docs.activeviam.com/products/atoti/server/latest/docs/start/license/).
## Install the starter project
The starter project is a reference Spring Boot application that demonstrates how to use Atoti Limits. It contains
the default configurations and workflows. It can be configured, customized, or extended for your specific use cases
using Spring.
To install the starter project:
1. Download the [Atoti Limits source code](https://activeviam.jfrog.io/artifactory/activeviam-accelerators-artifacts/limits/4.2.1/atoti-limits-4.2.1.zip).
This contains the starter project and the parent pom file.
2. Extract the source code folder into your workspace.
3. Open the project in your IDE.
4. Run `mvn clean install`.
This will compile the source code, run tests, and package the application. You may exclude test execution by running
`mvn clean install -DskipTests`.
## Run the starter
Start the application with:
* Windows:
```shell theme={"languages":{"custom":["/engine/python-sdk/0.9/languages/pycon.tmLanguage.json"]}}
java
--add-opens=java.base/java.util=ALL-UNNAMED
--add-opens=java.base/java.util.concurrent=ALL-UNNAMED
-Dlimits.initial-load.root-dir=
-jar /limits-starter--exec.jar
```
* MacOS/Linux:
```shell theme={"languages":{"custom":["/engine/python-sdk/0.9/languages/pycon.tmLanguage.json"]}}
java
--add-opens=java.base/java.util=ALL-UNNAMED
--add-opens=java.base/java.util.concurrent=ALL-UNNAMED
-Dlimits.initial-load.root-dir=
-Dactiveviam.chunkAllocatorKey=mmap
-jar /limits-starter--exec.jar
```
By default, the application starts on `http://localhost:3090`.
Alternatively, if using your IDE, run the `com.activeviam.solutions.limits.starter.Limits` class.
### Atoti Limits UI
For details on activating the UI features, see [UI Activation](./dev-ui-config/ui-activation).
## Connect Atoti Limits to your Atoti server
### Prerequisites
1. The Atoti server(s) you wish to connect to must contain a slicing date hierarchy. This hierarchy
will be used by Atoti Limits when evaluating limits.
2. User and role configurations must be consistent between Atoti Limits and the connected
Atoti server(s) in order to guarantee proper access control. We recommend placing your security
configurations in a single module and referencing that module in both Atoti Limits and the
Atoti server.
In order to start loading data and evaluating limits, Atoti Limits must be connected to your Atoti server.
Atoti Limits utilizes [Spring Auto-configuration](https://docs.spring.io/spring-boot/reference/using/auto-configuration.)
to create the connection to your Atoti server, minimizing the amount of manual configuration required.
Atoti Limits also supports connections to multiple Atoti servers to allow for managing limits across multiple
applications in one place.
See [How to Integrate Limits to an Atoti Server](./integration) for details on how to set up the connection
between Atoti Limits and your Atoti server(s).
### Externalize connection properties
We recommend externalizing the connection properties into a profile for each Atoti server you wish to connect to
Atoti Limits. This makes it easier to separate server-specific configurations.
Below are examples of property files that can be used to connect to Atoti FRTB and Atoti Market Risk:
```yaml theme={"languages":{"custom":["/engine/python-sdk/0.9/languages/pycon.tmLanguage.json"]}}
limits:
data-access-control:
servers:
FRTB:
role-permissions:
ROLE_RESTRICTED_USER:
structure-groups:
- Desk All PV
structure:
templates:
Book PV Structure:
template-name: Book PV Structure
server-name: FRTB
group: Book All PV
name: Book All PV
kpi-type: GREATER
polling-frequency: EOD
measure-name: PV
absolute-value-indicator: false
warning-threshold: 10
exception-workflow: Exception
limit-changes-workflow: StraightThrough
cube-name: StandardisedApproachCube
scope-keys:
- Book@Books@Booking
activeviam:
apps:
inter-server-event-service:
issuer:
target-servers:
- name: FRTB
url: http://localhost:8080/frtb-starter
```
```yaml theme={"languages":{"custom":["/engine/python-sdk/0.9/languages/pycon.tmLanguage.json"]}}
activeviam:
apps:
inter-server-event-service:
issuer:
target-servers:
- name: MR
url: http://localhost:10010/mr-application
```
Refer to the [Atoti Limits Properties](../user-ref/properties/config-properties/limits-activeviam) for more information on the specific properties used in the examples above.
With these files present, the profiles can then be activated by starting the application with
`-Dspring.profiles.active=frtb` or `-Dspring.profiles.active=mr` respectively, or `-Dspring.profiles.active=frtb,mr`
to connect Atoti Limits to both servers.
## Customize the starter
The following section outlines how to modify the starter project to suit your needs. We recommend that you make changes
in the following order:
1. **Configurations**: these are usually non-code related changes and are the easiest to migrate.
2. **Customizations**: these are usually code additions that can be easily “swapped in” to the existing codebase to
either safely override or augment existing functionality.
3. **Overrides**: these are usually code changes that require a more in-depth understanding of the codebase and may
require changes to existing code. In general, it is not technically possible to perform these changes as a configuration
or customization, for example [overriding the default JPA entities](./dev-extensions/custom-persistence/override-default-managed-objects).
These are the hardest to migrate, and if you need to do them **we recommend you raise a [Jira](https://activeviam.atlassian.net/jira/your-work)**
for us to see if there is a better alternative or if there is a gap in our product that needs to be addressed.
### 1. Configurations
We recommend that you configure the application as much as possible before customizing existing code. The following
configurations are commonly used:
#### Configure application properties
Application properties are used to configure functionality of Atoti Limits and most of its dependencies. These
can be found in the [properties](../user-ref/properties) section and updated by modifying the
`src/main/resources/application.yml` file, or by using environment variables.
#### Database configuration with Spring JPA
By default, the application uses an in-memory H2 database and expects any initial data to be loaded from CSV files.
Using the H2 database in production is not recommended. Instead, please use a production-grade database. There is none
in particular that we recommend, but popular choices include:
* [Postgresql](https://www.postgresql.org/)
* [MSSQL](https://www.microsoft.com/en-us/sql-server)
* [MySQL](https://www.mysql.com/)
If you wish to persist Atoti Limits data to an external database, you’ll need to configure the database
connection in the `application.yml` file. You will need to create and deploy your own database server, but once the
connection is configured, Atoti Limits will automatically create the required tables and schemas for you. See
[Persistence](./persistence) for more information on how to set up the database connection.
#### Performance
Depending on a multitude of factors, such as the number of limits you have, the cardinality of the scopes for your
limits, and/or the volume/schema of the data in the connected Atoti server, the performance of your Atoti Limits
implementation may vary. See [Performance](./integration/performance) for information on
options to improve performance.
### 2. Customizations
When you add new code as a customization to the starter project, we **highly recommend** that you use your own package
name and avoid using the `com.activeviam` package. This will separate your code from our code and make it much easier to
migrate. All customizations should be done in the `limits-starter` module, or in a separate module that depends on
`limits-starter`.
#### Customize via Spring beans
The application follows Spring best practices. To customize, you can override existing beans and components by defining
them in your application. **This is the safest form of overriding or augmenting existing code behavior.** We aim to use
`@ConditionalOnMissingBean` as much as possible to allow for easy customization. If we have not exposed a bean you wish
to override as `@ConditionalOnMissingBean`, **please raise a [Jira](https://activeviam.atlassian.net/jira/your-work)
with us** and mark your bean as `@Primary`.
#### Activiti workflow customization
The application includes default Activiti workflows located in `src/main/resources/processes/`. See [Limit Workflow](./limit-workflow)
for information on the default workflows. If you want to use custom workflows, you need to:
1. Create your BPMN file. You can either edit the existing BPMN files or use a BPMN editor, such as [BPMN.io](https://bpmn.io/).
2. Import any Spring beans or services required by your workflow. This is detailed further in [adding custom workflow
tasks](./dev-extensions/custom-workflow-service).
3. Add the new processes in `src/main/resources/processes/`.
4. Restart the application to ensure the changes are picked up.
#### Security customizations
The application comes with a default security configuration using Spring security. **You need to customize this by
implementing your own security configuration.** This is done by implementing and exposing the following interfaces:
* `com.activeviam.web.spring.api.config.ICorsConfig`: This interface is used to configure CORS settings.
* `org.springframework.security.web.SecurityFilterChain`: This interface is used to configure security filters for REST
requests.
* `org.springframework.security.core.userdetails.UserDetailsService`: This interface is used to load user-specific data.
#### Roles and permissions
Configure the roles assigned to users to control what actions users can perform and assign
permissions to custom roles to control what data they can access in Atoti Limits. See [Roles and Permissions](./roles)
for more information on the default roles provided by Atoti Limits and how to configure custom roles and
permissions.
#### Other customizations
The ability to customize the application is not limited to these examples. Please see the [Extending the Module](./dev-extensions)
section for more in-depth information on the different ways you can customize the application.
### 3. Override
If you cannot configure or customize the application to meet your requirements, you may need to override the
application. This is the most complex form of modification as it requires an in-depth knowledge of the core codebase and
may result in unintended consequences. It is also the most difficult code to migrate, because it may be difficult to
remember if the code was an override in the first place or is a legitimate starter class. We recommend adding a javadoc
to differentiate overrides from released source code.
If you need to override our code we recommend that you raise a [Jira](https://activeviam.atlassian.net/jira/your-work)
ticket with us to see if there is a better alternative or if there is a gap in our product that needs to be addressed.
## Migrate Atoti Limits
When migrating to a new version of Atoti Limits, we recommend the following steps:
1. Ensure your code customizations are under a separate package name from the `com.activeviam` package.
2. Create a new branch in your VCS for the upgrade.
3. If you have overridden any of our code, move it to a `tmp.com.activiam` package. This should only apply to
**overrides**, not to starter code.
4. Install the starter project for your new version, replacing the old starter `com.activeviam` packages with the new
packages.
5. Verify if any of the `tmp.com.activeviam` code can be removed. If so, remove it, otherwise, please raise a [Jira](https://activeviam.atlassian.net/jira/your-work)
and merge it with the new code.
6. Run `mvn clean install`
7. If you have any compilation errors, consult the [changelog](../releases/changelog) and [migration guide](../releases/migration-guide) for the new version.
8. Repeat steps 6-7 until the code compiles and is correctly installed.
## Usage
Atoti Limits can be integrated with any Atoti Server instance with the same version. For more
information, see [How to Connect Limits to an Atoti Server](./integration).
### As of date
The file [as\_of\_date.csv](../user-ref/input-files/as_of_date) sets the asOfDate for the limits application. This asOfDate is used for evaluating limits
against connected Solutions.
### Limit structures
A limit structure defines the business details for a collection of limits and serves as the parent to those limits.
Due to this relationship, limit structures are required to be created before you can start creating limits. You can
configure Atoti Limits to load limit structures from a [CSV file](../user-ref/input-files/limit_structures) or
[database](./persistence) as part of the initial load when the application is started, or manually create them
at runtime via [file upload](../user-ref/using-limits/create-limit/create-limit-upload) or using the [form in the UI](../user-ref/using-limits/create-limit/create-limit-ui).
### Limits
A limit is a business rule that defines a threshold for a specific metric on a given scope. Every limit is associated
with a limit structure, which defines the business details for all limits in the structure. If the parent structures are
defined in a CSV file or database and loaded at startup, the associated limits can also be loaded at startup from a
[CSV file](../user-ref/input-files/limits_approve) or [database](./persistence). You can also create limits
manually at runtime via [file upload](../user-ref/using-limits/create-limit/create-limit-upload) or using the
[form in the UI](../user-ref/using-limits/create-limit/create-limit-ui#add-limit-values).
### EvaluationTasks and the incidents store
EvaluationTasks are created for each limit in the [Limits](../user-ref/datastore/limits-store) store, which evaluates whether a limit is in breach or
warning state. The PollingFrequency field of a limit determines how often an EvaluationTask is run. When limits are in
breach or warning status, the EvaluationTask writes to a file named incidents.csv. You can find this file in today’s
date folder inside the directory `src/test/resources/data-damples/data/{serverName}/incident`. The files generated here
will populate the [Incidents](../user-ref/datastore/incident-store) store via a fetch topic on startup.
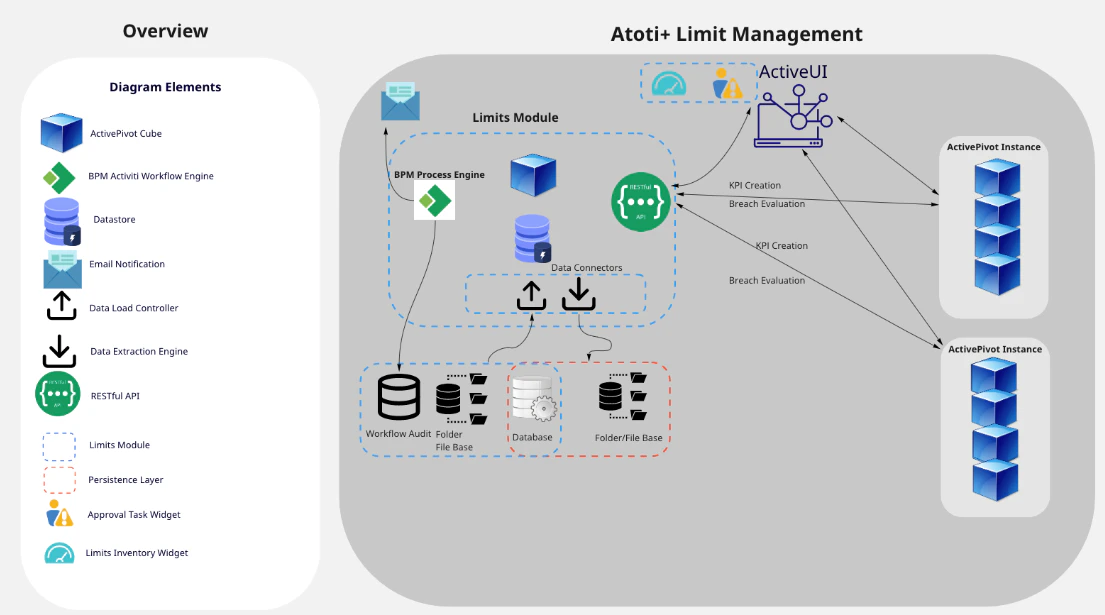
## Limits ecosystem and architecture
In the ActiveViam ecosystem, Atoti Limits runs on its own JVM and is the one-stop shop to manage all the limits
across all Atoti Server cubes. The workflow audit is automatically maintained in the persistent relational
database. All users log into a combined Atoti UI to access all Atoti Server cubes.
 ## Frequently asked questions
We store Maven repositories for all of our artifacts on Artifactory. The core Atoti Server jars are available
in [the ActiveViam share page](https://artifacts.activeviam.com/share/ActivePivot_stable/), as described in the
[Atoti Server download guide](https://docs.activeviam.com/products/atoti/server/latest/docs/start/download/).
From there you can download the Atoti Server 6.1.16 jars.
The Atoti Limits jars are available from the [Business Solutions artifacts repository](https://activeviam.jfrog.io/artifactory/activeviam-accelerators-artifacts/limits/4.2.1/atoti-limits-4.2.1-maven-repository.zip).
From there you can download the Atoti Limits jars. Once downloaded, install these jars in your local repository
and re-run the Maven build.
## Frequently asked questions
We store Maven repositories for all of our artifacts on Artifactory. The core Atoti Server jars are available
in [the ActiveViam share page](https://artifacts.activeviam.com/share/ActivePivot_stable/), as described in the
[Atoti Server download guide](https://docs.activeviam.com/products/atoti/server/latest/docs/start/download/).
From there you can download the Atoti Server 6.1.16 jars.
The Atoti Limits jars are available from the [Business Solutions artifacts repository](https://activeviam.jfrog.io/artifactory/activeviam-accelerators-artifacts/limits/4.2.1/atoti-limits-4.2.1-maven-repository.zip).
From there you can download the Atoti Limits jars. Once downloaded, install these jars in your local repository
and re-run the Maven build.