> ## Documentation Index
> Fetch the complete documentation index at: https://docs.activeviam.com/llms.txt
> Use this file to discover all available pages before exploring further.
# How to connect with Claude
> How to configure Claude Desktop to connect to the Atoti MCP Server, including the `mcpServers` JSON configuration block, `mcp-remote` via `npx`, Base64 Basic Auth passkey generation, and tool discovery verification steps.
This guide explains how to connect Claude Desktop to the Atoti MCP server.
**OAuth 2.1 browser authentication**
If the Atoti server has OAuth 2.1 enabled, recent versions of Claude Desktop and Claude Code drive
the browser-based PKCE flow automatically, with no Basic-auth passkey or manual token handling
required.
The Atoti MCP Server defaults to STREAMABLE transport, which exposes a single `POST /mcp`
endpoint. Configure Claude with the `http` transport type pointing at the `/mcp` URL:
```json theme={"languages":{"custom":["/engine/python-sdk/0.9/languages/pycon.tmLanguage.json"]}}
{
"mcpServers": {
"my-mcp-server": {
"type": "http",
"url": "http://localhost:9090/mcp"
}
}
}
```
Claude Desktop and Claude Code detect the `WWW-Authenticate` challenge on the first request,
open the system browser for the PKCE flow, and store the resulting tokens in the OS keychain.
No `mcp-remote` bridge is needed with this transport.
Two OAuth 2.1 modes are available: [external IdP discovery
(Okta, Entra ID, Auth0, Keycloak)](./configure-oauth2-discovery) and
[self-issued mode](./configure-oauth2-self-issued), where the Atoti server acts as its own
authorization server.
## Prerequisites
Before connecting Claude, ensure the following requirements are met:
* Atoti MCP server is set up and running
* Claude Desktop is installed
* Access to Claude Desktop configuration file
* Atoti application credentials (username and password)
## Configure Claude Desktop
Add the MCP server configuration to the Claude Desktop config file. The location of this file depends on the operating system.
The following examples assume the application runs locally on port `9090`. Replace `9090` with the port on which the application is running.
The server exposes a single `POST /mcp` endpoint (the STREAMABLE transport, which is the default).
Use `/mcp` in the examples below. The legacy `/sse` endpoint exists only when the deployment opts
back into the SSE transport with `spring.ai.mcp.server.protocol: SSE`.
### Option 1: Basic authentication
The following example uses HTTP Basic authentication via `mcp-remote`.
Replace `{passkey}` with a Base64-encoded string in the format `Base64(:)`.
```json theme={"languages":{"custom":["/engine/python-sdk/0.9/languages/pycon.tmLanguage.json"]}}
{
"mcpServers": {
"my-mcp-server": {
"command": "npx",
"args": [
"-y",
"mcp-remote",
"http://localhost:9090/mcp",
"--header",
"Authorization: Basic {passkey}",
"--header",
"Content-Type: application/json",
"--header",
"Accept: application/json, text/event-stream",
"http-only"
]
}
}
}
```
### Option 2: Bearer token authentication
The following example uses a long-lived JWT bearer token via `mcp-remote`.
Replace `` with a token generated from the [MCP credentials page](./mcp-credentials-page).
```json theme={"languages":{"custom":["/engine/python-sdk/0.9/languages/pycon.tmLanguage.json"]}}
{
"mcpServers": {
"my-mcp-server": {
"command": "npx",
"args": [
"-y",
"mcp-remote",
"http://localhost:9090/mcp",
"--header",
"Authorization: Bearer ",
"--header",
"Content-Type: application/json",
"--header",
"Accept: application/json, text/event-stream",
"http-only"
]
}
}
}
```
The bearer token approach avoids embedding credentials in the configuration file. The MCP credentials page must be enabled in the application before a token can be generated.
## Generate the passkey
Replace `{passkey}` in the Basic authentication configuration with a Base64-encoded string.
Generate the passkey using the following format:
```
Base64(:)
```
Replace `` and `` with the Atoti application credentials.
## Verify the connection
After configuring Claude Desktop, verify that the connection works:
1. Restart Claude Desktop
2. Check that Claude discovers the MCP server tools
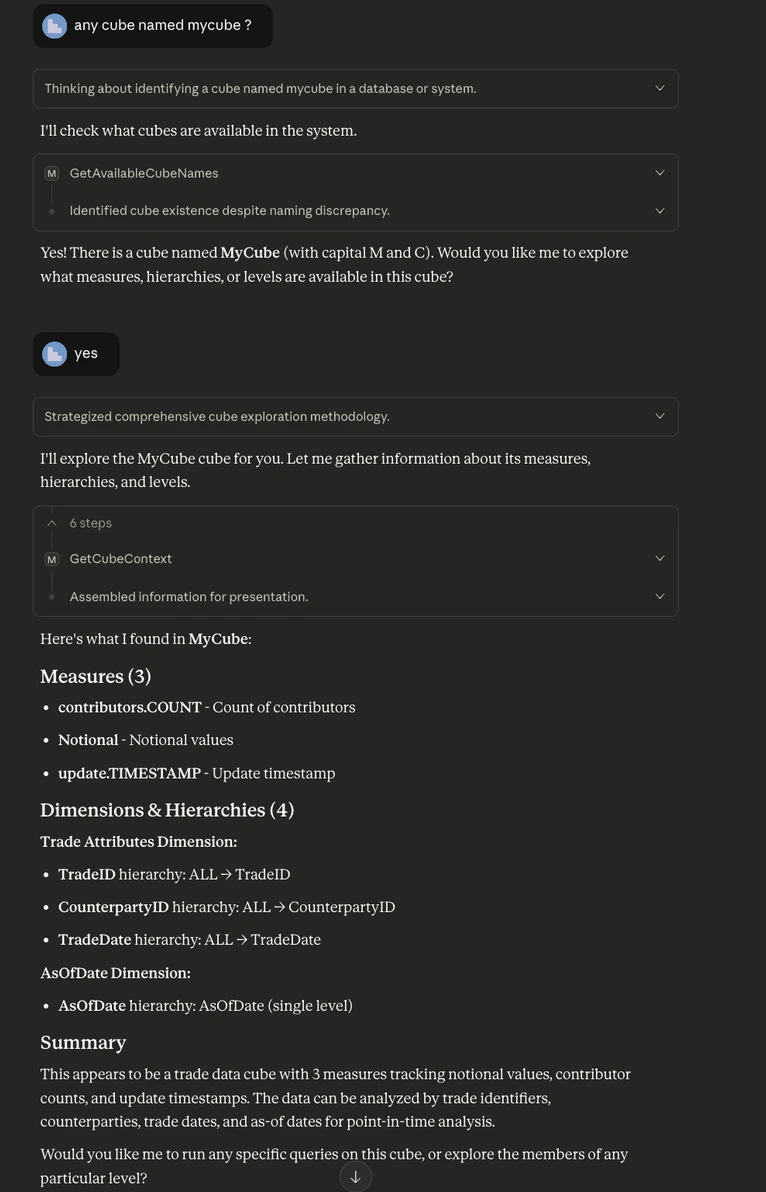
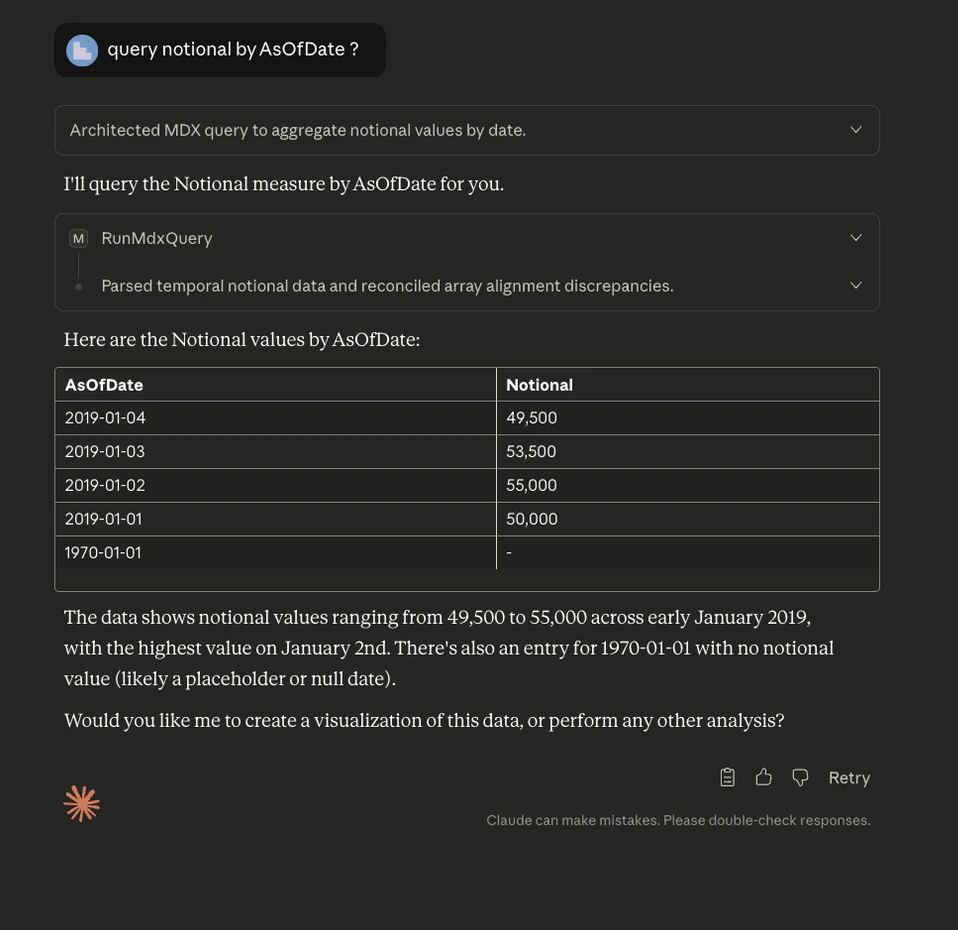
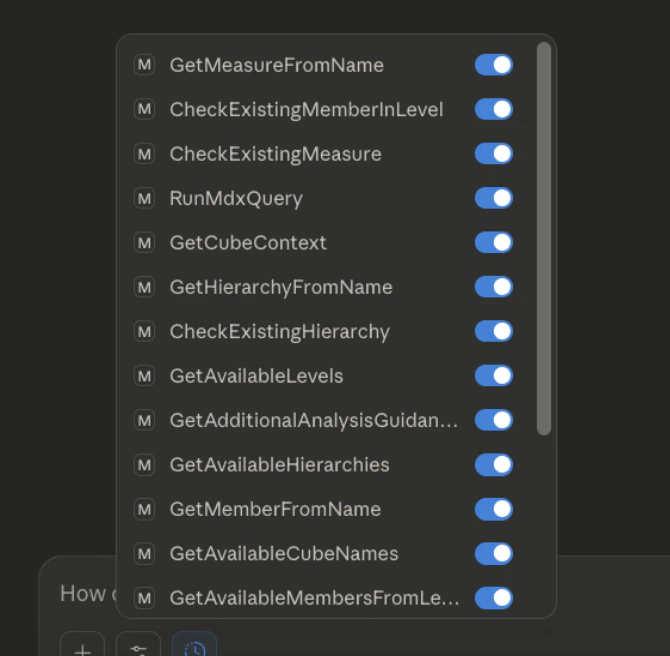 3. Test interaction with the Atoti server by asking Claude to use the available tools
 ## Troubleshooting
If Claude does not discover the tools, check the following:
* The Atoti application is running and accessible
* The MCP server endpoint is available at the configured URL
* The passkey is correctly formatted and encoded
* The Claude Desktop configuration file is valid JSON
## Related reading
After connecting Claude, explore additional capabilities:
* [Add custom tools](../custom-tools) to extend MCP server functionality
## Troubleshooting
If Claude does not discover the tools, check the following:
* The Atoti application is running and accessible
* The MCP server endpoint is available at the configured URL
* The passkey is correctly formatted and encoded
* The Claude Desktop configuration file is valid JSON
## Related reading
After connecting Claude, explore additional capabilities:
* [Add custom tools](../custom-tools) to extend MCP server functionality